Unofficial fan-made guide. Not affiliated with Webelinx Games, the developer of Rooms & Exits: Escape Room Games.
Rebuilt frame by frame from a recorded playthrough of the current build — 4 minutes 34 seconds of footage, extracted at one frame per second and re-read at four frames per second wherever a digit mattered. Every code on this page was read twice from separate frames and agrees: 1-6-5 on the shape panel, 6098 on the locker keypad, 3516 on the bike console, and the seven-word arrow list. Two things in this room could not be pinned down twice — the purpose of the rolled Mat and the rule behind the exit door panel — and this page says so instead of inventing an answer.
Chapter 2 · No Honor Among Thieves26 of 26 with full written steps · 26 with a video
Quick answer
The Gym has four codes and one hidden item: 1-6-5 on the shape panel, 6098 on locker 1, 3516 on the exercise bike and Up, Up, Down, Left, Left, Down, Up on the treadmill. Finish worth +50 coins.
Count the shapes in the framed strongman picture → set square 1, triangle 6, circle 5 on the three-screen plate → Pedal part.
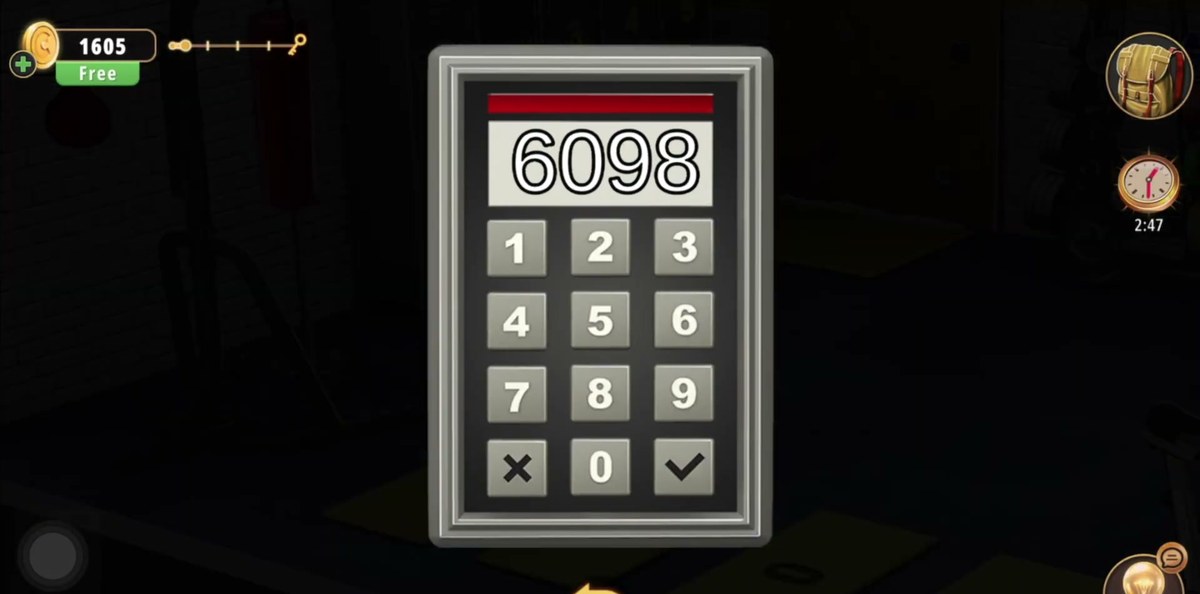
Read the four yellow mats → type 6098 into the keypad on locker 1 → Mat.
Fit the Pedal part to the exercise bike → its console wakes up.
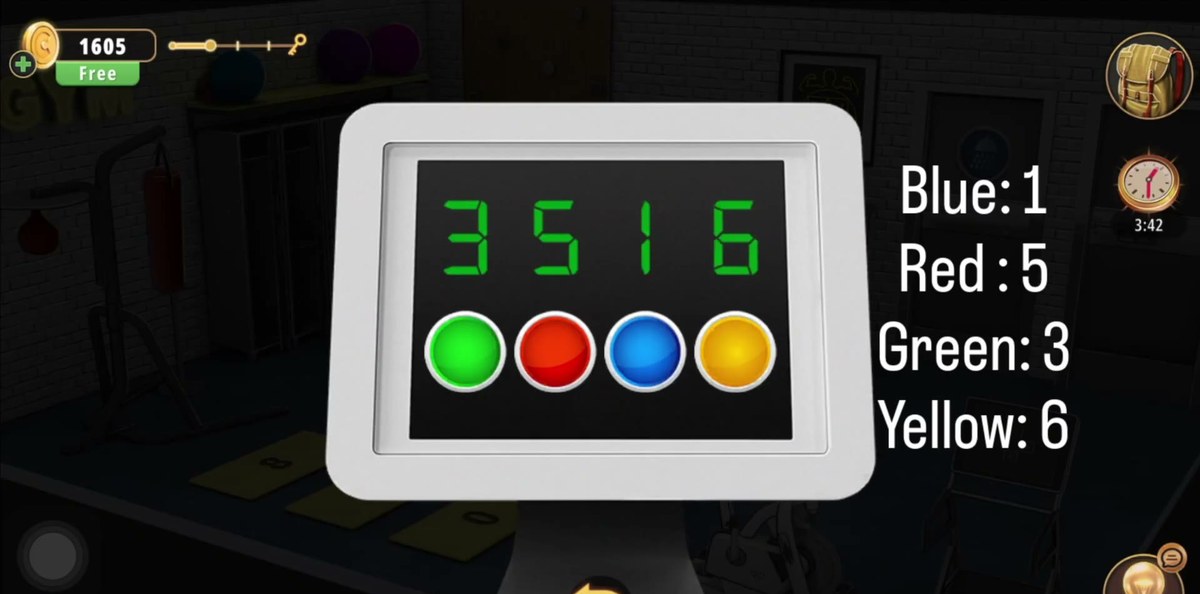
Count the plates on the weight rack (Blue 1, Red 5, Green 3, Yellow 6) → type 3516 on the bike console.
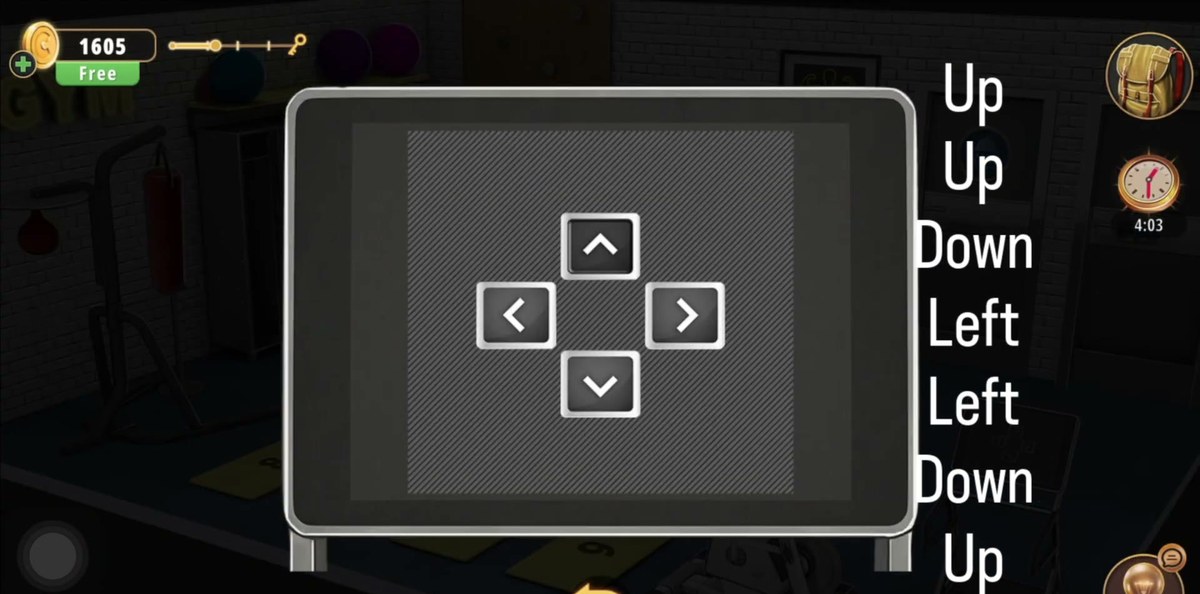
Enter Up, Up, Down, Left, Left, Down, Up on the treadmill pad.
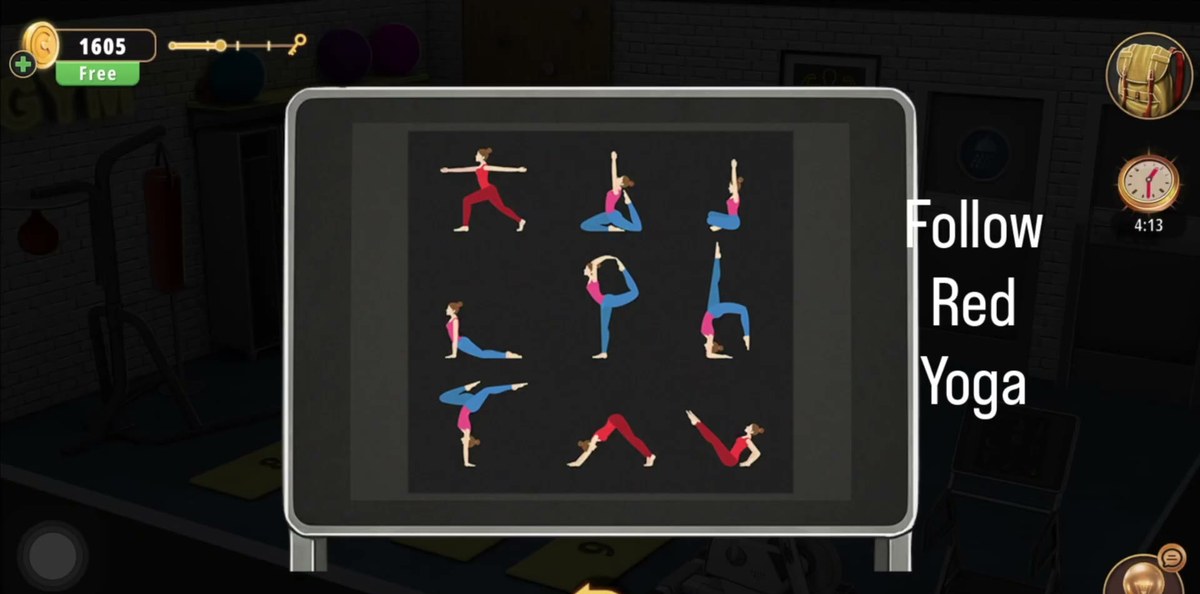
Copy the red yoga poses from the wall poster into the four-slot panel → locker 4 opens → Key.
Use the Key on the shower-sign door → changing room → solve the key board → Ladder + Bag of chalk.
Stand the Ladder at the climbing wall, chalk the top holds, then open the EXIT door → +50 coins.
What this level actually is.
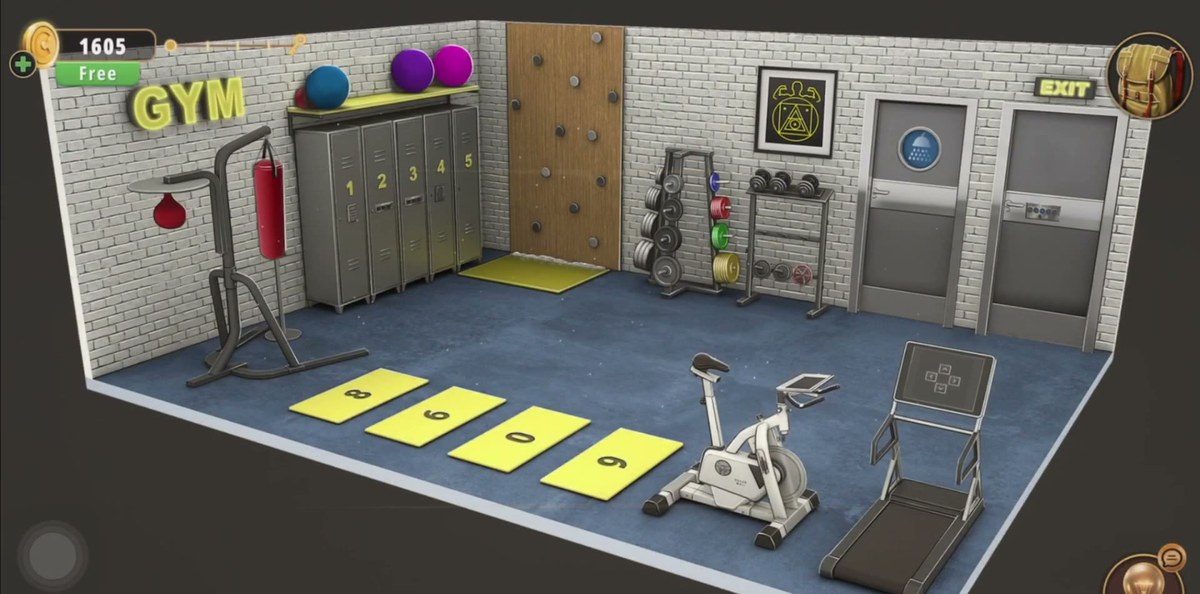
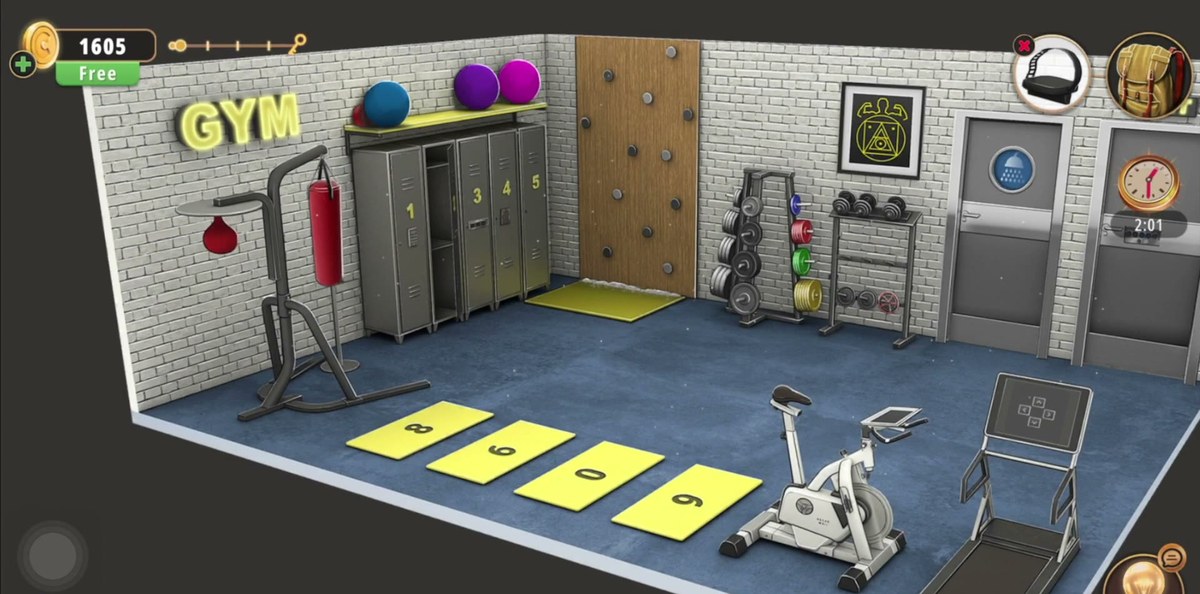
The Gym is the fifth room of Chapter 2 and it is the first one in the chapter that behaves like a proper hub rather than a corridor. Everything sits in a single blue-floored room with grey brick walls: a red heavy bag and a speed bag on a black stand under a glowing GYM sign on the left, five grey lockers with yellow tops along the back wall and a couple of coloured exercise balls on the shelf above them, a wooden climbing wall with grey holds in the middle of the back wall, and two weight racks on the right — one loaded with coloured plates, one with black dumbbells — under a framed picture of a flexing strongman built out of geometric shapes.
Along the floor runs the level's signature: four yellow mats, each printed with a single black digit. On the right wall there are two doors, one carrying a blue circular sign with a figure on it (the changing room) and one under a yellow EXIT sign. Between them, an exercise bike with a tablet on its handlebars and a treadmill whose console shows a grid of stick figures. That is the whole room, and every puzzle in it is a read-and-carry: a clue on one object, a lock on another, and no line drawn between them.
What makes the Gym feel long is that four different locks are live at the same time from the moment you walk in. The three-screen plate on the metal panel, the keypad on locker 1, the bike console and the treadmill pad can all be opened in almost any order, and three of them need nothing but a number you can read off a wall. The fourth — the yoga panel — is the one that gates the changing room, and the changing room is what gates the exit. The recording clears the room in 8:03 of level time, and about two of those minutes are spent walking between the mats and the lockers.
The four locks at a glance.
Lock
Answer
Where the clue is
What it gives
Three-screen plate (square / triangle / circle)
1 · 6 · 5
Framed strongman picture, back wall
Pedal part
Keypad on locker 1
6098
Four yellow floor mats
Mat
Exercise bike console (4 colour buttons)
3516
Weight rack colour counts
Green status light
Treadmill arrow pad
Up · Up · Down · Left · Left · Down · Up
Word list beside the pad
Unlocks the yoga step
The colours on the bike console are in the order green, red, blue, yellow — which is not the order the weight-rack board lists them in. That mismatch is the whole trick of that lock.
Step by step.
Step 1 · 0:00Read the room before you touch a lock
The opening sweep is the only wide shot you get without a UI panel over half the screen, so use it. Left: the GYM sign, the heavy bag and the speed bag on their stand, a blue exercise ball on the floor. Back wall, left to right: the five lockers, the wooden climbing wall, the plate rack, the dumbbell rack, the framed picture. Right wall: the two doors with the bike and treadmill in front of them. Floor: the four numbered mats.
Note what is not here — no keypad on the exit door, no code written on a wall, no note. Every number in the Gym is a count, and every count is of something already drawn in the room.
Step 2 · 0:20Zoom the framed picture and actually count
The framed picture above the dumbbell rack is a line drawing of a flexing strongman assembled out of geometric shapes: one large square block as the base, a run of triangles through the torso and the arms, and circles forming the head and the weights. This is the clue for the plate on the metal panel, and the panel is asking you to count each shape family — nothing else in the room uses a square, a triangle or a circle as a label.
Count them yourself rather than trusting a number off a page; the shapes overlap on the arms and it is easy to be one out. Our capture ends on square 1, triangle 6, circle 5, and the panel accepted exactly that.
Step 3 · 0:43The three-screen plate: 1, 6, 5 → Pedal part
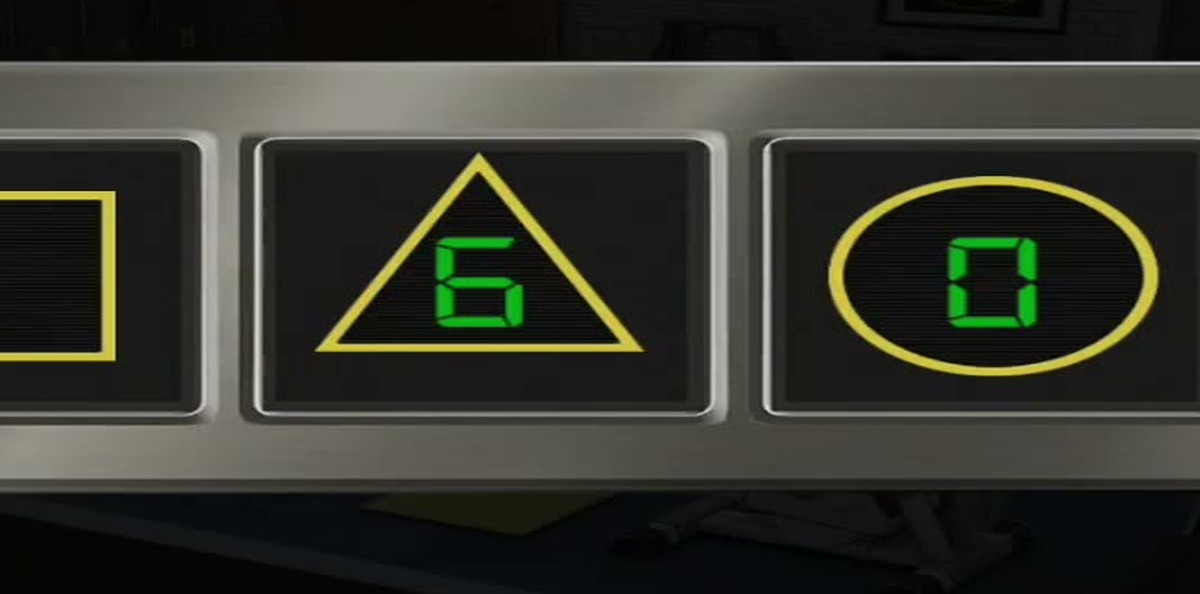
The metal plate at the centre of the room has three small screens, each framed by a yellow outline: a square on the left, a triangle in the middle, a circle on the right. Each screen shows a single green digit that you dial up and down. Set the square to 1, the triangle to 6 and the circle to 5.
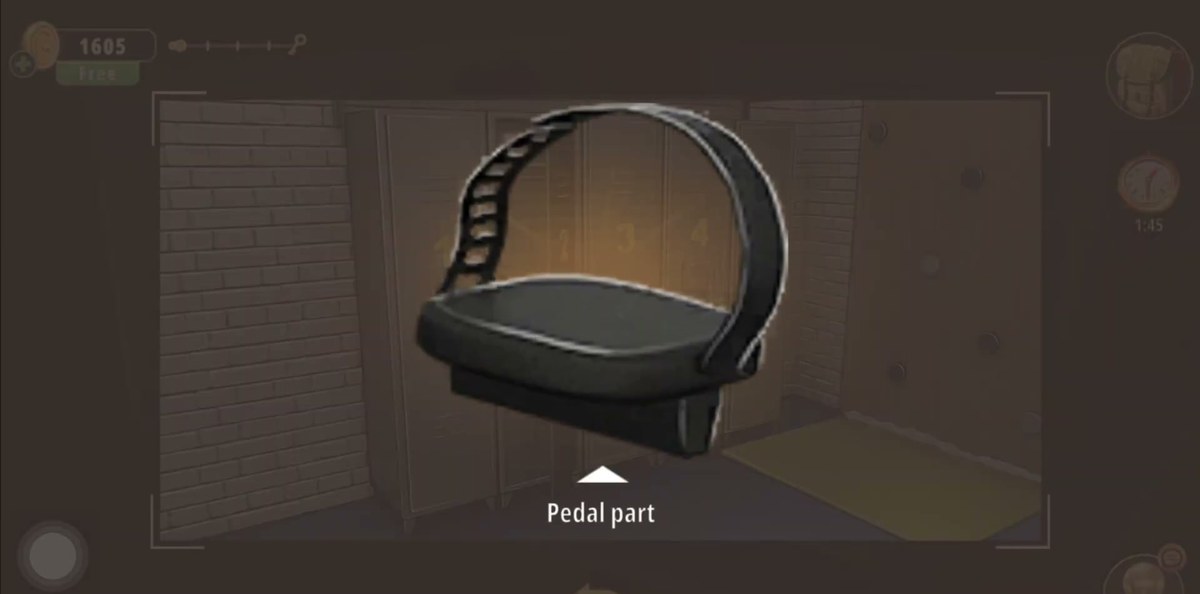
A useful tell from the footage: the recording reaches 1 · 6 · 4 first, sits there, and the circle screen then ticks up to 5 — so if your count lands on 4 for the circles, recount the head and the two end weights before you decide the panel is broken. Clearing it hands you the Pedal part.
Step 4 · 0:46Take the Pedal part — the bike is missing exactly this
The reward pops out as a highlighted object with the label Pedal part. Tap it into the bag. You now hold the only piece of gym equipment in the room that is visibly incomplete: the exercise bike in front of the right-hand doors has a bare crank arm on its near side where a pedal should be.
This is the one dependency in the Gym that is not a number — the bike console physically will not light up until the pedal is fitted, and there is no other pedal anywhere in the room.
Step 5 · 1:20The floor mats: four digits, one direction that works
Four yellow mats lie in a diagonal line across the blue floor, each stamped with one black digit. Because the camera is isometric the digits are drawn at an angle, and a 6 and a 9 look almost identical — this is where most players lose the code.
Read the row starting at the mat nearest the treadmill and work back toward the climbing wall: 6, 0, 9, 8. If you scan the screen from left to right instead you will read 8-6-0-9, and that is the order the locker keypad rejects. Keep the treadmill end as the start.
Step 6 · 1:41Locker 1 keypad: 6098
Locker 1, the leftmost of the five, has a keypad mounted on its door: a numeric pad with a backspace and a tick, and a narrow green strip across the top that shows what you have typed. Enter 6098.
The recording arrives at 6098 across all four cells of the strip; that exact four-digit state was re-read at four frames per second and agrees every time. If your pad keeps refusing the code, you have almost certainly read the mats in screen order rather than treadmill order; reverse the row.
Step 7 · 1:43Locker 1 holds a rolled Mat
The door swings open on an empty interior and a rolled yellow Mat floats out with the usual highlight and label. Take it. Locker 1 is the only locker with a keypad on it, which is worth remembering when you are staring at lockers 2 to 5 later and wondering why they do not respond.
Step 8 · 1:52Fit the Pedal part and wake the console
Select the Pedal part in the inventory, press Use, and tap the exercise bike. The bike is a white and grey machine with a heavy flywheel and a tablet clipped to the handlebars; with the pedal on, the tablet lights up and becomes the colour-button console.
Two things to notice on the frame: the bike's frame carries a maker's decal in white lettering, and the console's four round buttons are coloured green, red, blue, yellow, left to right. That order is the key to the next step and it is easy to walk past.
Step 9 · 2:12The weight rack is a counting board
Turn to the plate rack on the back wall. Beside it, an overlay lists the four colours with a number against each: Blue: 1, Red: 5, Green: 3, Yellow: 6. That is the count of plates of each colour stacked on the rack, and it is the only place in the room where colour is written down as a number.
The trap is the order. The board lists blue first; the bike console does not.
Step 10 · 2:24Bike console: 3516, not 1536
On the console, each of the four coloured buttons owns one cell of a four-digit display. Read the buttons in the console's own order — green, red, blue, yellow — and type the value the rack gave each colour: green 3, red 5, blue 1, yellow 6. The display reads 3516 and the status light beside it turns green.
This is the single most common wrong answer in the level. Typing the numbers in the order the board lists them (blue, red, green, yellow) gives 1-5-3-6 and the console stays dark. Match the buttons, not the list.
Step 11 · 2:36Treadmill: Up, Up, Down, Left, Left, Down, Up
The treadmill's handlebar pad has four silver direction buttons in a cross — up, left, right, down — and a panel beside it lists seven words in a column: Up, Up, Down, Left, Left, Down, Up. Press the matching button for each word, in order. The panel reprints the whole list beside the pad while you work, so you can check each press without going back.
The same list appears twice in the footage — once on the treadmill console and once on the wider panel view — and both readings agree word for word. Get it right and the pad stops asking.
Step 12 · 2:44The yoga poster: follow the red ones
On the wall beside the punching bags hangs a framed poster of nine yoga poses in a 3×3 grid, and above the four-slot panel the game writes the instruction plainly: Follow Red Yoga. Four of the nine figures are drawn in red; the rest are in pink and blue. Those four, in the order they appear on the poster (left to right, top to bottom), are what the four slots want.
Step 13 · 2:51Fill the four pose slots → locker 4 opens → Key
The pose panel is a metal strip with four recessed slots. Tap a slot, choose a pose, repeat. Each correct pose lands as a small green figure; when all four are in, the strip closes and the camera swings to the lockers with locker 4 highlighted and sparkling. Open it and you get a Key.
This is the only door-opener in the room, and it is the reason the yoga detour exists at all: lockers 2 to 5 have no keypads, because the game wants you to earn the key rather than dial for it.
Step 14 · 3:07Use the Key on the shower-sign door
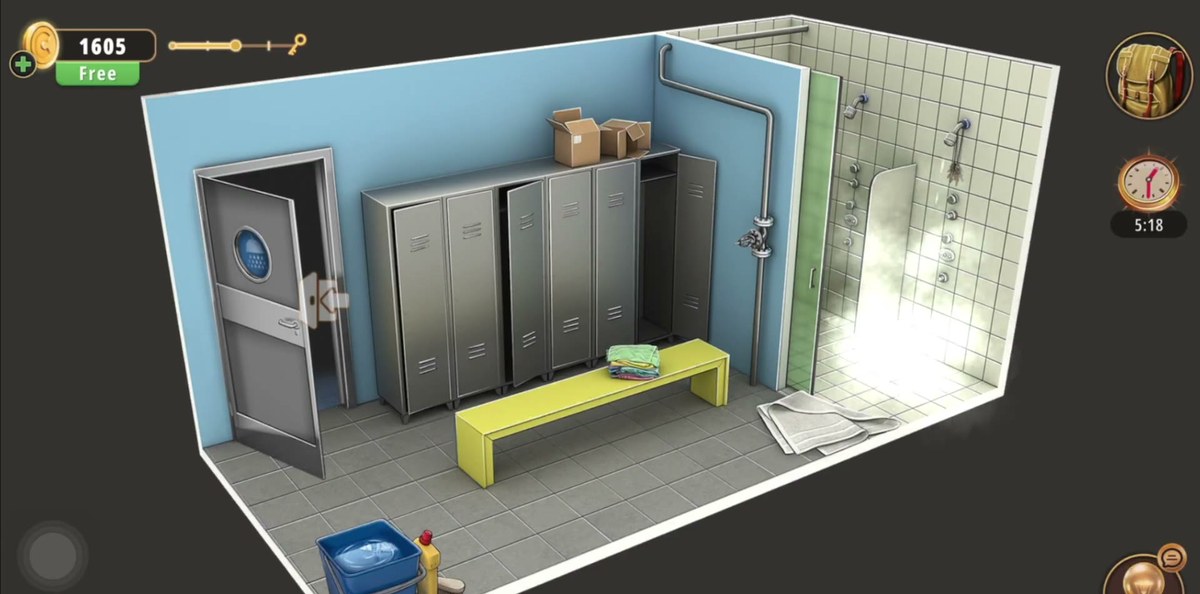
The left-hand door on the right wall carries a blue circular sign with a figure on it. Select the Key, press Use, tap the door. It swings inward on a white-tiled room: six grey lockers with slatted vents, a long yellow bench with a folded stack of coloured clothes on it, two cardboard boxes on the shelf above the lockers, a blue bucket and a bottle of cleaning fluid in the corner, and two shower stalls behind a pale green partition with a red spoked valve wheel on the silver pipe.
Nothing in the first room can be finished without coming through here, and there is no second key — if you skipped the yoga panel you cannot get in.
Step 15 · 3:36The key board: match every key to its silhouette
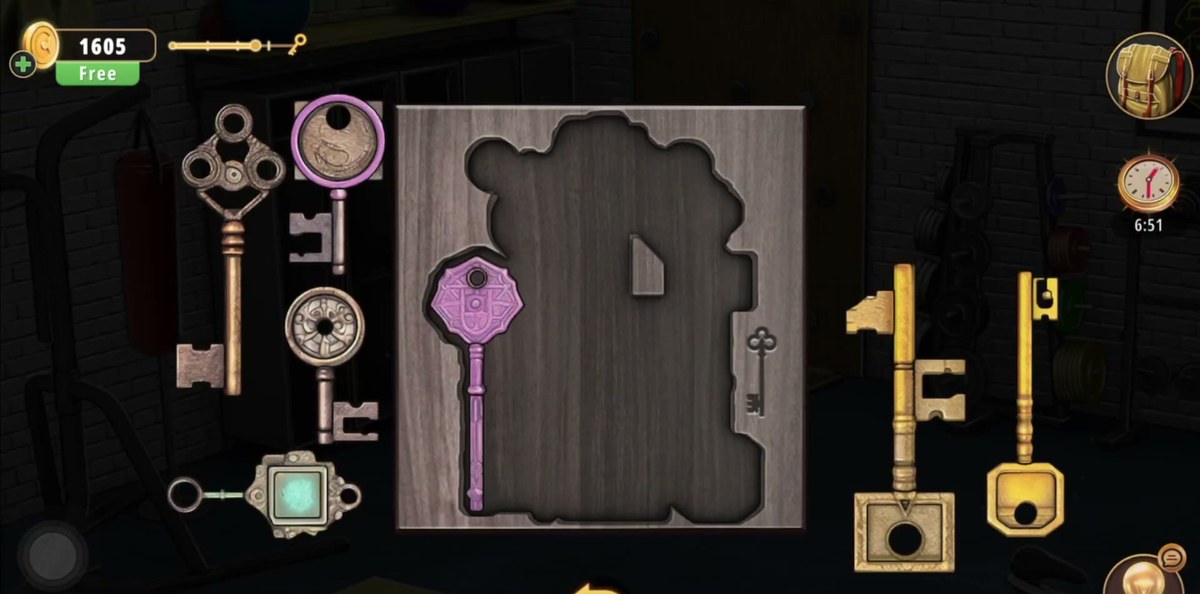
The changing room's puzzle is a wooden board of key-shaped cutouts. A collection of keys sits around it — a heavy brass key with a ringed bow, a pair of purple keys, a silver key with a decorative bow, a small plain silver key and a pair of gold keys — and each one has exactly one silhouette on the board. Drag a key onto its outline and it seats with a click; wrong keys simply will not sit.
Work by bow shape rather than by colour: the board's cutouts are outlines only, and two of the keys are the same purple. Clearing the board pays out two items at once, a Ladder and a Bag of chalk.
Step 16 · 4:12Ladder, chalk, climbing wall: "From up Into Down"
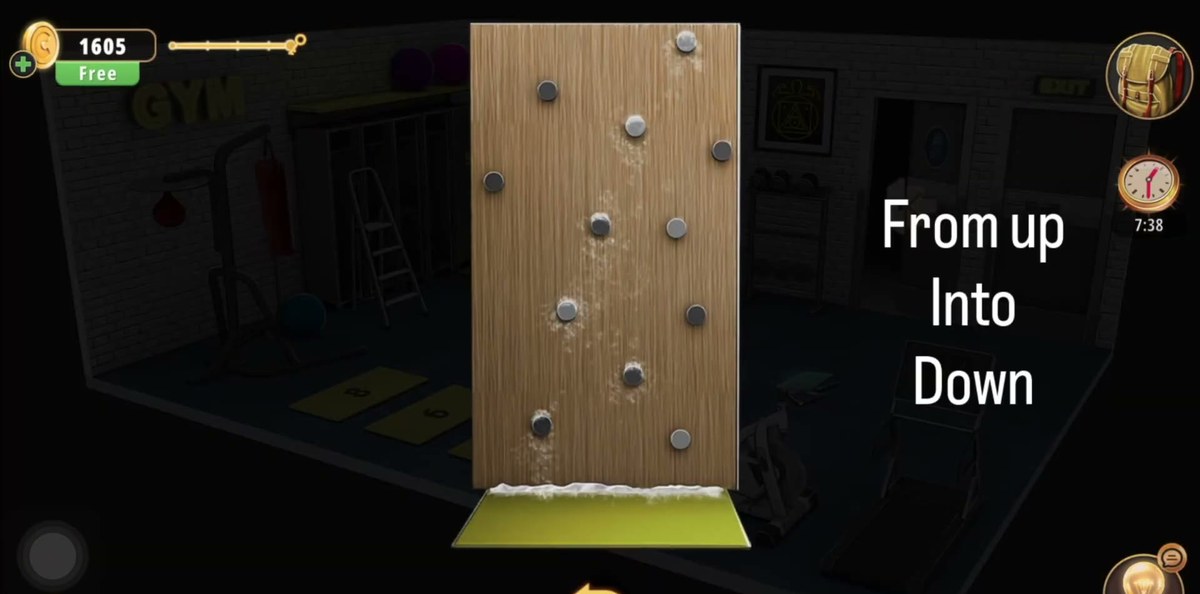
Back in the gym, stand the Ladder against the wooden climbing wall. It has a scatter of grey holds over the wooden panel in no obvious grid, and the top ones are out of reach from the floor — that is what the ladder is for. Climb, then use the Bag of chalk on the top holds.
Chalking the wall reveals the phrase "From up Into Down" across the panel. Treat it as the wall's own instruction: the route the chalk marks out runs from the top of the board down. This is the last clue the level gives you before the exit.
Step 17 · 4:29Open the EXIT door: +50 coins
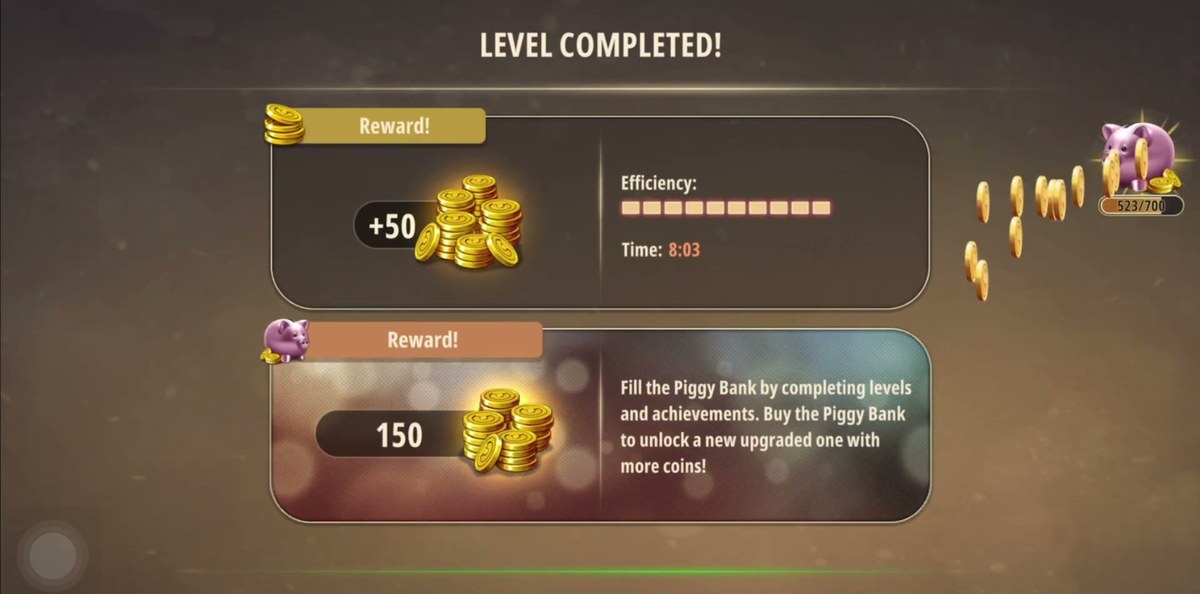
The right-hand door under the yellow EXIT sign carries a panel of round buttons across its face. Work it in the up-and-down order the chalked wall gave you, and the door swings open. The camera pulls back to the wide room and the level ends on the results panel: LEVEL COMPLETED!, Reward! +50, an efficiency bar filled to eight of ten, and Time: 8:03.
The room looks like five unrelated locks; it is really two chains and a side branch. The first chain is the one that gets you out of the building: picture → shape panel → Pedal part → bike console → colour code → arrow pad → yoga panel → locker 4 → Key → changing room → key board → Ladder and chalk → climbing wall → EXIT. Every link in that chain is compulsory, and each one is physically gated on the item the previous link produced. No pedal, no console. No key, no changing room. No ladder, no chalk, no exit code.
The second chain is the one that looks compulsory and is not: floor mats → locker 1 keypad → Mat. It costs you two minutes and, in our footage, the Mat never comes back out of the bag. It is the only reward in the room that does not feed the exit chain, and it is also the only lock that punishes a careless read, because the mat digits are mirrored by the camera angle.
The side branch is the colour count. The plate rack, the dumbbell rack and the framed picture all sit on the same back wall and all three exist only to feed a lock somewhere else — the rack feeds the bike, the picture feeds the plate. Nothing on that wall opens anything by itself, which is why players who camp there feel stuck.
What we could not verify: two things. First, the Mat from locker 1 — the recording takes it at 1:43 and never uses it again before the exit, so we cannot tell you what it is for; treat it as optional unless your build asks for it. Second, the EXIT door panel — the footage shows the panel releasing the door at 8:03 right after the chalked wall clue, but it never shows a wrong entry being rejected, so we have described the order of operations rather than inventing a rule. If your panel does not respond to the up-and-down order, read the chalked wall again in-game: the pattern is drawn on the holds, and it is the only statement of it the level makes.
Where people get stuck.
The mats' direction. Nearly every wrong answer in this room is 8609. The digits are 8, 6, 0 and 9 read across the screen, but the keypad wants them from the treadmill end, which is 6098. If the pad refuses, you read the row backwards.
The colour order. The rack lists Blue, Red, Green, Yellow. The bike console is Green, Red, Blue, Yellow. Transcribing the rack's list straight across gives 1536 and nothing happens. The console wants 3516.
The bike before the pedal. The console is invisible until the Pedal part is fitted. Players who tap the bike first see a plain tablet and assume the colour puzzle is somewhere else in the room.
Locker 5. It is numbered and it is shut, and it stays shut — the keypad is on locker 1, and the only other locker that opens is 4. Do not spend time hunting a code for 5.
The yoga count. The instruction is Follow Red Yoga, not "follow the poses". Four figures are red; copying the first four poses in the grid, or the three most athletic-looking ones, fills the panel with the wrong figures and nothing seats.
The key board. Two keys are purple and two are gold; matching by colour instead of by bow outline gets you stuck on the last two slots. The cutouts are shapes, not colours.
The ladder. It goes to the climbing wall, not to the shelf over the lockers. The balls on the shelf are decoration and the top holds are the only thing in the room you cannot reach from the floor.
Chapter 2 levels.
Chapter 2 opens with the Cell Phone Store and runs twenty-six rooms; the list below reflects what is written up so far.
Chapter 2 · No Honor Among Thieves26 of 26 with full written steps · 26 with a video
What are the codes in Rooms & Exits Chapter 2 Level 5?
Four of them. The three-screen shape panel on the metal plate takes 1 (square), 6 (triangle), 5 (circle). The keypad on locker 1 takes 6098, the four digits printed on the yellow floor mats. The exercise bike console takes 3516, which is the colour count from the weight rack read in the console's own dot order (green, red, blue, yellow). The treadmill wants the seven-step arrow sequence Up, Up, Down, Left, Left, Down, Up.
How do I open locker 1 in the Gym?
Locker 1 has a four-digit keypad with a green strip across the top. The code is 6098, taken from the four yellow mats on the floor. Read the mats starting at the one nearest the treadmill and work back toward the climbing wall: 6, 0, 9, 8. The isometric camera mirrors the digits, so the same row scans as 8-6-0-9 if you read the screen left to right, which is the order that gets rejected. Inside locker 1 is a rolled Mat.
What is the shape panel answer in the Gym?
1, 6 and 5. The panel has three small screens framed by a square, a triangle and a circle, and each screen counts how often that shape appears in the framed picture of the flexing strongman on the back wall. Square 1, triangle 6, circle 5. Solving it hands you the Pedal part, which is what the exercise bike is missing.
What is the colour code on the exercise bike?
3516. The weight rack on the back wall carries a hint board that reads Blue: 1, Red: 5, Green: 3, Yellow: 6. The bike console has four buttons in the order green, red, blue, yellow, so you type the value for each button in that order: 3, 5, 1, 6. The console's status light turns green when the code lands.
What is the arrow sequence on the treadmill?
Up, Up, Down, Left, Left, Down, Up. The treadmill console shows four direction buttons and a list of seven words beside them; enter the words with the matching buttons in the order written. The same seven-step list is also shown on the panel by the arrow pad, so you can check your reading against both displays.
How do I finish the Gym and how long does it take?
After you chalk the climbing wall you get the phrase "From up Into Down", and the exit door beside the shower sign is the last thing you touch. The recording opens it at 8:03 of level time and the results screen pays +50 coins. Nothing in the level is timed and there is no fail state.
 GridPaw
 Shikaku
 Akari
 Kakuro
 Nonogram
 Nurikabe
 Pictomino
 KenKen
 Binary
 Star Battle
 Hashi
 Slitherlink
 Murder Sudoku
 Meowdoku
 Crazy Cleanup