 GridPaw
 Shikaku
 Akari
 Kakuro
 Nonogram
 Nurikabe
 Pictomino
 KenKen
 Binary
 Star Battle
 Hashi
 Slitherlink
 Murder Sudoku
 Meowdoku
 Crazy Cleanup
Rooms & Exits Chapter 2 Level 26 Walkthrough: Parking
Parking is the twenty-sixth and final room of Chapter 2, and it is one of the biggest single levels in the chapter: a two-floor car park, a lift you will ride a dozen times, and two independent code systems. This walkthrough gives you the route, both codes, and an honest account of what the ending screen actually says.
Parking is room 26 of 26 — the last level of Chapter 2. Two code locks, one power switch, one lift ride: 1876 / 3542 / 2002 on the three-row panel on floor -2, 0243 on the C B A D keypad on floor -1, then press P. Finish worth +50 coins.
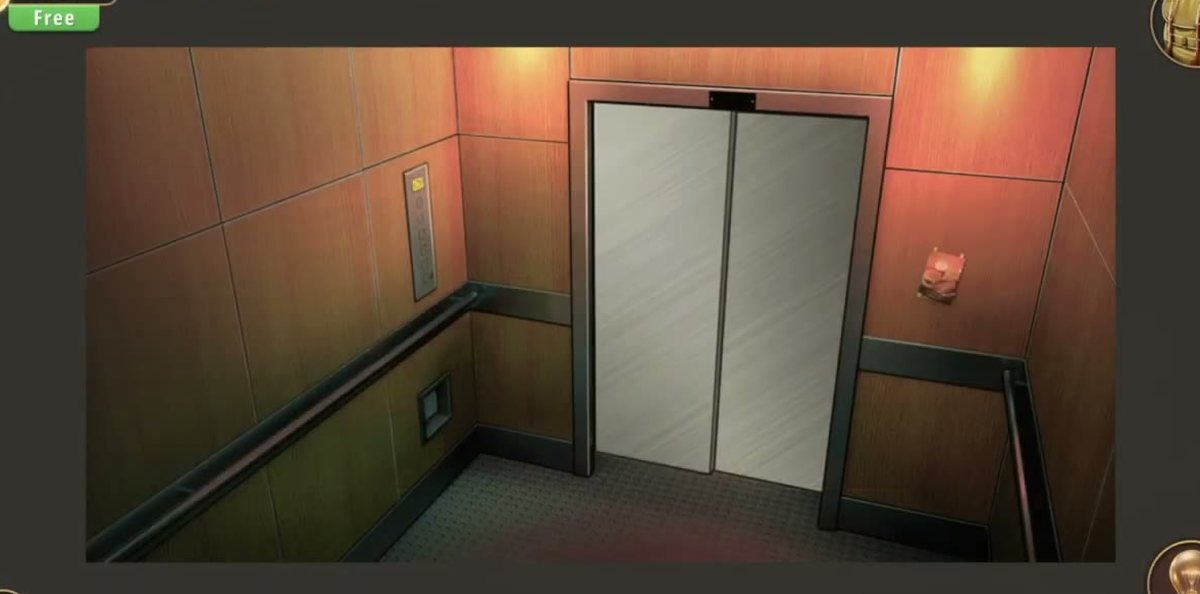
- Take the Paperclip from the food poster in the lift, examine it into a Modified paperclip, and pick the hatch under the handrail.
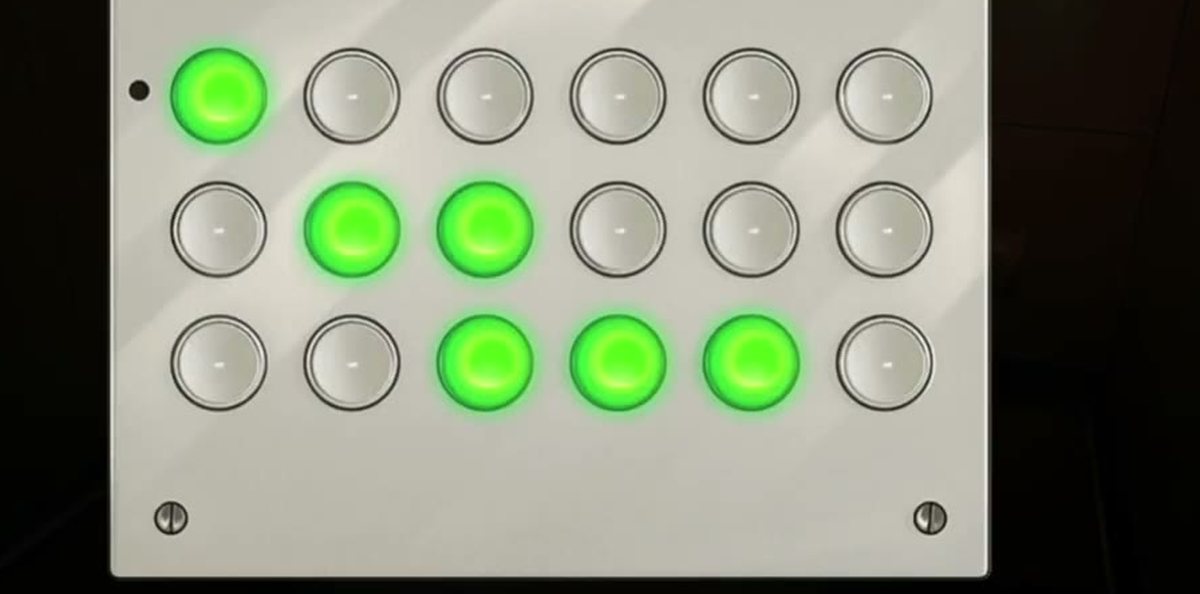
- Clear the bank of round buttons behind the hatch — the lift doors open onto floor -1.
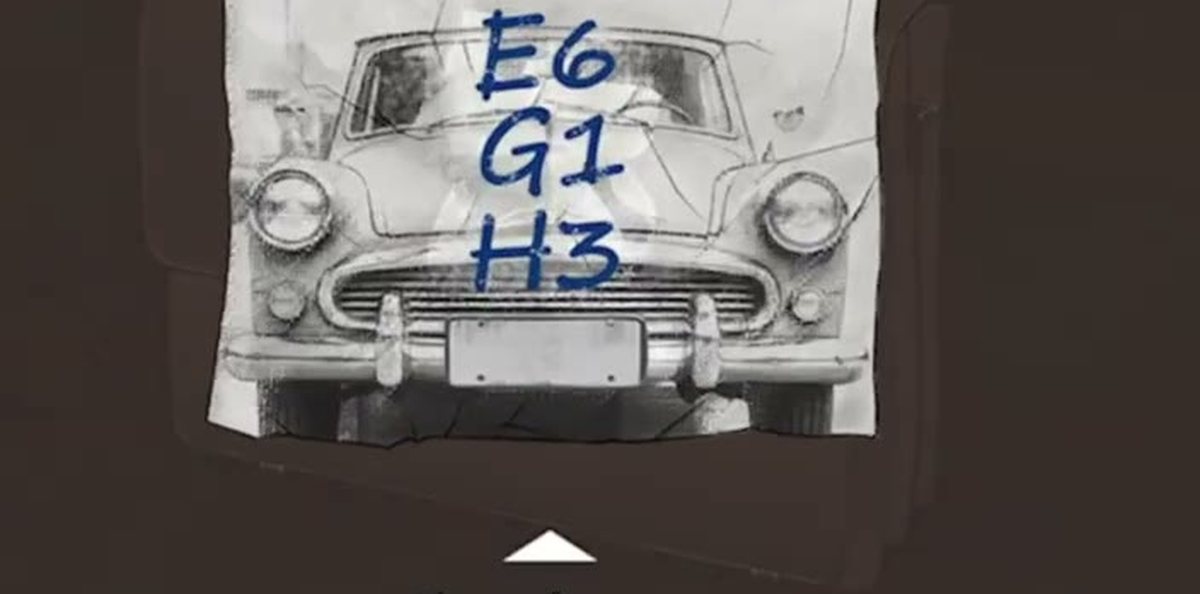
- Collect the Piece of paper (E6 · G1 · H3), the Package, the Glass shard, the Wrench and, in time, the Key.
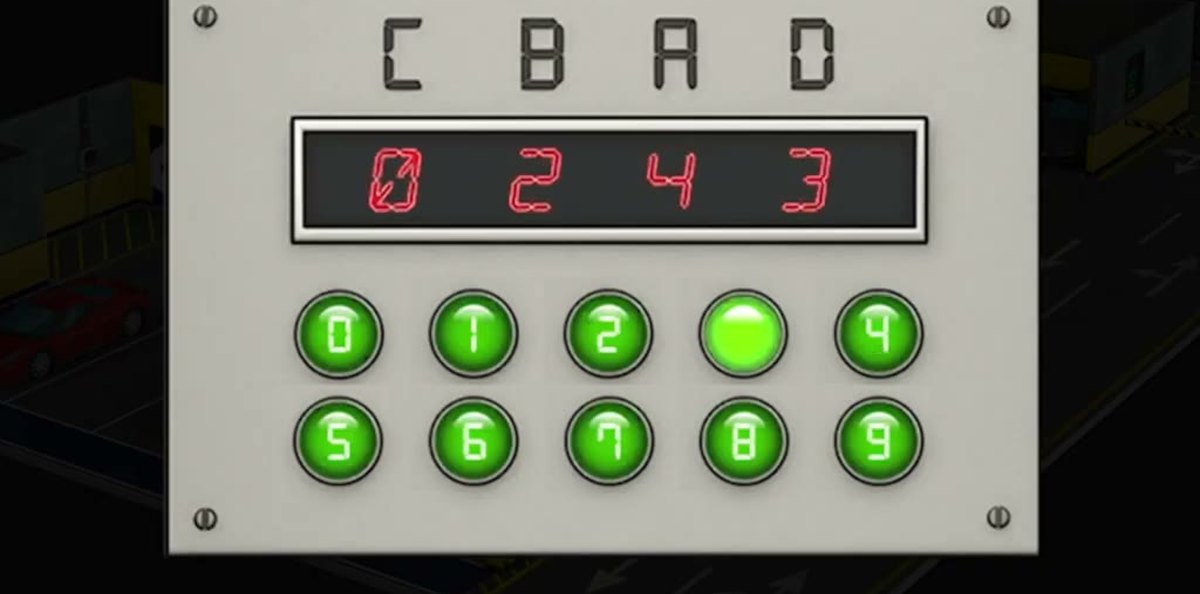
- Use the wrench on the bolted service box. Its keypad is labelled C B A D.
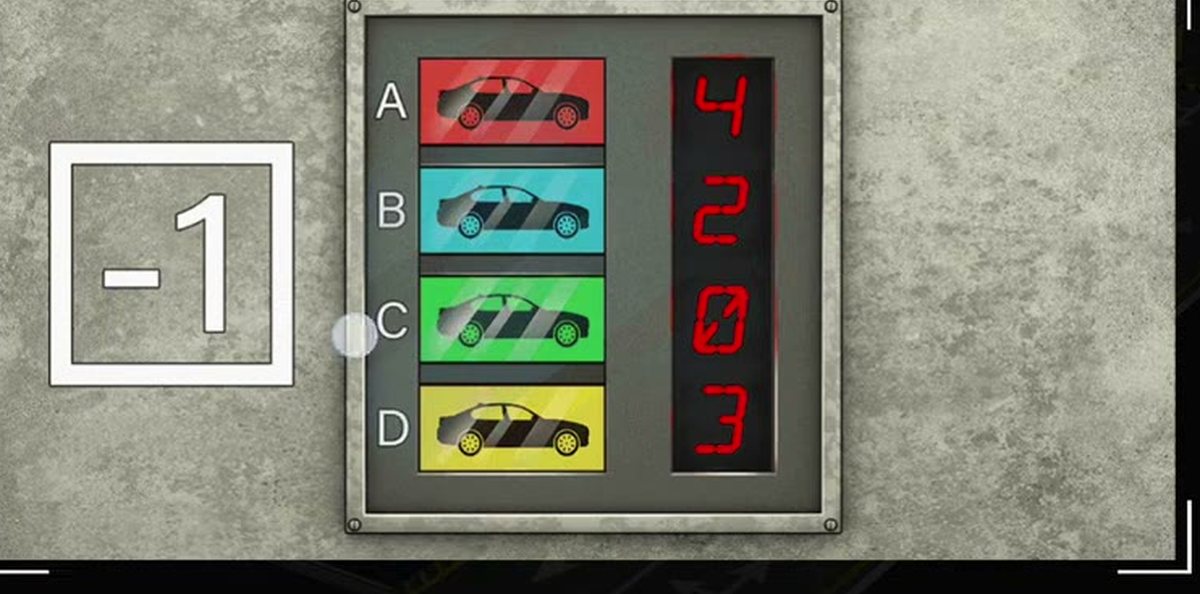
- Read the locator board on floor -1: A=4, B=2, C=0, D=3. Enter 0 · 2 · 4 · 3 and throw the red switch.
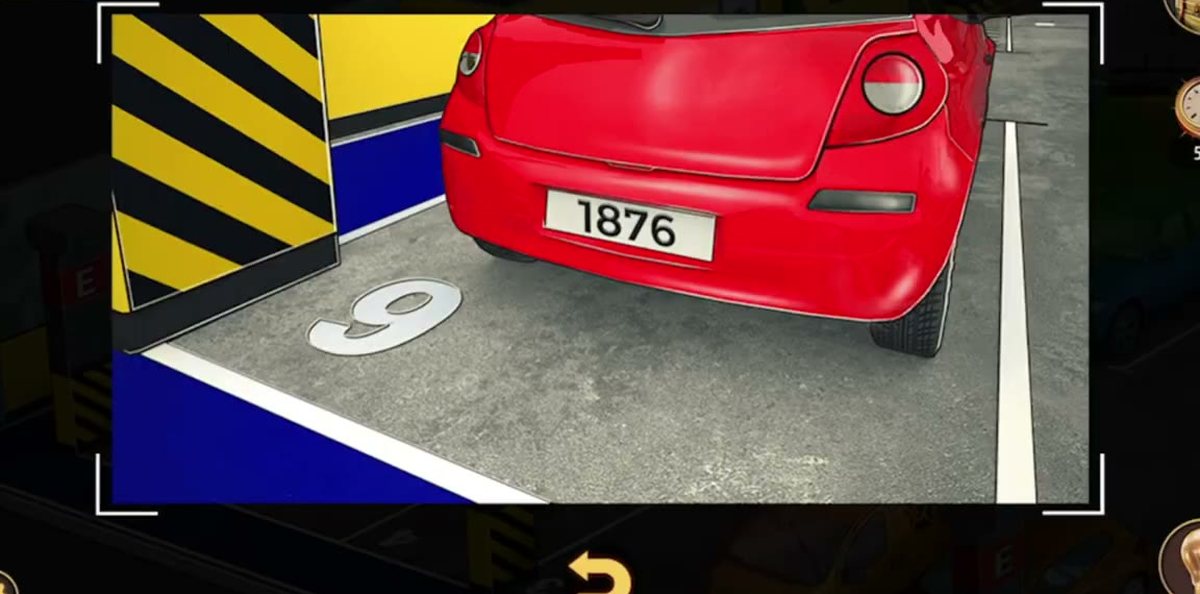
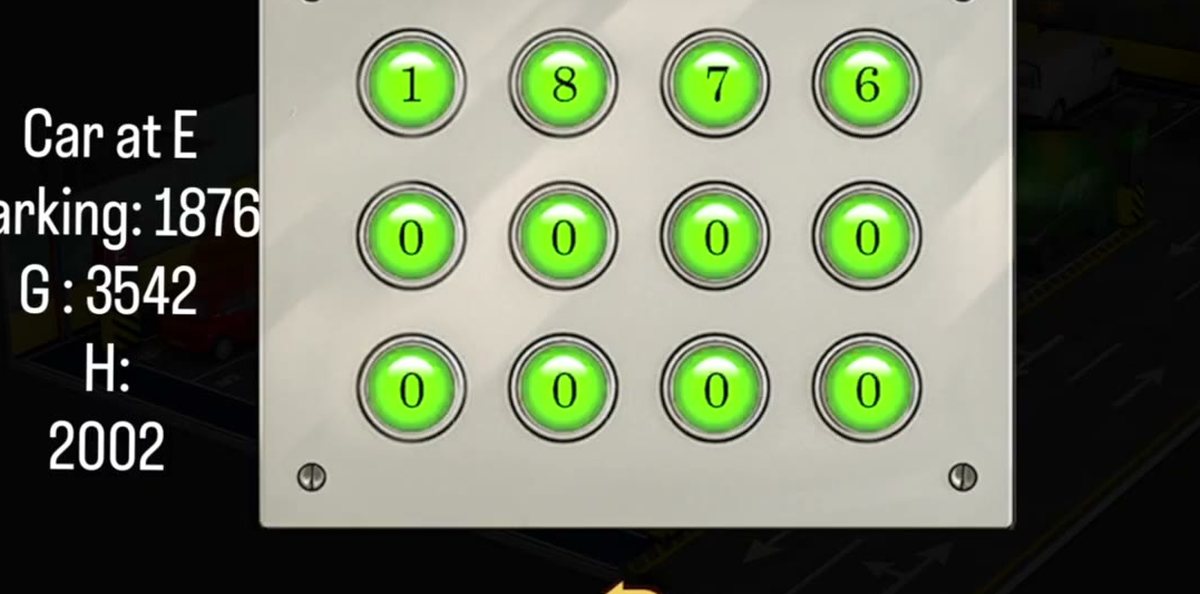
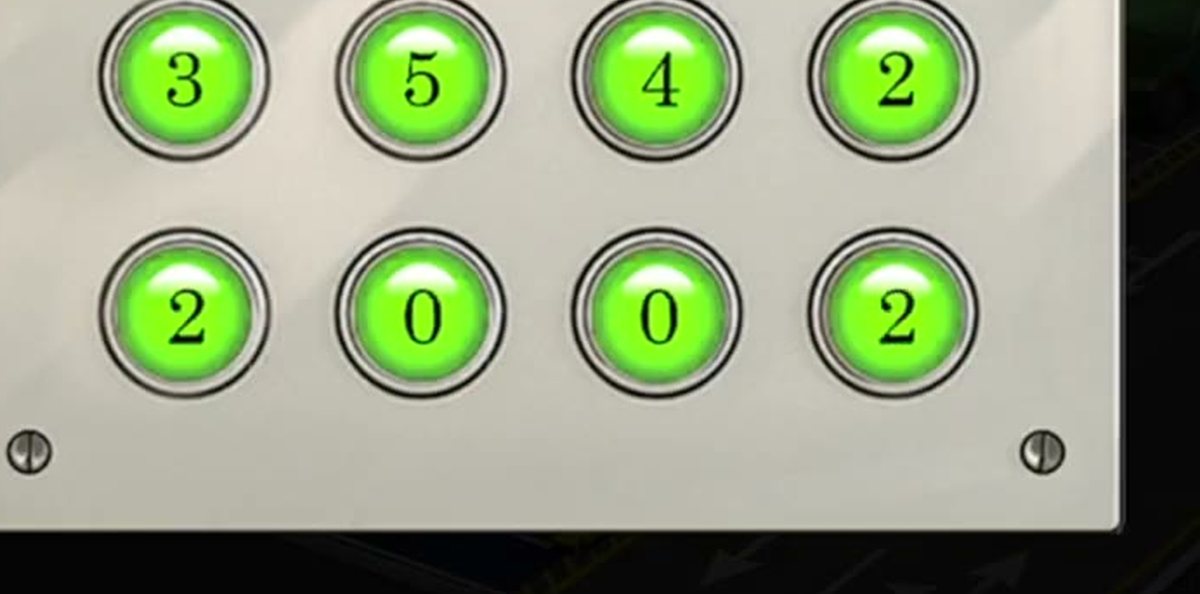
- Ride to -2 with the key, read the three plates at bays E6 / G1 / H3, and set the twelve-button panel to 1876 / 3542 / 2002.
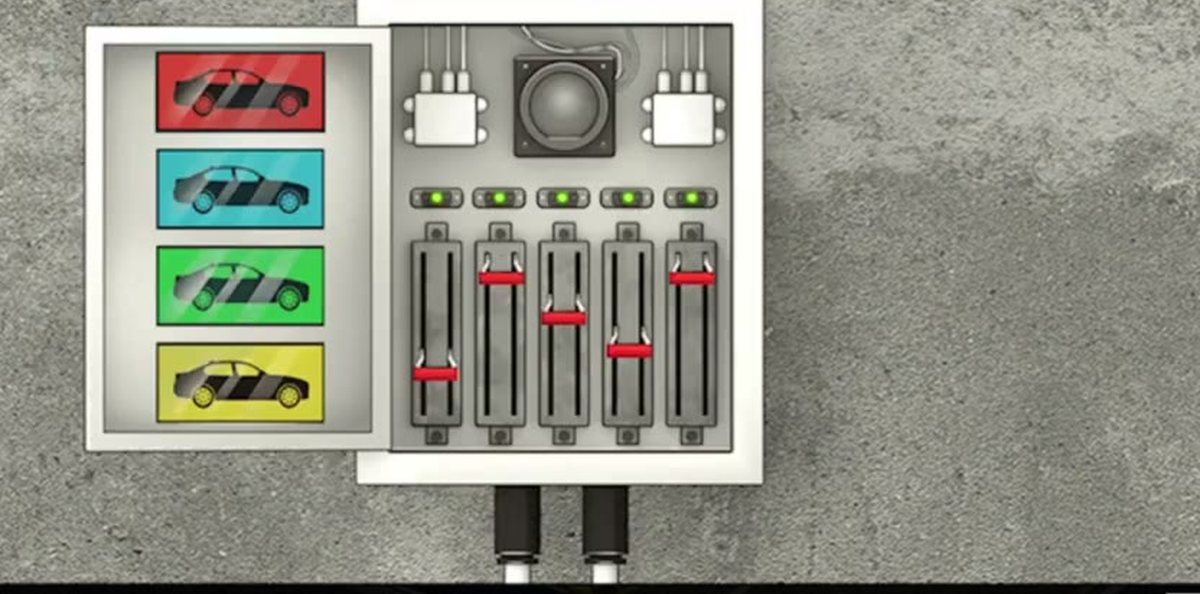
- Set the five faders until all five lamps are green, go back up, press P — LEVEL COMPLETED, +50 coins.

The full 6:13 run used for this page. It reaches the results panel; the second recording is linked where it shows a puzzle this one skips past.
What this level actually is.
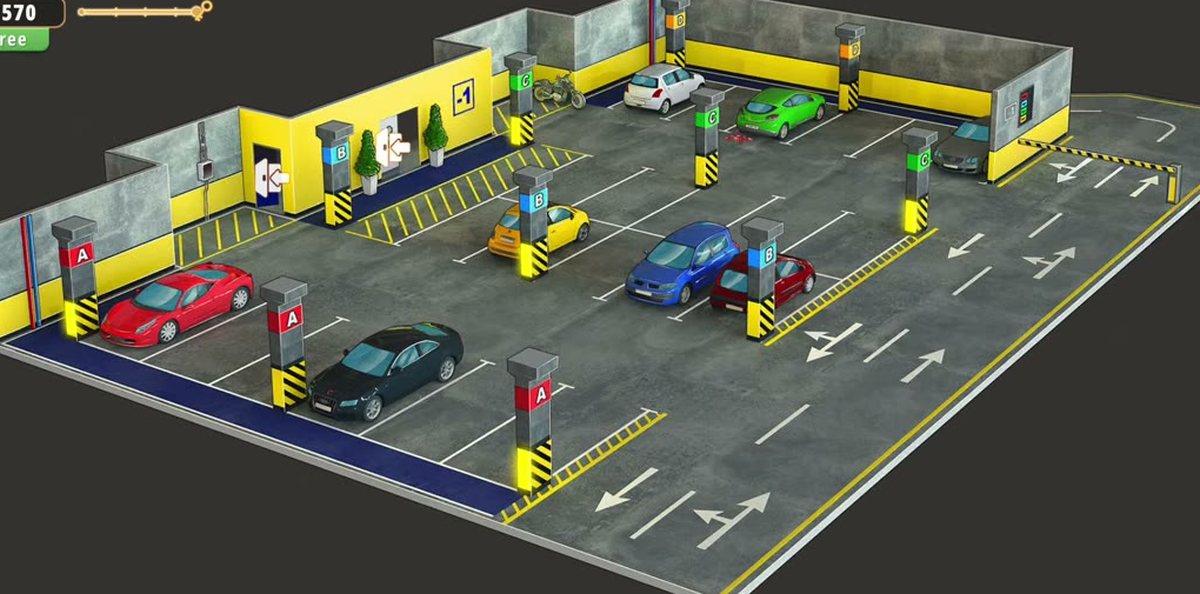
Parking is the last room of Chapter 2 and it does not behave like a room at all. There is no single suite you are locked into: the level is a working multi-storey car park with two basement floors, a lift that connects them, and a handful of locked services scattered across both. You begin inside the lift, you spend most of the level on floor -1, you go down to floor -2 for the second half, and you finish by riding the lift back up to P. The camera is isometric, the floors are open, and the only thing telling you which floor you are on is the blue -1 or -2 sign painted on a wall.
That structure is why the level feels bigger than it is. Floor -1 is one long rectangle: the lift on the back wall, four parking zones marked by pillars lettered A, B, C and D in red, blue, green and orange, a row of parked cars, a motorcycle, a pedestrian door with an arrow, a barrier exit on the right, a toilet block, and a wall-mounted service box with a keypad. Floor -2 is the same concrete language with different furniture: bays lettered E, F, G and H, three cars with readable plates, a wall plaque that lists them, a twelve-button panel, and a five-fader service panel in a recess.
Two things shape the solve. First, the level is gated by power, not by a door: the lift will not take you where you need to go until the service box on -1 has been opened, coded and switched. Second, the two codes are printed in the world rather than hidden behind a puzzle minigame — one on a locator board, one on a piece of paper and a plaque. If you are stuck, you are almost certainly missing a read, not a mechanic.
The map: what is where.
Every interactive object that matters, and the floor it lives on.
| Object | Floor / where | What it does |
|---|---|---|
| Food poster | Lift interior, right wall | Holds the Paperclip. No other function. |
| Hatch under the handrail | Lift interior, left wall | Picked with the modified paperclip; exposes the round-button bank. |
| Round-button bank | Behind the hatch | Sequence lock; opens the lift doors onto -1. |
| Locator board | -1, beside the -1 sign | Four colour rows A–D with digits 4 / 2 / 0 / 3: the source of 0243. |
| Service box | -1, concrete wall | Bolted cover, C B A D keypad, red power toggle. |
| Piece of paper | Carried item | Car photo with E6, G1, H3 — the three bays to visit on -2. |
| Restroom | -1, rear corner | Tiled room where the Package is found. |
| Green car, rear | -1 | Smashed taillight; the Glass shard, and the Wrench nearby. |
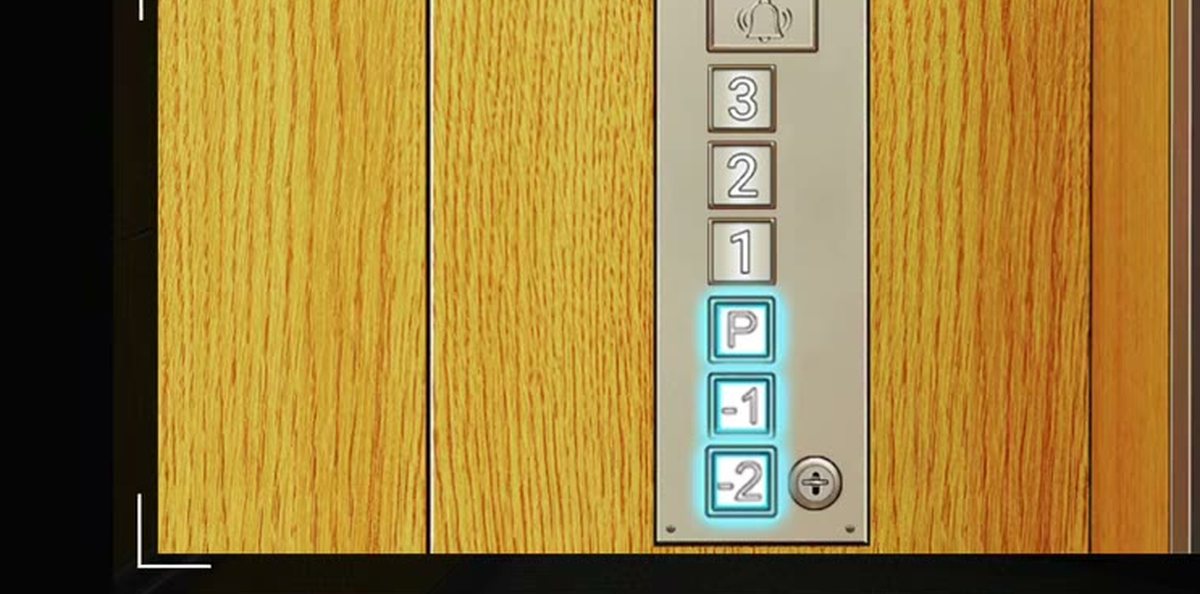
| Lift floor panel | Inside the lift | 3 · 2 · 1 · P · -1 · -2; -2 carries the keyhole. |
| Wall plaque | -2, above the twelve-button panel | Car at E parking: 1876 / G: 3542 / H: 2002. |
| Twelve-button panel | -2, wall | Three rows of four digits: 1876 / 3542 / 2002. |
| Five-fader panel | -2, recess | Five sliders, five lamps; all green to clear. |
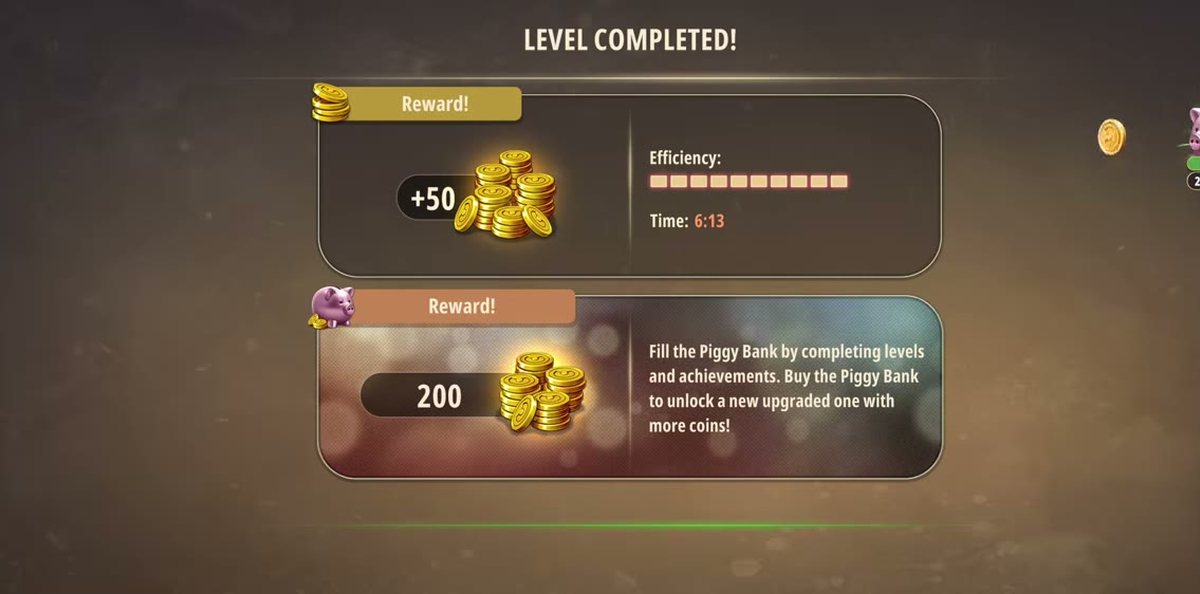
| Results panel | After pressing P | LEVEL COMPLETED, +50 coins, 6:13, full Efficiency bar. |
Step by step.
The order below follows the 6:13 recording, with the longer recording used where it shows a panel or an item pickup more clearly. Timestamps are the game's own clock; the links jump to the matching second of the video.
How the level gates you.
Parking is built out of three kinds of lock, and knowing which one you are looking at saves a lot of wandering.
The pick lock. The hatch in the lift is a pure item gate: no code, no sequence, just the right tool in the bag. The paperclip is on the poster six feet away, and examining it is the step people skip. If the hatch will not open, the answer is almost always the item name — Paperclip is not Modified paperclip.
The sequence lock. The button bank behind the hatch is the only puzzle in the level with no printed clue anywhere. It is also the only one where the feedback is purely visual: each correct press leaves a green light, and the doors open when the pattern is complete. Our recordings do not preserve the order that was pressed, so this page does not print one — see the verification note at the end. The caption the recorder left on the clip calls it "the correct order", which is as much as we can honestly say.
The read-and-enter locks. Everything else in the level is a two-step: find a number written in the world, then type it into a panel. The piece of paper gives you bays; the cars give you plates; the plaque repeats them; the locator board gives you letter-digit pairs; the keypad asks for them in the order C B A D. None of these locks is a puzzle in the usual sense. They are reading comprehension with a keypad attached, and every failure we saw in the footage came from entering a number in the wrong order rather than from misreading it.
The power switch is the hinge between the two halves. Before it is thrown, the lift will run to -1 and -2 but P stays dark; after it, P lights and the level can end. That is why the C B A D keypad matters even though it sits on the first floor you visit: it is not a side puzzle, it is the level's main switch, and the code for it is on the same floor, six paces away.
There is one more panel in the garage that looks like a puzzle and is not one of these locks: a wide brown display carrying the equation 8+4+6 = 6+7+4, with small marks under three of the digits and a five-digit readout to its right. In both recordings the players walk up to it, look at it, and leave without solving anything, and the level completes without it. Treat it as scenery until something in the level asks you for a number it could produce.
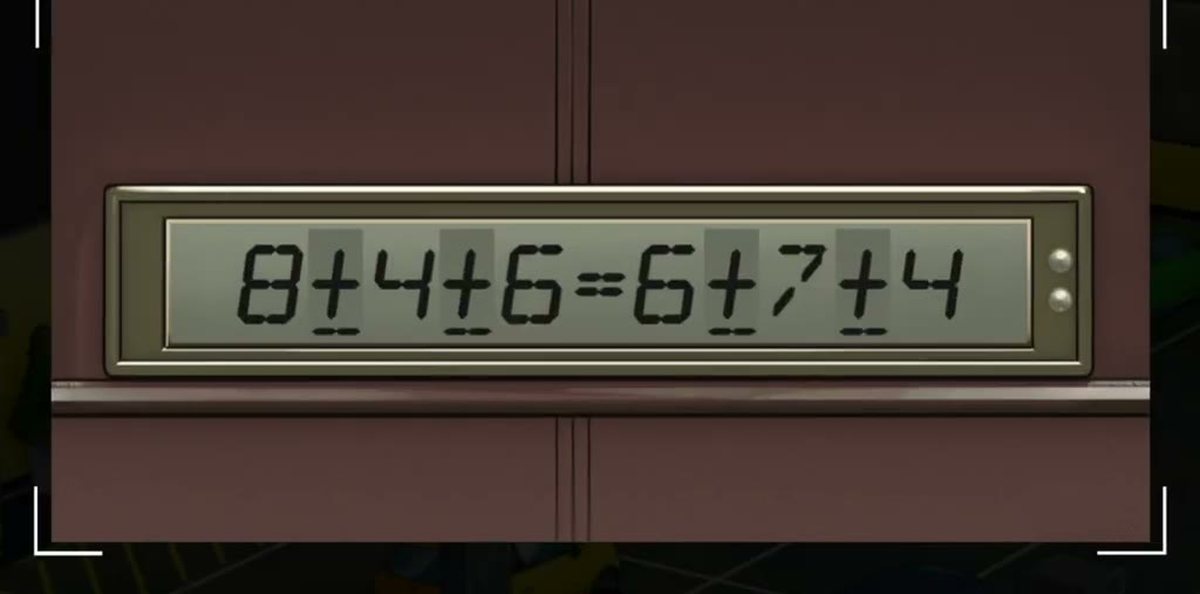
The equation panel on floor -1. Neither recording interacts with it, and the level finishes without it — which is why this page does not offer a solution.
Second recording (detailed run): watch it on YouTube
Sampled at one frame per second. It is the one that shows the twelve-button panel and the fader recess most clearly (panel at 4:49, faders at 5:03); its on-screen clock runs at roughly double the video time. It is linked rather than embedded because the uploader has embedding switched off.
The chapter ending: what is actually on screen.
This is the part of the page we rewound the most, because Parking is room 26 of 26 and "last level" usually means a send-off. Here is exactly what the footage shows.
Pressing P plays a short lift ride, the doors open on the top parking level, and the results panel comes up. It is the same panel the game uses for every room: LEVEL COMPLETED!, a trophy, Reward +50, five stars, a ten-block Efficiency bar at ten of ten, and Time: 6:13. Under it, the piggy-bank strip reads 200 and there is a Claim ×2 button. There is no chapter title card, no "Chapter 2 complete" banner, no cutscene of the thieves, no letter, no newspaper, and no next-level button in the panel itself. The second recording ends on the same card, with the same layout; only its clock differs.
So the honest answer to "what happens at the end of Chapter 2" is: the level ends, the chapter does not announce itself. If there is an epilogue, it plays after the results panel — behind the Claim button or on a continue prompt that neither recording presses — and we cannot describe it. What we can say is that the room count is 26, Parking is 26, and the results card after Parking is a normal results card.
That is worth knowing before you play it, because it changes how you read the level. Parking is not a finale in structure: it is a bigger, two-floor room that reuses every idea Chapter 2 has taught — an item gate, a sequence panel, a locator board, a plate puzzle, a fader panel — and then stops. The story beat, if the game has one, is not in this room.
Where people get stuck.
The hatch does not respond. Check the item, not the hatch. The paperclip has to be examined into a Modified paperclip before the keyhole will take it. This is the single most common place to stall, because the clip is already in the bag and nothing on screen tells you to examine it.
The button bank resets. The bank keeps its green lights between presses, but the pattern is order-sensitive. If you have lit most of the panel and the doors still will not open, you are not missing a button — you pressed two of them in the wrong order somewhere. Start the pattern again from the first button rather than hunting for an unlit one.
The twelve-button panel will not accept a row. Each row is four digits and there is no screen: the buttons themselves display the digits. If a row will not settle, check the digit you are setting against the plate, not against the plaque's line breaks. The plaque puts "parking: 1876" on its own line and "H:" two lines above "2002", and reading it as a single column of numbers is the classic mistake.
3 or 8 on the G1 plate. The seven-segment 3 is open on the left; an 8 is closed. At the distance the camera sits, the difference is a few pixels. 3542 is the reading that survives both recordings and the plaque, so use it as the tie-breaker if you are unsure.
P stays dark. That means the switch on -1 did not take, or the keypad reset when you left the box. Go back, re-check that the display still reads 0243, and throw the switch again before riding up.
The fader lamps will not all go green. Work one fader at a time and watch its own lamp. The panel gives no other feedback, and the car silhouettes on the left edge are decoration — they do not encode the heights.
Where Parking sits in Chapter 2.
Chapter 2 is No Honor Among Thieves, and its twenty-six rooms run through a town's worth of small businesses before they end in this car park: sports store, bookstore, furniture store, household appliances, print shop, bakery, toy store, restroom, and then Parking. The last stretch is worth keeping in mind because Parking reuses their grammar — a picked lock, a sequence panel, a plate puzzle, a fader board — without reusing their props. Nothing you carried out of the toy store or the restroom follows you in here; Parking starts you with an empty bag in a lift.
If you are working through the chapter in order, the two rooms immediately before this one are 24 Toy Store and 25 Restroom. Parking is a step up in size from both: two floors instead of one, two independent code systems instead of one, and a lift you will ride a dozen times. Budget ten to fifteen minutes for a first run if you read the clues yourself, and six if you follow the route above.
- 1 Cell Phone Store guide
- 2 Cinemas guide
- 3 Pharmacy guide
- 4 Optical Store guide
- 5 Gym guide
- 6 Candy Shop guide
- 7 Food Court guide
- 8 Pet Shop guide
- 9 Indoor Playground guide
- 10 Restaurant guide
- 11 DIY Shop guide
- 12 Jewelry Store guide
- 13 Grocery Store guide
- 14 Exchange Office guide
- 15 Fashion Store guide
- 16 Art Supplies Store guide
- 17 Shoe Store guide
- 18 Sports Store guide
- 19 Bookstore guide
- 20 Furniture Store guide
- 21 Household Appliances guide
- 22 Print Shop guide
- 23 Bakery guide
- 24 Toy Store guide
- 25 Restroom guide
- 26 Parking you are here
Previous room: Chapter 2 Level 25 — Restroom
Frequently asked questions.
What is the code in Rooms & Exits Chapter 2 Level 26 Parking?
There are two, and they do different jobs. The C B A D keypad on the service box takes 0 · 2 · 4 · 3 — the parking-bay numbers of cars C, B, A and D, read off the locator board on floor -1. The twelve-button panel on floor -2 takes three four-digit rows: 1876, 3542 and 2002, the plates of the cars parked at bays E6, G1 and H3. Both sets were read twice, in two separate recordings.
Where does 0243 come from?
From the car-locator board mounted on the wall of floor -1, next to the -1 sign. It has four colour rows — A red, B cyan, C green, D yellow — and a red seven-segment column reading 4, 2, 0, 3 top to bottom. That gives A=4, B=2, C=0, D=3. The service-box keypad is labelled C B A D, so you read the same board in that order: C=0, B=2, A=4, D=3, which is 0243.
Where do 1876, 3542 and 2002 come from?
From the Piece of paper in your bag. It is a photograph of a vintage car with three bay codes written on it: E6, G1 and H3. On floor -2 the wall plaque spells the same thing out — Car at E parking: 1876, G: 3542, H: 2002 — and the three cars at those bays carry exactly those plates. The twelve-button panel has three rows of four digits for those three numbers.
How do I get down to floor -2?
With the lift's own keyhole. The floor panel inside the elevator has 3, 2, 1, P, -1 and -2, and the -2 button is the one with a keyhole beside it. The key that clears it is the one you pick up in the course of the level; once it is in the bag the lift will take you down. Our footage shows the key being collected and then the ride to -2, but not the moment the key turns in the lock, so treat the keyhole as the gate rather than a separate puzzle.
How do I solve the five-fader panel?
It is not a code and it does not want a number. The panel has five vertical faders and one indicator lamp above each; a lamp turns green when its fader sits at the right height, and the puzzle is finished when all five are green at the same time. In our recordings the lamps come on one at a time as each fader is set, and the panel is left with five green lamps before the player returns to the lift. Move one fader at a time and watch its own lamp — the faders do not appear to reset each other.
How do I actually finish the level?
Restore the power, then ride the lift to P. The service box on floor -1 has a red toggle switch under the keypad; with 0243 accepted the switch can be thrown, and the lift's floor panel then lights P. Press P, ride up, and the level ends on the results panel with +50 coins and 6:13 on the clock in the run we captured.
What do I get for finishing Parking?
The standard results panel pays +50 coins, shows a full ten-block Efficiency bar and reads Time: 6:13 in our recording. The piggy-bank strip underneath reads 200 and there is a Claim ×2 button in the corner. The panel does not mention your items; the only thing it reports is the reward, the clock and the efficiency bar.
Is Parking the last level of Chapter 2?
Yes. Chapter 2, No Honor Among Thieves, runs twenty-six rooms and Parking is number 26 — the level list in the game's own data ends here. What that means in practice surprised us: the results panel after Parking is the same LEVEL COMPLETED card as every other room, with no chapter-summary screen, no story card and no next-level button in the footage we captured.
Do I need the paperclip at the start?
Yes — it is the first lock of the level. The paperclip is clipped to the fast-food poster on the right wall of the lift you start in. Take it, examine it, and it becomes a Modified paperclip: a pick. That pick opens the small hatch under the handrail, and the hatch is what exposes the bank of round buttons that opens the lift doors.
Do I need the wrench?
For the service box, yes. The wrench is the tool that engages the bolt on the metal service panel — our close-up shows the wrench head on the bolt with the cover partly swung. You can walk the whole garage without it, but the C B A D keypad and the red power switch sit behind that cover.
What this page could not verify.
1. The button-bank sequence. We can see the panel, the green lights and the doors opening, but neither recording preserves which button was pressed in which order, and the game gives no printed clue. No order is printed here because any order we gave you would be invented.
2. The equation panel. The display 8+4+6 = 6+7+4 with marks under three digits is visible and readable, but neither player interacts with it and the level completes without it. Whether it is a red herring, an optional sequence, or the input for something we never found, we do not know.
3. The Glass shard and the Package. Both are picked up, both are labelled in the inventory, and neither is used in any shot we captured. The obvious guess is that the shard cuts the package open, and that the package holds the key — but neither recording shows either action, so it is a guess, not a read, and it is not printed as a step.
4. The chapter epilogue. The results panel after room 26 is the standard one, with no chapter card in either recording. If the game plays a Chapter 2 epilogue after the panel, it happens behind a button neither recording pressed.