Unofficial fan-made guide. Not affiliated with Webelinx Games, the developer of Rooms & Exits: Escape Room Games.
Rebuilt frame by frame from a recorded playthrough of the current build. 5 minutes 33 seconds of footage, extracted at one frame per second and read at full resolution, including the level-complete screen at the end. Every number below was read twice from separate frames at original resolution, with one exception that is flagged further down: the colour assigned to each digit of the 438 lock. Where the recording cannot settle a detail, this page says so instead of guessing.
Chapter 2 · No Honor Among Thieves26 of 26 with full written steps · 26 with a video
Quick answer
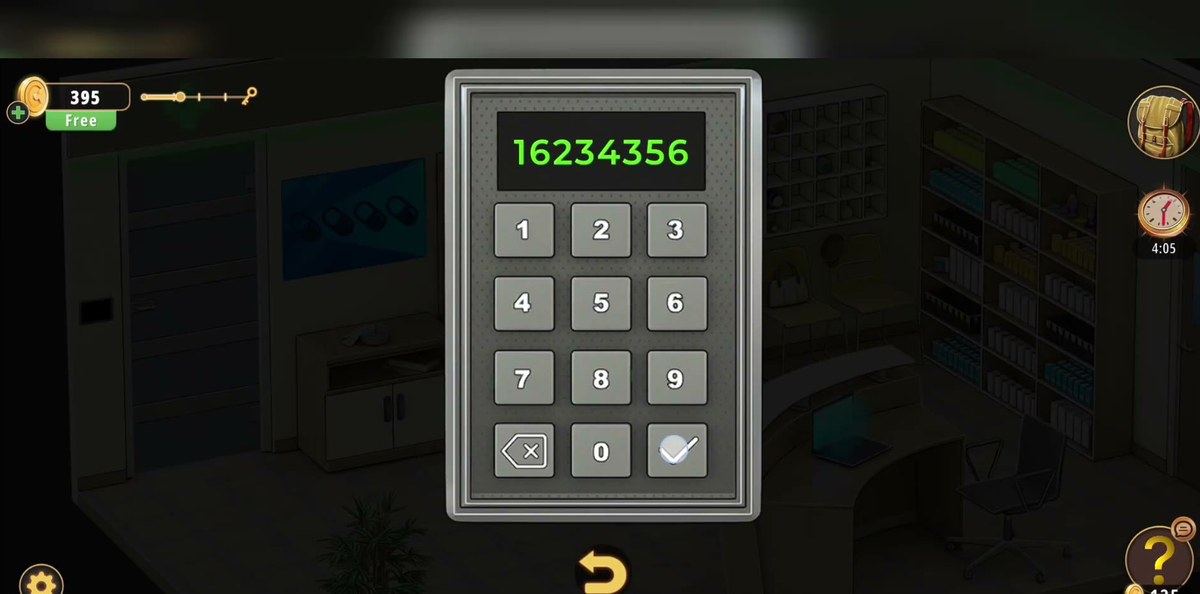
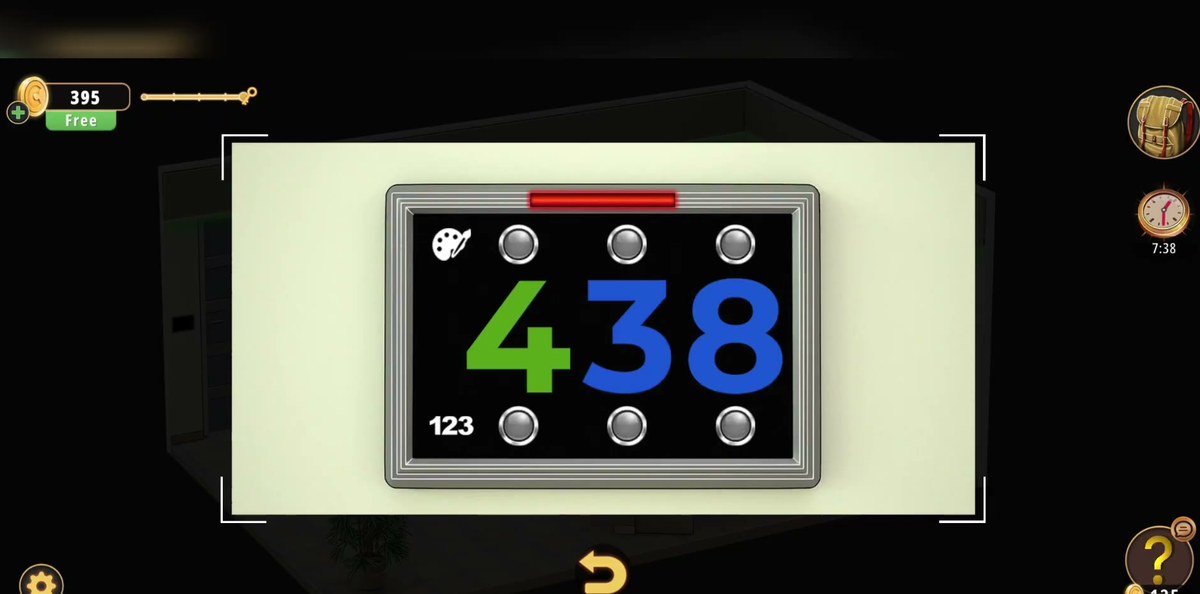
The Pharmacy has two numeric codes and one word lock. The keypad in the middle of the room is 16234356, the four numbered pills in the white dish (16, 23, 43, 56) in ascending order. The three-digit lock at the end is 438. The word lock takes HEALTH.
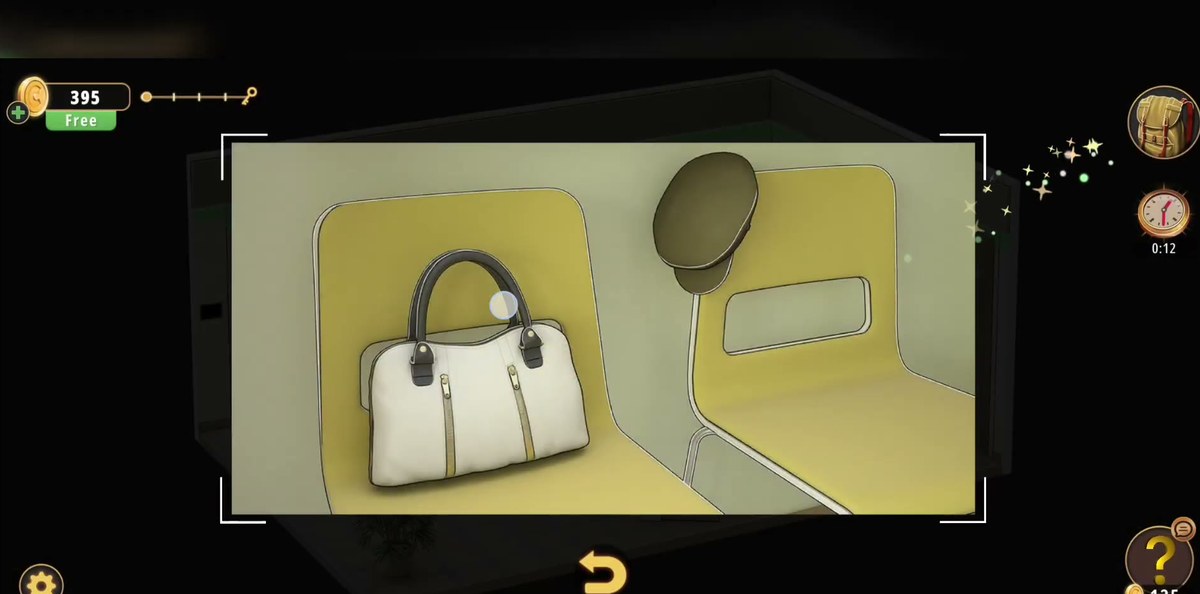
White handbag on the yellow chair → Adhesive bandage. Piece of paper → a 5×5 letter grid.
Steel QWERTY panel on the wall → type HEALTH → the locker opens → vitamin bottles.
White dish of pills → the four numbered ones read 16, 23, 43, 56.
Keypad by the glass cabinet → 16234356 → the cabinet unlocks → the rest of the vitamin bottles.
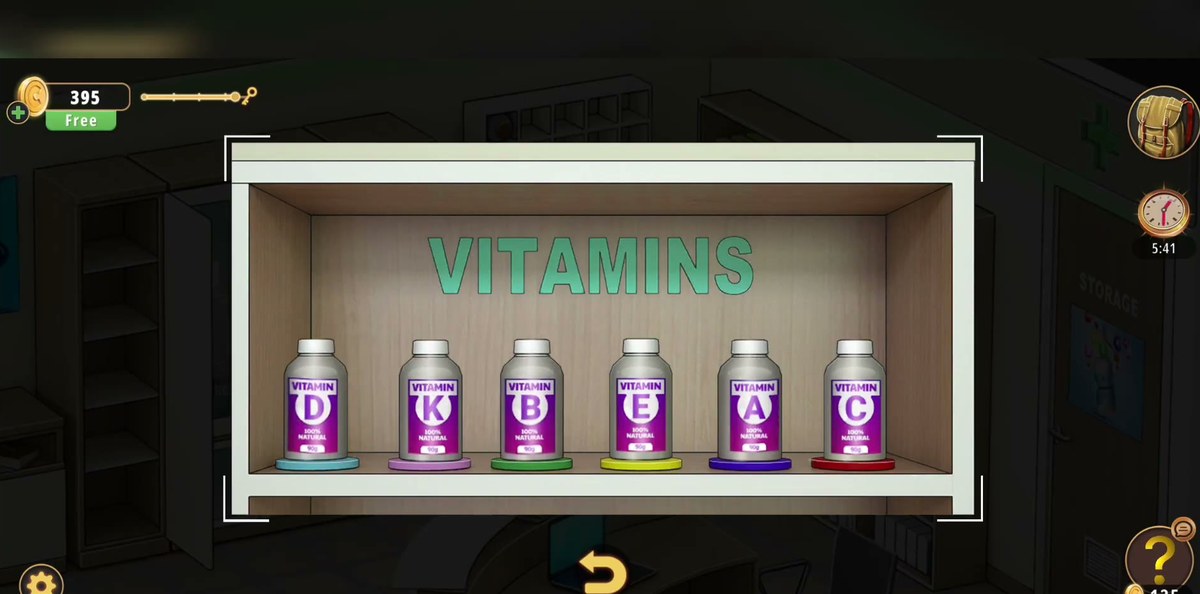
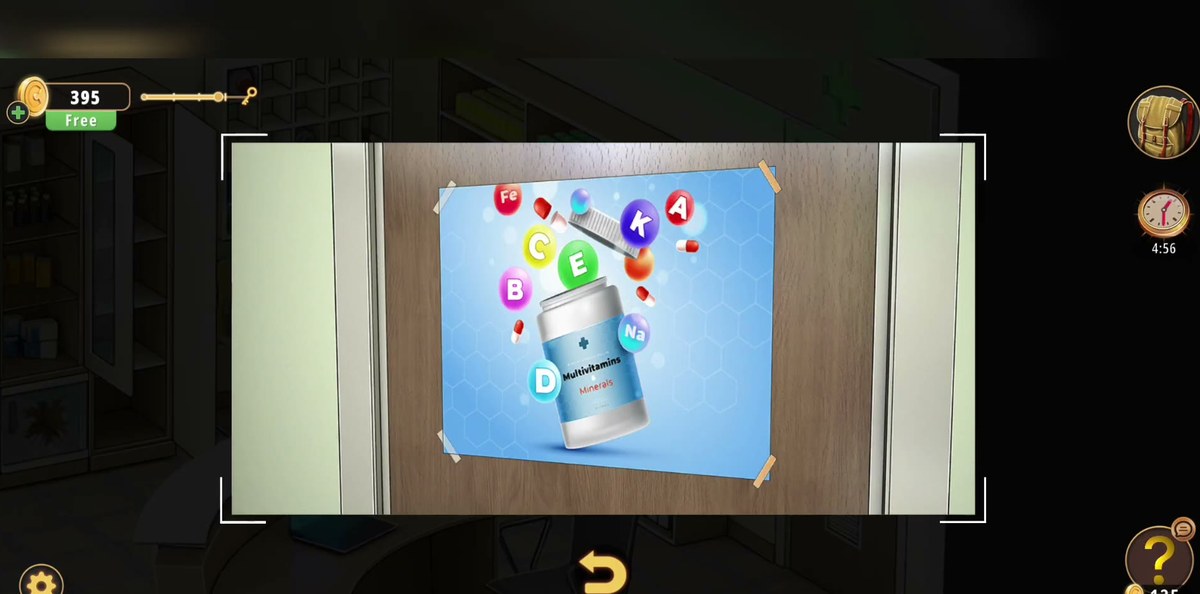
VITAMINS shelf: six coloured pads, six lettered bottles (A, B, C, D, E, K). The multivitamin poster on the door is the colour key.
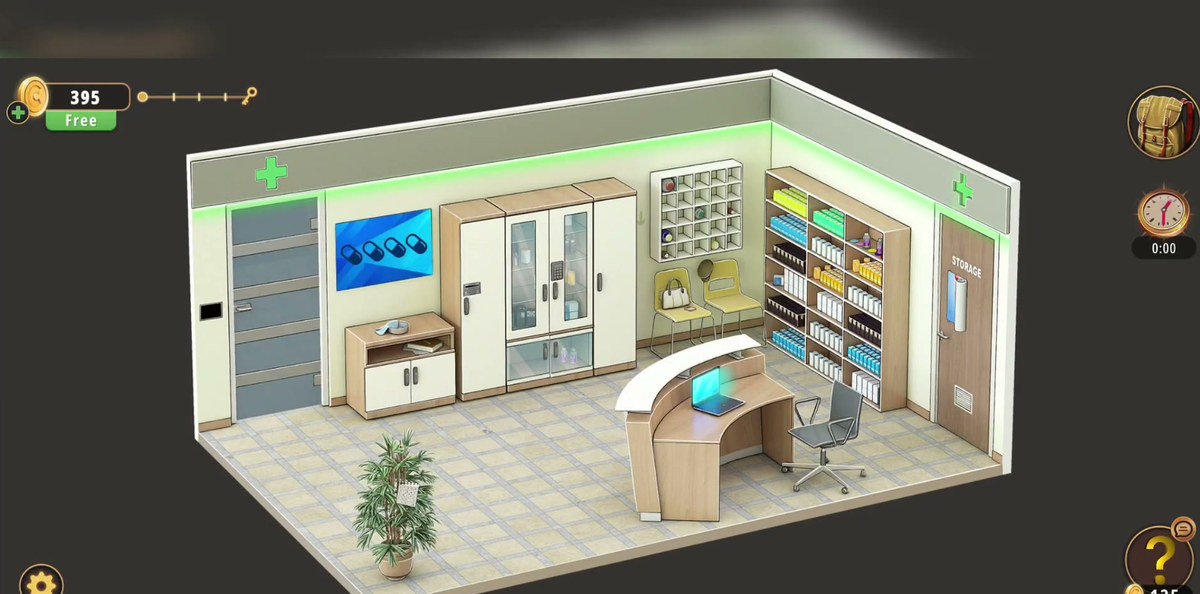
The Pharmacy is one room, and it is smaller than it looks. A curved reception desk with a laptop sits in the middle, an office chair behind it; two yellow tub chairs with a white handbag on one of them make up the waiting side; glass-fronted medicine cabinets and a tall shelf of boxed stock fill the right; and a door marked STORAGE closes off the back. A blue pill poster hangs on the wall behind the counter, and a framed multivitamin advert is taped to the storage door.
That compact layout is exactly why people stall. The room gives you two different locks on the same wall, one numeric and one alphabetic, and it never tells you which order they want. It also hands you six vitamin bottles that are useless until you have all six, and a shelf with six coloured pads that does not say what the pads mean. The footage runs five and a half minutes, and almost all of that time is reading, not searching: nothing in this level is hidden, everything is lying in the open and the difficulty is entirely in matching the right clue to the right lock.
The item list you finish with is short. An adhesive bandage, a piece of paper with a letter grid on it, six vitamin bottles, and whatever the cabinets hand you on the way. The bandage is the only true red herring in the room: our recording picks it up out of the handbag in the first twenty seconds, carries it the whole level and never uses it on anything.
Step by step.
Step 1 · 0:03Land in the room and read the walls first
The opening shot is the whole pharmacy from above the counter: reception desk and laptop centre, glass cabinets right, two yellow chairs left, STORAGE door at the back. Do not start tapping shelves. Two wall fixtures are the ones that matter later, and both are easy to walk past: the framed blue pill poster on the wall behind the counter, and the multivitamin advert taped to the storage door on the right. The advert on the door is the colour key for the vitamin shelf, and it is the sheet you will come back to in Step 11.
Step 2 · 0:12The white handbag on the yellow chair
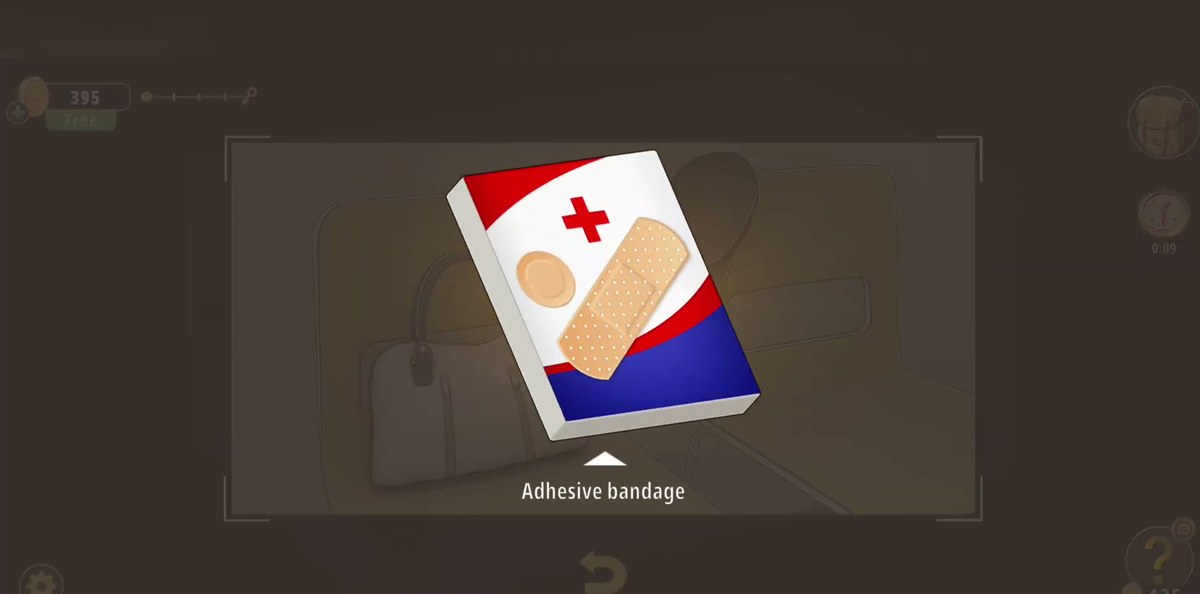
Zoom the handbag on the left-hand chair and it opens into an inventory view of what is inside. The pickup is an Adhesive bandage, labelled exactly that on the way into your bag. It is a box of plasters, and as far as this level is concerned it is decoration: there is no wound, no cut and no use prompt anywhere in the pharmacy. Take it if you like a full inventory, but do not spend time looking for a place to spend it.
Step 3 · 0:34The piece of paper with the 5×5 letter grid
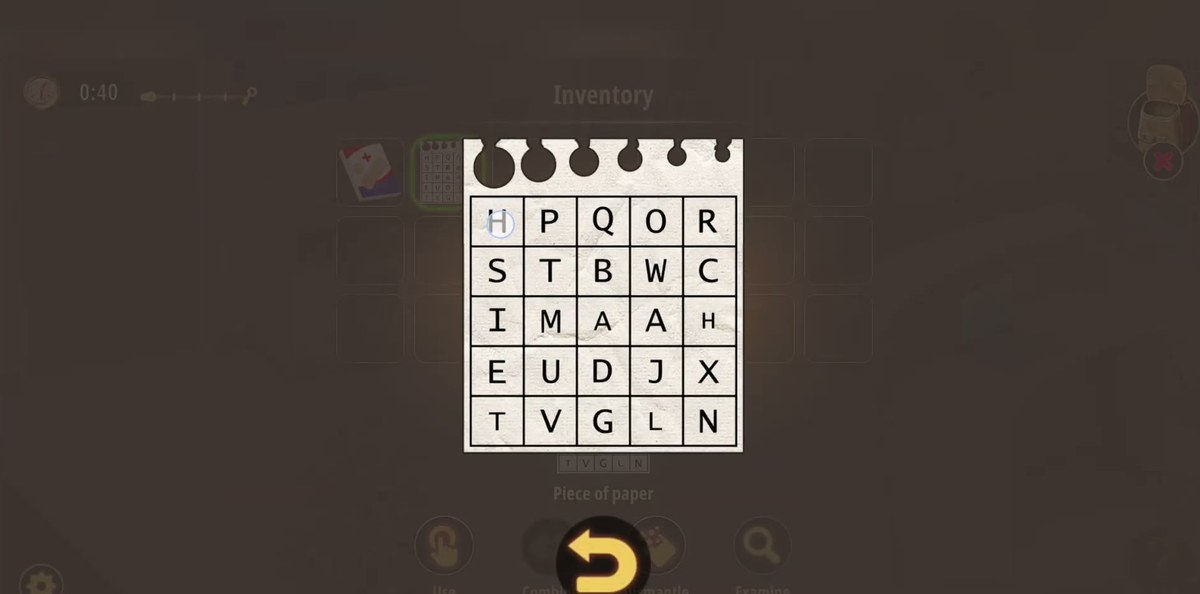
Somewhere in the room there is a sheet you can pick up, and it lands in the inventory as Piece of paper. Open it with Examine and it is a 5×5 grid of capitals, five rows of five. Row by row our frames read H P Q O R, S T B W C, I M A A H, E U D J X, T V G L N. The H in the top-left corner is circled in the game, which is the only mark on the sheet. It reads like a word-search starter, and it is the only paper clue in the level that is not a poster.
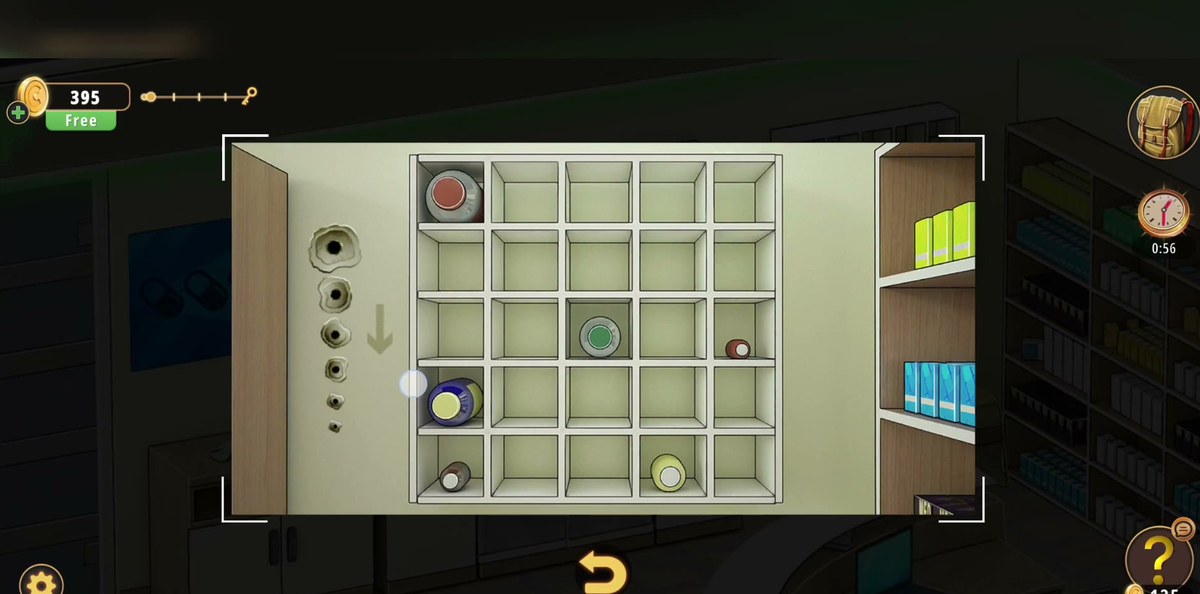
Step 4 · 0:58The wall of cubbies
There is a 5×5 grid of open square cubbies on a wall unit, and some of them hold bottles with coloured caps. Tap it and you get a zoomed view of the whole block. Our recording moves bottles around in it for a minute and then leaves, and the footage never shows the block solving or rejecting anything, so we are not going to pretend we know the rule. What we can say is what it costs you: nothing. The level completes without this block ever giving up an item in our run.
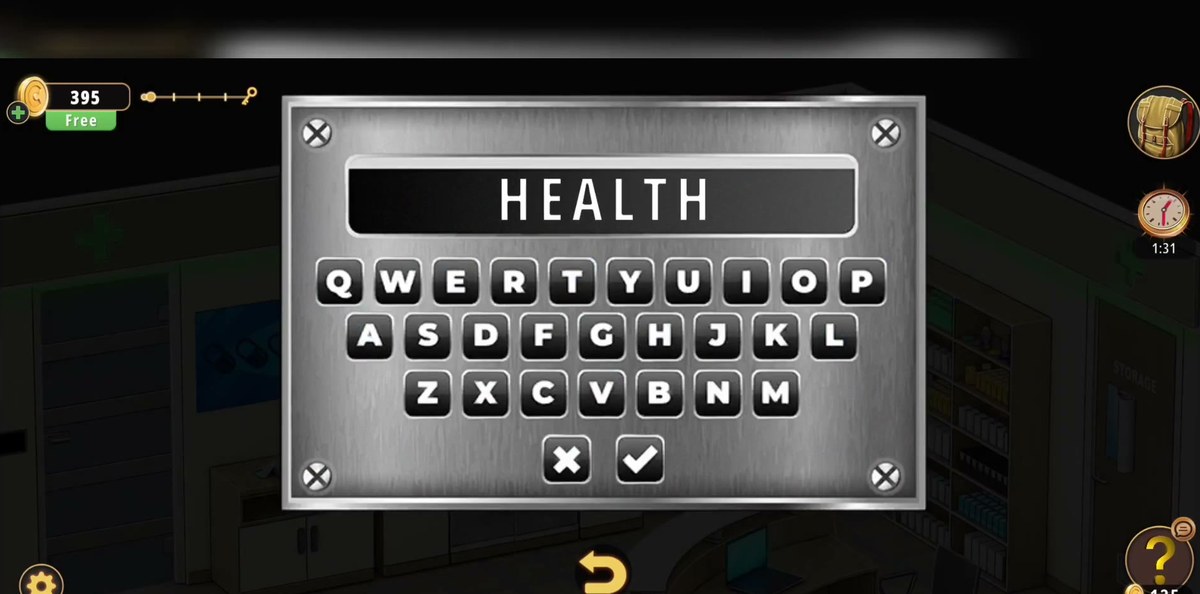
Step 5 · 1:31The steel QWERTY panel: HEALTH
This is the lock most people misread. It is a brushed steel plate with four corner screws and a full QWERTY keyboard on it, not a number pad, and it sits on the wall near the reception area. Tap the field and type H E A L T H, then press the tick to the right of the X. The field fills one letter at a time and there is no backspace drama: if you get it wrong, the X clears the field. In our footage the word is already reading HEALTH at 1:35 and the panel is accepted immediately after.
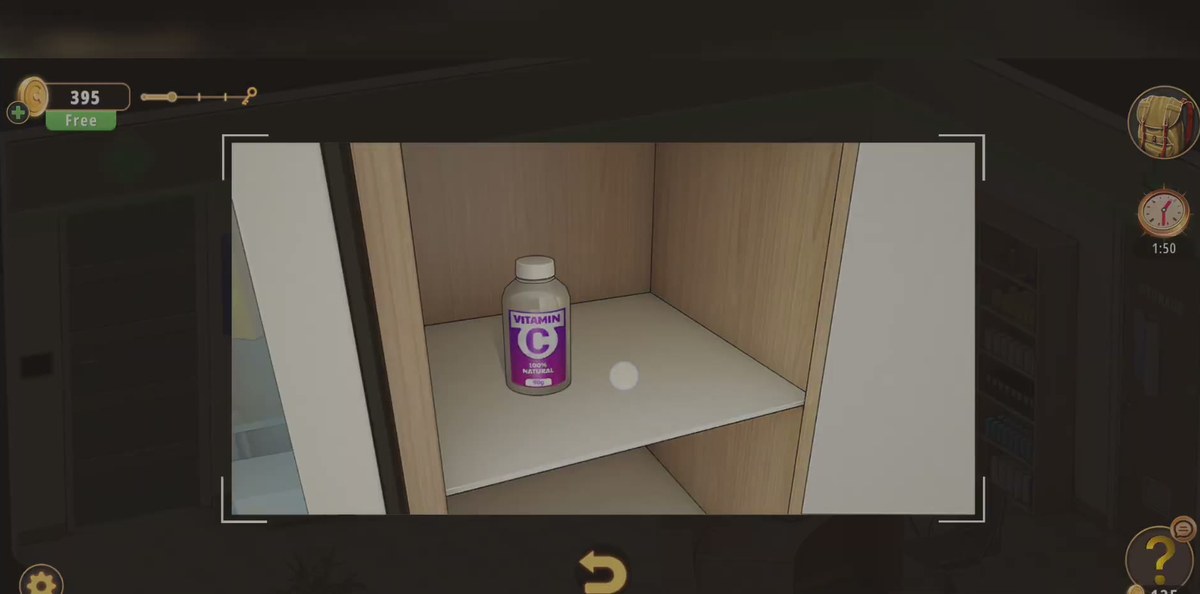
Step 6 · 1:51The locker under the panel: vitamin bottles
The panel does not open a door, it releases the locker below it, and the locker is stocked rather than empty. Our frames show a purple-labelled bottle marked VITAMIN C sitting on the shelf inside, and it goes straight into the inventory. This is the first of the six bottles the VITAMINS shelf will want, and it is the reason the HEALTH plate matters: without it you can stand in front of the vitamin shelf with five bottles and no way to get the sixth.
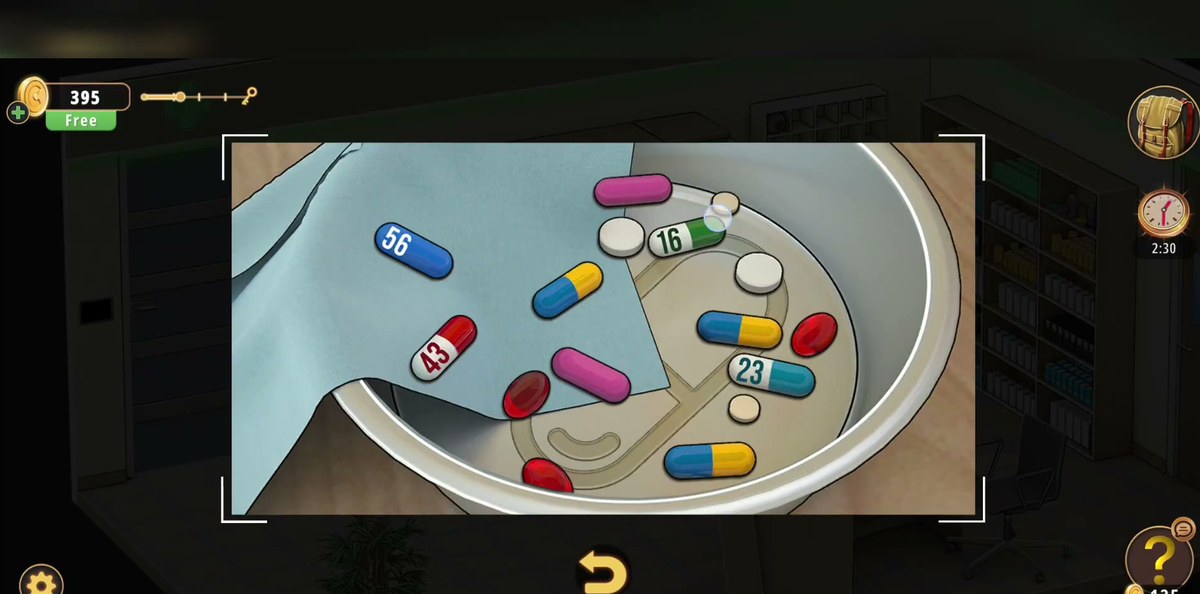
Step 7 · 2:08The white dish: four pills with numbers on them
Behind the counter there is a shallow white dish with a blue cloth folded over one side and a dozen loose pills in it. Four of them carry numbers in black: 56 on the blue capsule, 43 on the red one, 16 on the green-and-white one and 23 on the pale blue one. This is the whole clue for the numeric keypad, and the trap is that they are not laid out in any order: they are scattered across the dish, so you have to read all four and then decide the order yourself.
Step 8 · 2:22The keypad by the glass cabinet: 16234356
The keypad is on the frame of the glass display cabinet beside the reception desk, and it takes an eight-digit run, not four. The code is the four pill numbers read smallest to largest and typed as one string: 16 · 23 · 43 · 56 becomes 16234356. Type it, watch the display fill left to right, and confirm. Our frames catch the display mid-entry at 1, 162, 16234 and then 16234356, and the cabinet is open on the next cut.
Step 9 · 2:31Empty the cabinets: A, B, C, D, E, K
With the glass cabinet open, the vitamin bottles come out one at a time. Our frames read VITAMIN B on the shelf inside the glass cabinet at 2:31, and the locker bottles on the other side of the room. Six bottles in total, each with a single big letter on a purple label: A, B, C, D, E and K. The inventory stacks them in a row, and that row is your checklist for the next step. If the shelf refuses to complete, count the bottles before you blame the puzzle: five letters means you have not opened one of the two cabinets.
Step 10 · 3:12The VITAMINS shelf and its six coloured pads
The shelf is labelled VITAMINS in pale green across the back panel, and the moment you zoom it you can see the puzzle: six round pads on the shelf, six different colours, and space for one bottle on each. From left to right our frames read the pads as blue-cyan, lavender, green, yellow, royal blue and red. The bottles go on standing up, and the shelf fills as you place them: the recording ends with all six occupied, which is what completes it.
Step 11 · 3:20The multivitamin poster: the colour key
This is the sheet you need in your head while you fill the shelf. Taped to the storage door, it is an advert for a bottle labelled Multivitamins / Minerals with pills spilling out of it, and each pill carries a letter in white: Fe, C, E, B, K, A, Na and D, each on a differently coloured pill. That is the link between the purple bottle labels and the coloured pads on the shelf. Read it before you place anything, because the shelf gives you no feedback about which colour is wrong.
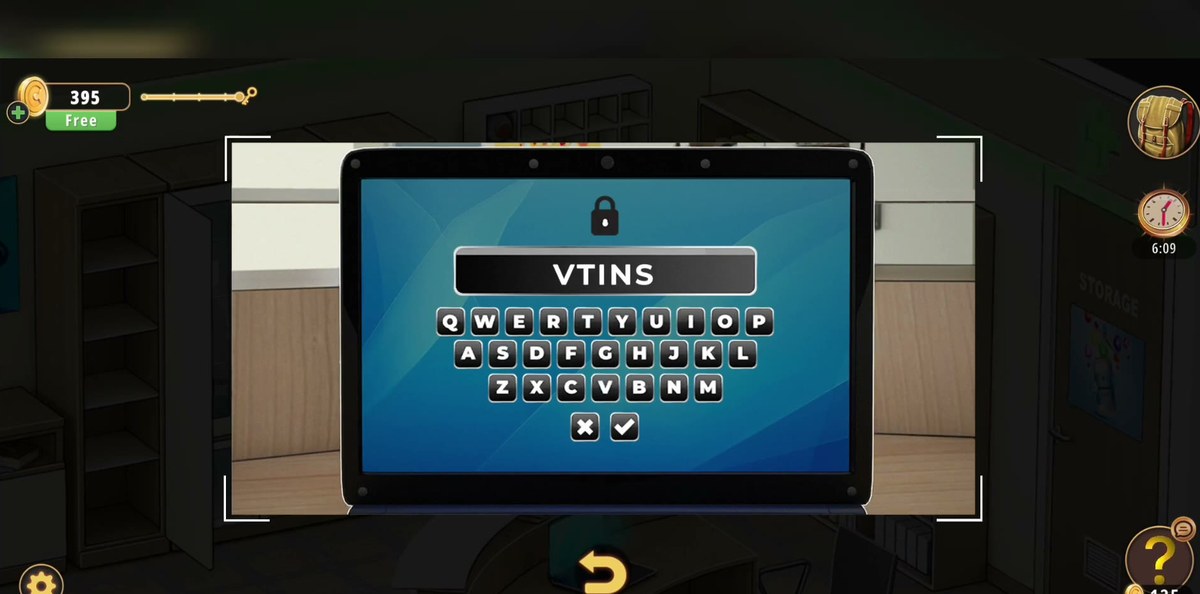
Step 12 · 4:35The reception laptop: a word, not a number
The laptop on the reception desk is a second QWERTY lock, and it looks almost identical to the steel panel that took HEALTH, which is why people type the same word twice and get nowhere. It has a padlock above the field, a blue patterned wallpaper, and a tick and X under the keys. Our frames read the field filling as V T I N S with the padlock open and a highlight across the field, and the screen then drops to a desktop with a single app icon on it.
What we could not verify: the full word on the laptop. The recording cuts between keystrokes, so the field is only catchable mid-entry: our frames read VTI at 4:34, VTIN a second later and VTINS at 4:35, with the padlock already open and a green highlight across the field. We can tell you that the laptop wants letters rather than digits and that the field in our footage ends up reading VTINS, but we cannot honestly print the whole word as fact.
Step 13 · 4:42The vitamin reference app
The desktop itself is a blue wallpaper with a small grid of coloured app icons in the top-left corner. Open one and the laptop switches to a vitamin reference sheet: round badges in different colours, each carrying a vitamin letter with its chemical structure drawn underneath. Letters we can make out across the sheet include A, B, C, D, H and K, with B-numbered variants among them. This is the last thing the room shows you before the final lock, and it is almost certainly where the lock's colour idea comes from, but see the note below before you try to copy a sequence off it.
Step 14 · 4:51The three-digit colour lock: 438
The last mechanism in the room is a cream panel with a black display, three digits and six round buttons, three above the display and three below. Two small icons sit to the left of the buttons, a palette at the top and the digits 123 at the bottom, and that pairing is the whole trick: you are not only setting three numbers, you are setting three colours as well. Set the digits to 4 3 8. Our recording steps through 400, 433 and then 438 on the display, and the red bar above it turns green when the whole thing matches.
Step 15 · 5:29Level complete: +50 coins
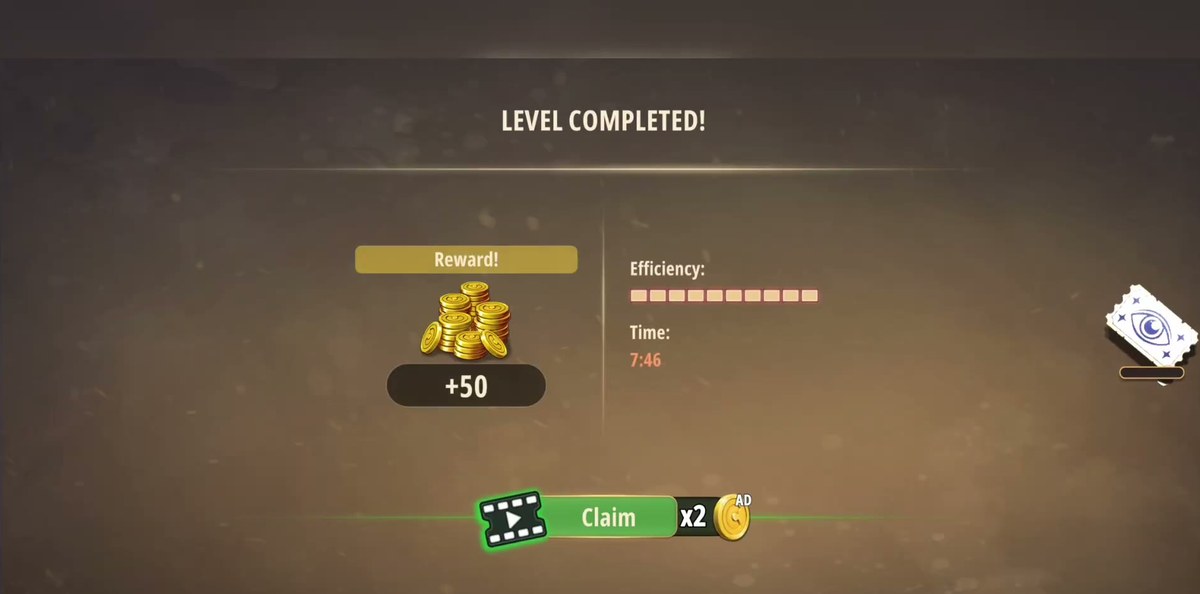
The end screen is the standard one: LEVEL COMPLETED! across the top, a reward panel showing a stack of coins and +50, a full efficiency bar, a level time of 7:46 in our run, and the green Claim button with the x2 advert beside it. There is no exit door to walk through and nothing to collect first: the level ends the moment the lock accepts.
The two numbers, and why one of them is eight digits.
The keypad code is the single most useful thing on this page, so it is worth spelling out how the room arrives at it. The clue is not a note and it is not written on a wall: it is four numbered pills sitting in a dish with a dozen unnumbered ones. Read them in the order they sit in the dish and you get 56, 43, 16, 23, which is not a code anybody would type. The keypad wants eight digits. Sort the four numbers ascending, 16 then 23 then 43 then 56, and type them as a single run:
16: the green-and-white pill.
23: the pale blue pill.
43: the red pill.
56: the blue capsule.
Concatenated that is 16234356. The display on the keypad shows every digit as you press it, so you can see the string build up and check it before you confirm rather than pressing the tick on a half-typed number.
What we could not verify: the rule itself. Our footage shows the player read the dish and then type 16234356, and the cabinet opens, but it never shows a wrong order being rejected. We can tell you the code; we cannot tell you whether the game would also accept 56431623 or some other arrangement. Type it ascending and you will not have to find out.
The colour lock is the part that catches people.
Everything before the last lock is reading. The last lock is the only one that wants a second dimension. Its display is three digits, but each digit also carries a colour, and the six round buttons above and below the display are how you change both: the palette icon on the left switches you between number and colour, and the bar across the top of the display is the only feedback the lock gives you. Red means the combination is not right yet. Green means it is.
In our recording the digits settle on 438 and the bar goes green, which is why 438 is the number on this page. What we could not pin down is the colour each digit is supposed to be: across separate frames at original resolution the colour on the third digit reads differently more than once, and we are not going to publish a colour we could not confirm twice. If the numbers are on 438 and the bar is still red, change the colour on one digit at a time rather than the number.
What we could not verify: the exact target colours of the three digits, and which clue in the room produces 438 in the first place. The vitamin reference app on the laptop is the last thing the room shows you before the lock, so it is the obvious source, but our footage cuts from the app to a lock that already reads 400, and we cannot reconstruct the step in between. Treat 438 as the number and the colour cycling as the work.
Where people get stuck.
Two keyboards, one word. The steel HEALTH panel on the wall and the reception laptop both open a QWERTY screen that looks the same at a glance. HEALTH goes in the steel panel only. Typing HEALTH into the laptop does nothing, and that is the single most common way to lose five minutes in this room.
Four numbers, eight digits. Players read 56, 43, 16, 23, type 56431623, and the keypad sits there. Nothing tells you to sort them. The keypad takes eight digits, not four, and the only arrangement that our footage confirms is ascending.
The vitamin shelf before the poster. The pads are coloured and the bottles are lettered, and there is nothing on the shelf itself that maps one to the other. The multivitamin poster on the storage door is the map. Place bottles before reading it and you are guessing six times in a row.
Five bottles instead of six. The bottles are split across two containers: the wall locker that HEALTH opens and the glass cabinet that 16234356 opens. Miss either one and the shelf will never complete, and the game will not tell you which letter you are short of.
The bandage. It is a real pickup with a real label and it is used on nothing. Our recording carries it from the first twenty seconds to the end screen. If you are hunting for a use for it, stop.
The cubby wall. The 5×5 block of cubbies with coloured-capped bottles looks like a required puzzle and costs nothing in our run. Do not let it eat your session before you have read the pills and the poster.
Chapter 2 levels.
Chapter 2 · No Honor Among Thieves26 of 26 with full written steps · 26 with a video
What is the keypad code in Chapter 2 Level 3 Pharmacy?
16234356. The four numbered pills in the white dish read 16, 23, 43 and 56, and the keypad wants them as one eight-digit run in ascending order. Type 16234356 and confirm: the glass display cabinet next to the reception desk unlocks and the VITAMIN B bottle inside it becomes takeable.
Where is the HEALTH word lock and what does it open?
It is the steel panel with a QWERTY keyboard on it, on the wall side of the reception area. Tap it, type HEALTH on the on-screen keyboard and press the tick. The locker under the panel swings open and the vitamin bottles inside it can be picked up.
How many vitamin bottles are there and where do they go?
Six: A, B, C, D, E and K. They come out of the two cabinets rather than off the shelves, and they all go onto the VITAMINS shelf, which has six round pads in six different colours. Each bottle stands on one pad; the multivitamin poster on the door is the sheet that tells you which colour belongs to which letter.
What is the code on the three-digit colour lock at the end?
438. The lock shows three digits and each digit also carries a colour, and the bar above the display stays red until the whole thing matches. Our footage ends with 438 and a green bar. We could not read the three target colours off the recording reliably, so if the bar stays red on 438, cycle the colour on each digit rather than changing the numbers.
What do you get for finishing the Pharmacy?
+50 coins. The end screen shows LEVEL COMPLETED!, a reward of +50 coins, a full efficiency bar and a level time of 7:46 in our recording, plus the usual Claim x2 advert button.
Does the Pharmacy have a timed puzzle?
No. The clock in the top right is a running level timer, not a countdown, and nothing in the room fails you for being slow. The only thing that punishes you is entering a code on a keypad before you have read the clue that produces it.
 GridPaw
 Shikaku
 Akari
 Kakuro
 Nonogram
 Nurikabe
 Pictomino
 KenKen
 Binary
 Star Battle
 Hashi
 Slitherlink
 Murder Sudoku
 Meowdoku
 Crazy Cleanup