 GridPaw
 Shikaku
 Akari
 Kakuro
 Nonogram
 Nurikabe
 Pictomino
 KenKen
 Binary
 Star Battle
 Hashi
 Slitherlink
 Murder Sudoku
 Meowdoku
 Crazy Cleanup
Rooms & Exits Chapter 2 Level 22 Walkthrough: Print Shop
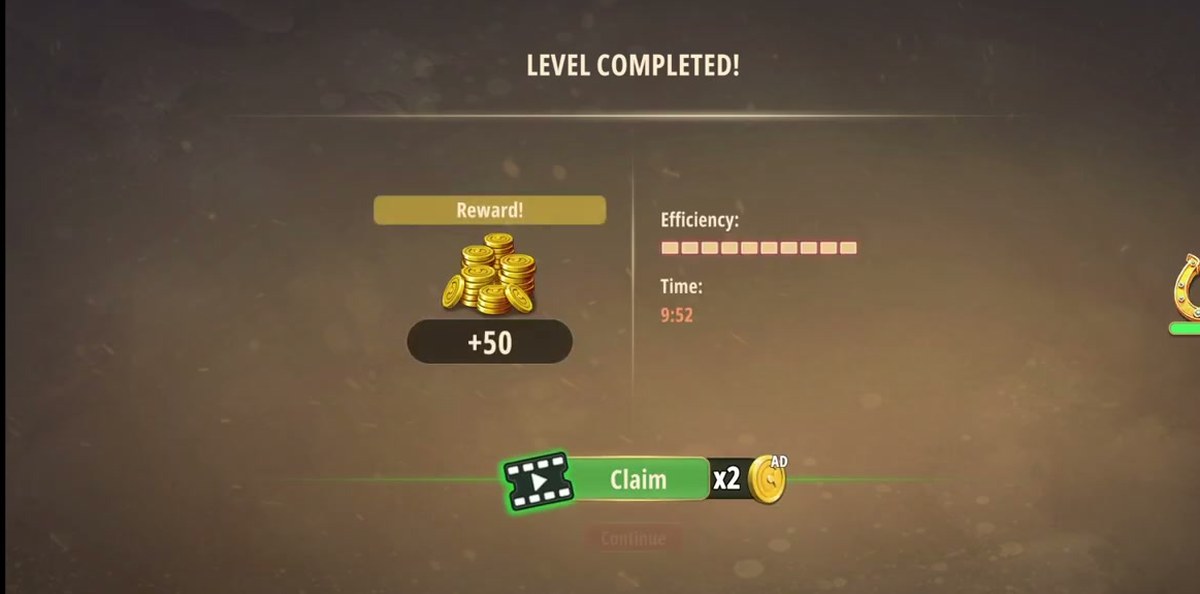
Print Shop is a chain of locks, and the numbers you need are 133951 for the till, 54 for the printing wheel, and then one of the six numbers on the sheet you print for the door. The exit is the grey-framed glass door on the back wall; its keypad refuses some of those numbers and accepts one, and it is not the same one every time — our three runs opened on 8, 18 and 24, so work through 8 · 13 · 18 · 24 · 39 · 54 until the door swings. Finish worth +50 coins.
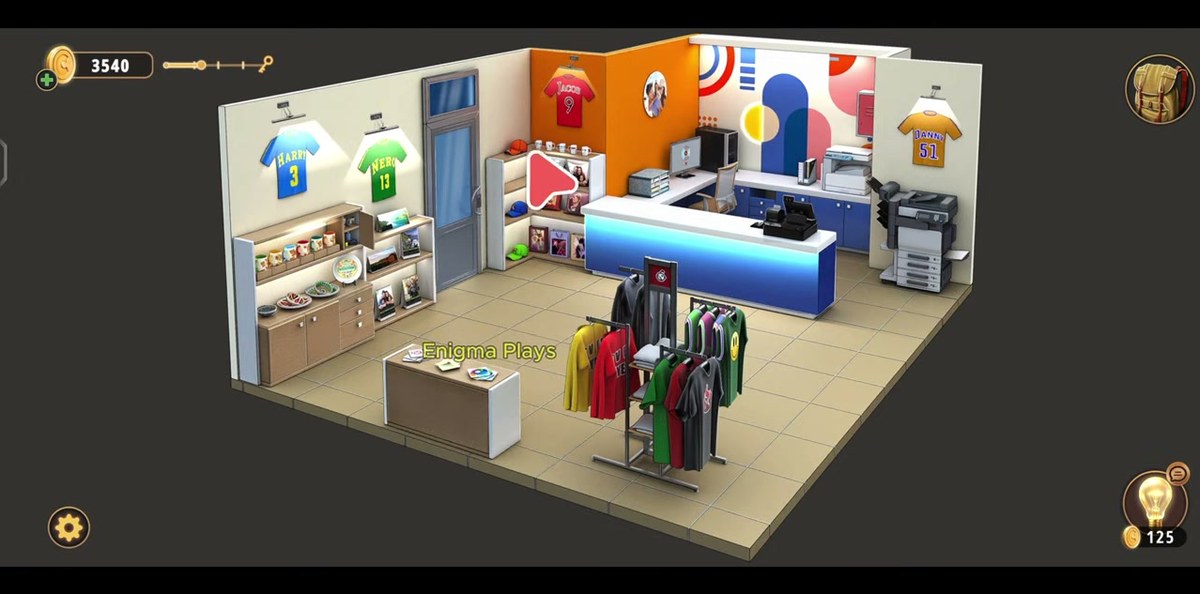
- Read the four jerseys: HARRY 3, NERO 13, JACOB 9, DANNY 51.
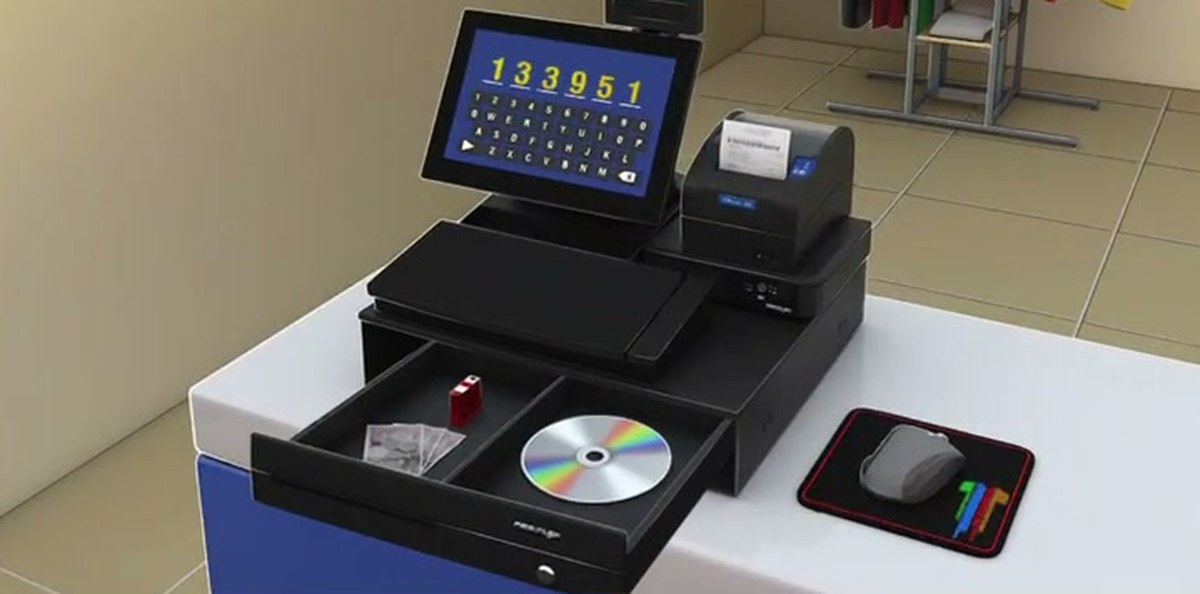
- Type the till code 133951 → cash drawer opens → take the CD.
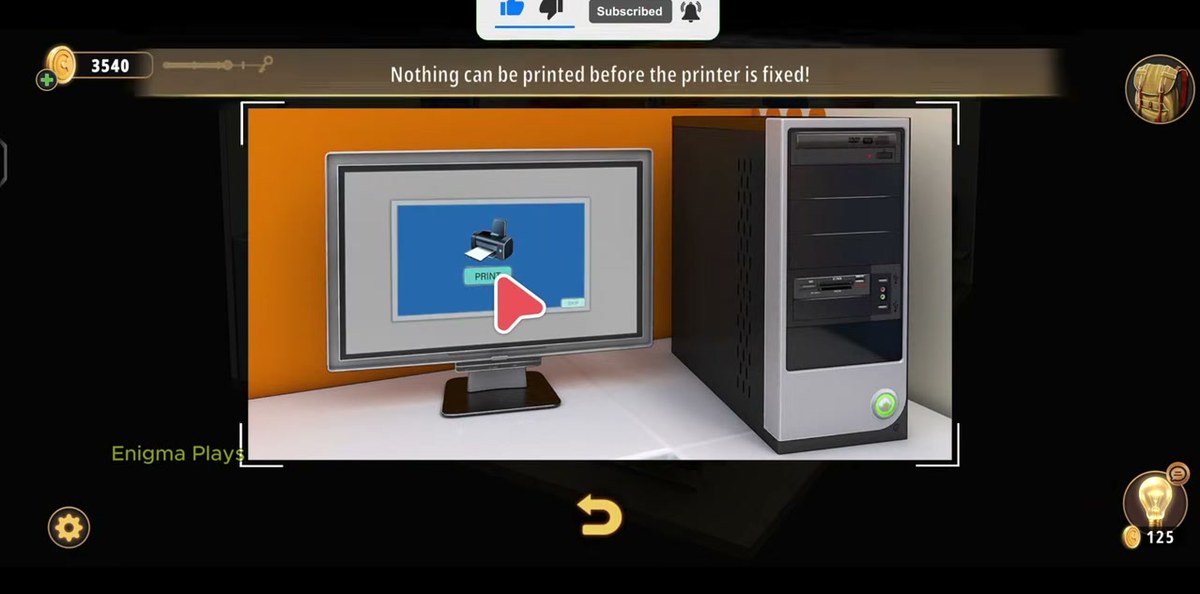
- Use the CD on the desktop tower beside the monitor (this produces Nothing can be printed before the printer is fixed! in one recording; our long run skips it).
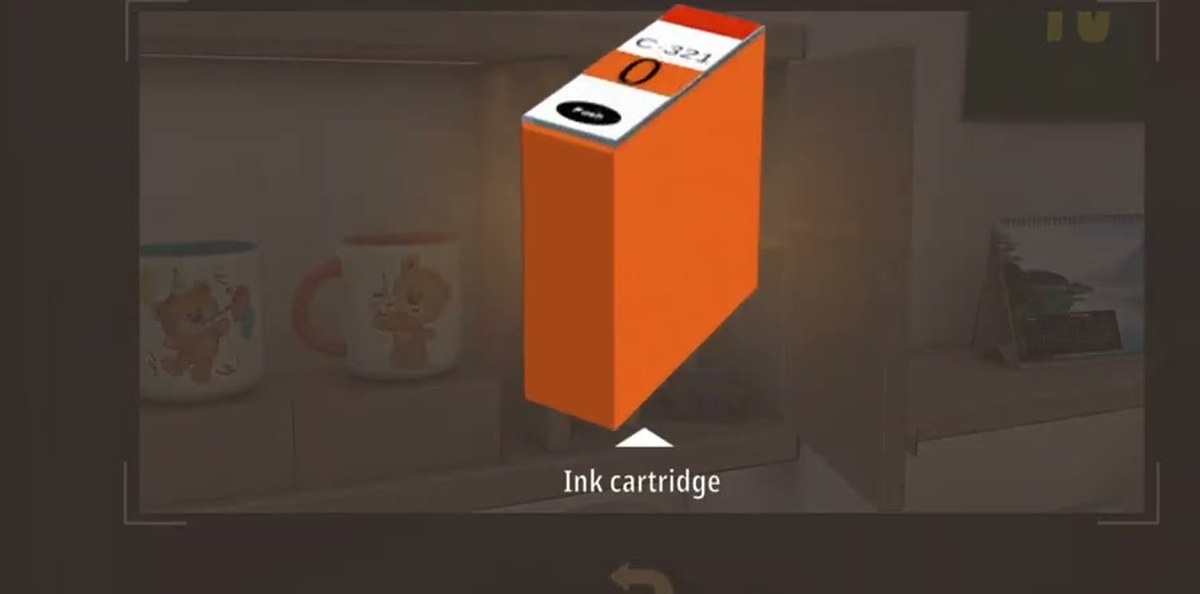
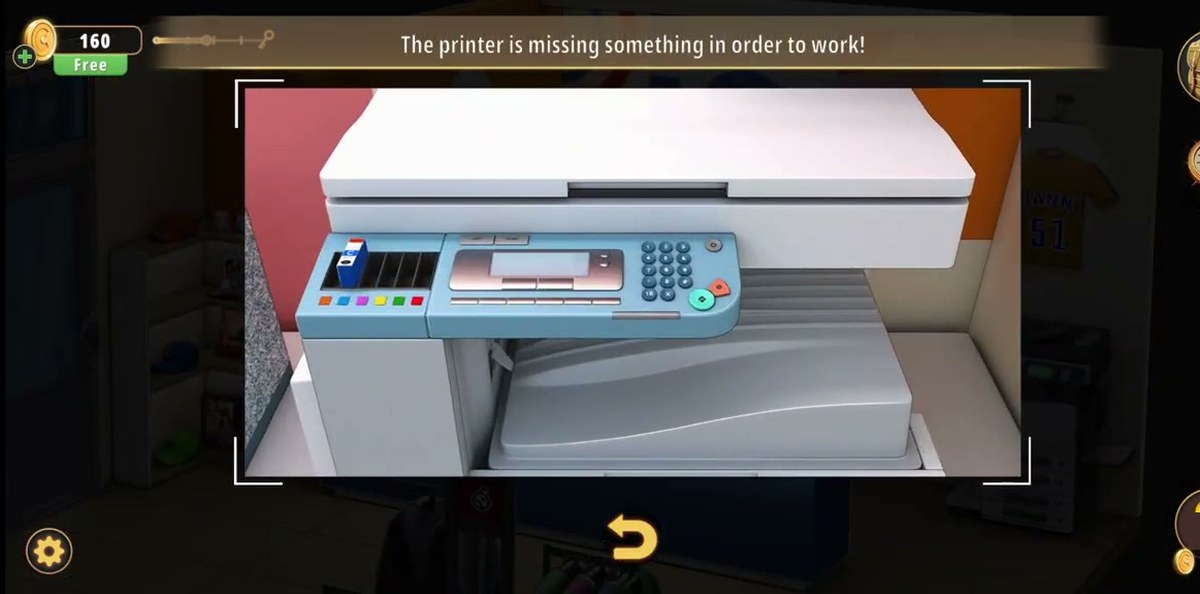
- Take an Ink cartridge (the first sits in the low cabinet under the left-hand mug display at 1:39) and use it on the big floor printer → The printer is missing something in order to work! clears.
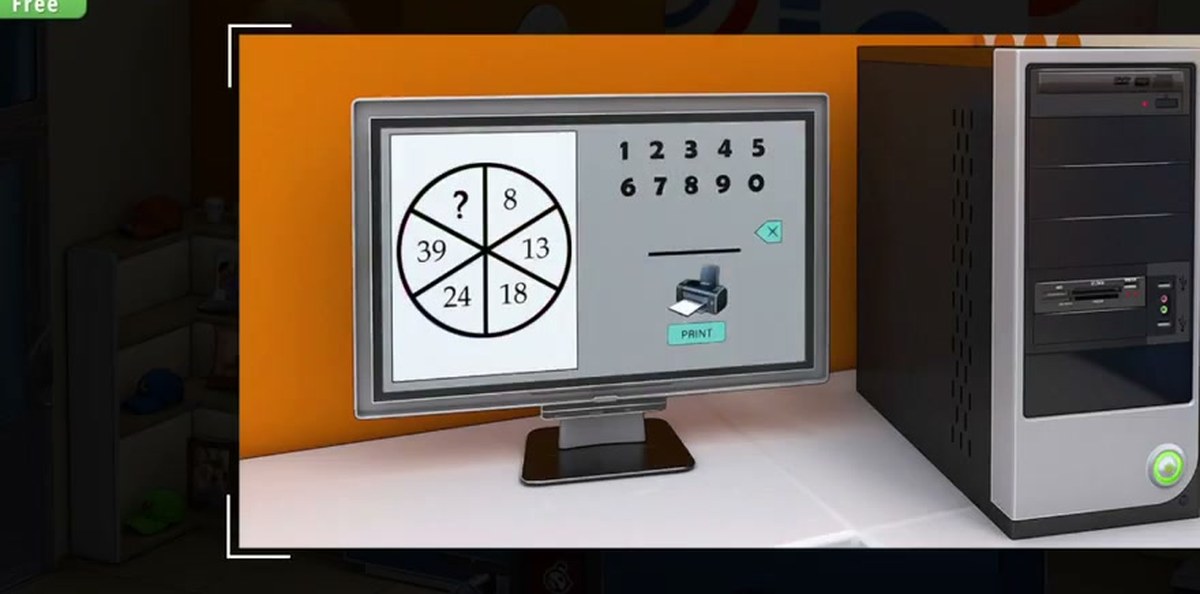
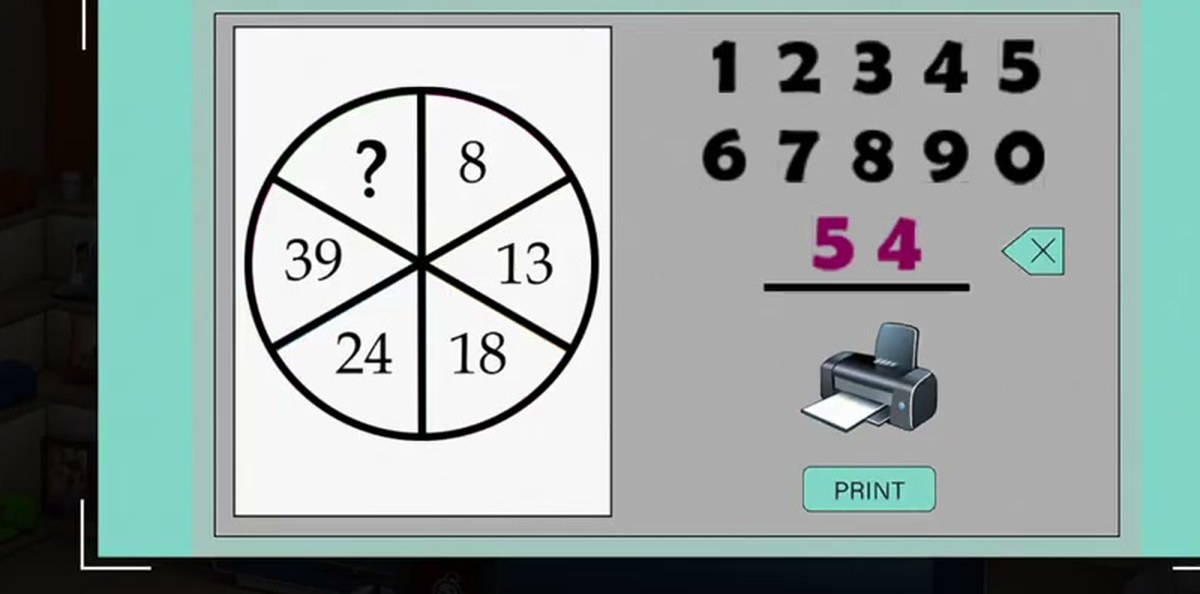
- On the monitor, solve the wheel: 8 · 13 · 18 · 24 · 39 · ? triple in opposite pairs → type 54 → PRINT.
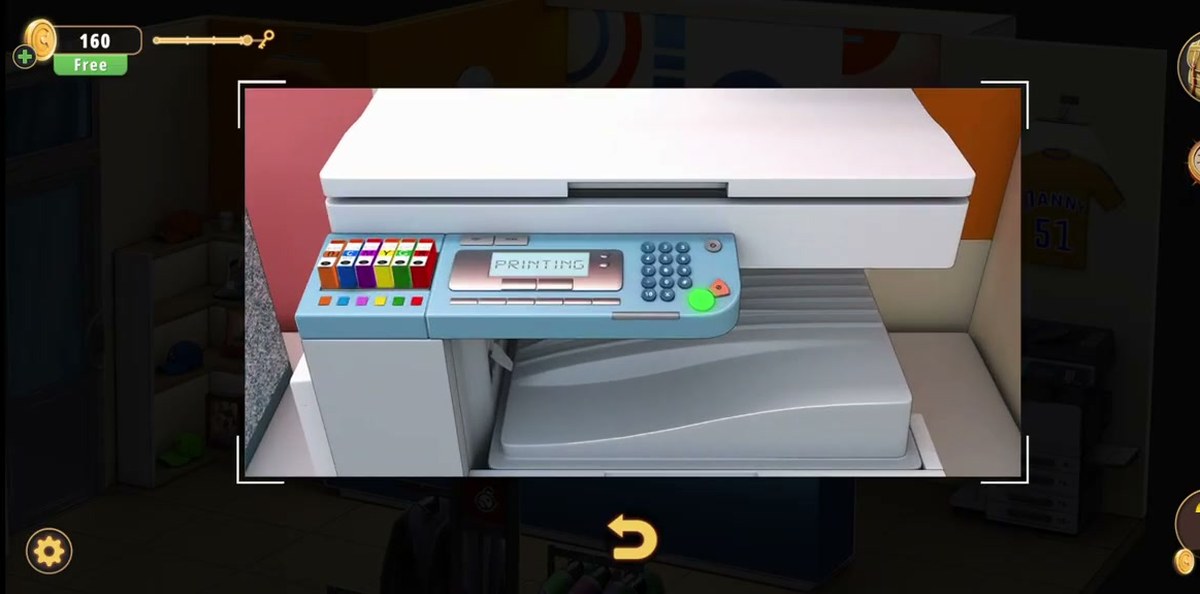
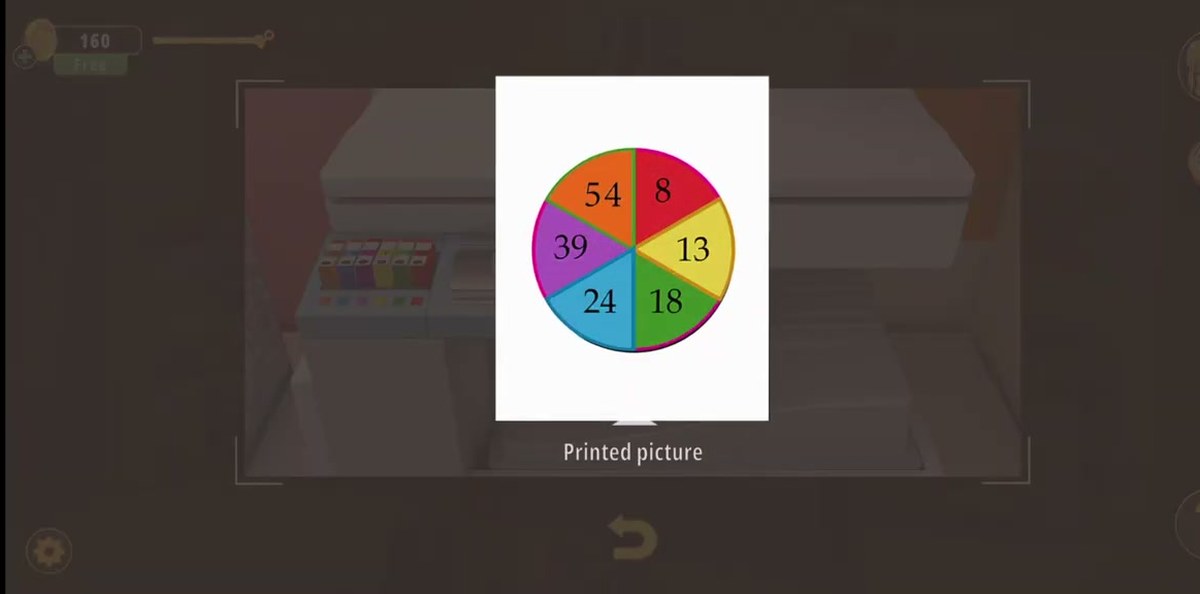
- Wait for PRINTING, then take the Printed picture from the bag.
- Tap the keypad on the glass door and type the numbers from the printed sheet until one is accepted — 8, 18 and 24 each worked in one of our runs → +50 coins.

What this level actually is.
The Print Shop is level 22 on the map and the level-select card files it as Very Hard — which is the right rating for the wrong reason. There is no single brutal puzzle here. What makes it heavy is that the room is a production line: every lock feeds the next one, and most of them are gated behind an object you have to carry from one end of the shop to the other. You cannot shortcut the till to get to the wheel, and you cannot print anything until the printer has ink.
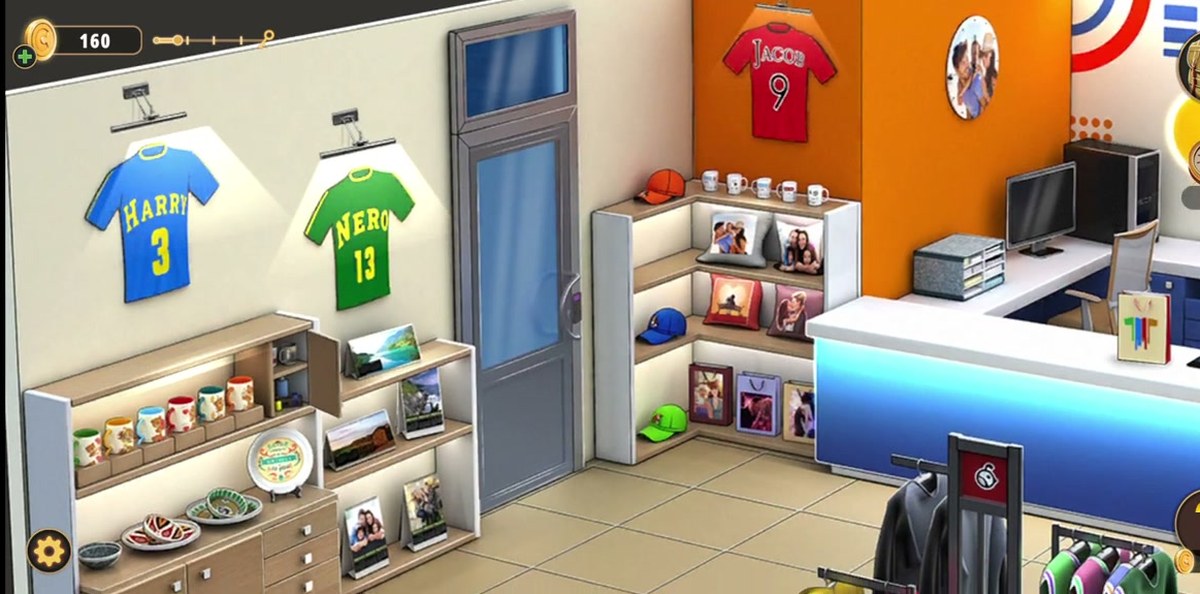
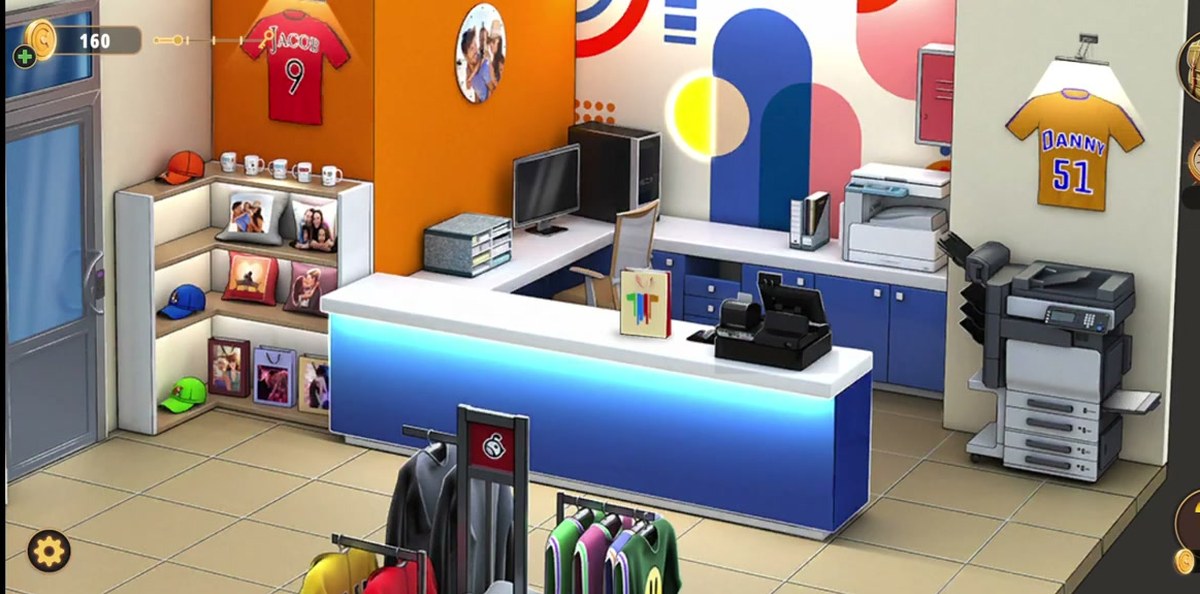
The fiction is a custom merchandise shop: jerseys printed with names and numbers, mugs and plates with cartoon bears, caps, framed photos, cushions, and two clothing racks of blanks in the foreground. The shop is one open isometric floor with a fixed camera. Along the back wall, left to right: a shelving unit stacked with mugs on top and plates below, with a low wooden cabinet underneath; the blue HARRY 3 jersey and the green NERO 13 jersey; the grey-framed glass door you eventually leave through; an orange accent corner holding the red JACOB 9 jersey, more mugs and caps; then the L-shaped service counter with two monitors, a desktop tower and a small white printer. On the right-hand wall hangs the yellow DANNY 51 jersey, and under it the big floor-standing copier that does the actual print job. Front of house is the blue-lit sales counter with the till, and two clothing racks sitting in the middle of the floor.
Everything you can see is either merchandise or a container, and the game is unusually strict about which is which. The mugs, plates, caps and cushions are scenery. The low cabinet, the till drawer, the desktop tower, the printer's cartridge bay and the shopping bag are the containers. Learning that split early saves you ten minutes of tapping crockery.
The map: what is where.
If you only read one part of this page, read this table. Every object in the Print Shop that does something, and what it does.
| Object | Where | What it gives you |
|---|---|---|
| Jerseys | Back wall and right wall | HARRY 3 (blue), NERO 13 (green), JACOB 9 (red), DANNY 51 (yellow). The digits for the till code. |
| Cash register | Front sales counter, centre | A touchscreen that opens a full QWERTY overlay. Takes the six-digit code and opens the drawer. |
| Cash drawer | Under the till | Clear bags, a small red object and the CD. |
| Desktop computer | Counter, under DANNY 51 | Monitor + tower. Takes the CD and shows the print-job warning — though one of our runs finishes without ever using the disc. |
| Big floor printer | Right wall, under DANNY 51 | Takes the ink cartridge. Its panel shows PRINTING and feeds out the sheet. |
| Low cabinet | Under the left-hand mug display | First Ink cartridge of the level. |
| Mug and plate shelves | Back-left wall | Scenery. Six mugs with coloured handles, plates below. Nothing to solve here. |
| Caps and cushions | Orange corner unit | Scenery. The caps are the same three colours as some jerseys and mean nothing. |
| Paper bag | Floor in front of the counter | The shop's branded bag — a container, not a clue. |
| Clothing racks | Centre of the floor | Blank shirts, front and centre. Scenery. |
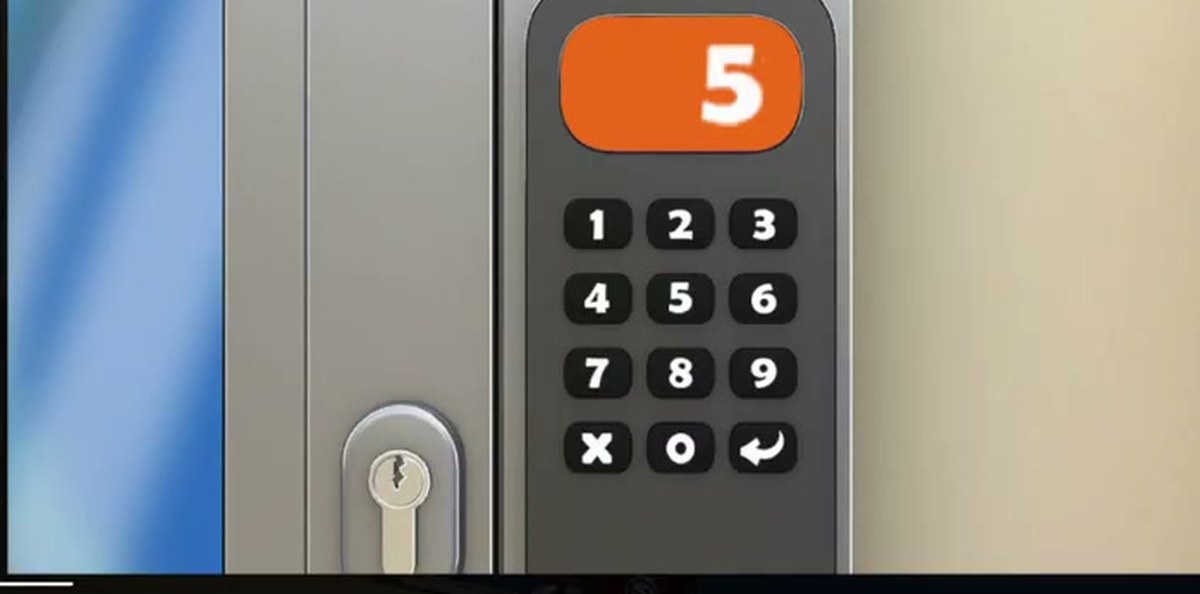
| Exit door | Back wall, beside NERO 13 | Grey frame, blue glass, 3×3 keypad and a keyhole below it. The keypad takes one number from the printed sheet — the way out. |
| Wall clock | Orange corner | A photo-face clock. Decorative. |
Step by step.
The timestamps below are the embedded run's clock, so you can scrub straight to the frame. The room's own timer sits about half a minute behind the video — the intro and the level card eat that — so do not be alarmed when the HUD and the video disagree by a few seconds.
The locks, and why order matters.
Print Shop is not a room with a puzzle in it; it is a chain of dependencies with a shop painted on top. Once you see it that way, the level stops being a hunt and becomes a checklist, and the checklist has an order because each step consumes the output of the one before it — with exactly one optional link in the middle.
- The jerseys feed the till. Four numbers on the wall — 3, 13, 9, 51 — become the six-digit till code 133951. Nothing else in the room produces those digits, and no other lock accepts letters or names, so the jerseys have exactly one consumer.
- The till feeds the CD. There is no other way into the cash drawer. The drawer is shut until the code lands, and the CD inside it is the only disc in the level.
- The CD feeds the computer — in one of our runs. In the 4:44 recording the disc goes into the tower's bay and the monitor answers with the struck-through printer and the print-job warning. In the long run the CD stays in the bag and the wheel appears anyway once the printer has ink, so we are not going to pretend this link is mandatory. It is the difference between knowing why the print job is blocked and simply unblocking it.
- The cartridge feeds the printer. The floor copier will not move until it has ink, and while it is dry the computer refuses to print. This is the one step that is easy to do out of order, because the cartridge is found in a cabinet on the opposite side of the room from both machines.
- The wheel feeds the printout. 54 on the monitor, PRINT, PRINTING on the panel, and the sheet lands on the printer's tray and goes into the bag.
- The printout feeds the door. This is the part most guides get wrong. The Printed picture is not a souvenir of the wheel puzzle — it is the door's code list, six numbers laid out on one sheet, and the keypad wants one of them. Which one is not fixed: our three runs opened with 8, 18 and 24, and 8 was refused outright in the run that opened with 24.
The practical consequence is that most "dead ends" in this level are steps attempted too early. The printer saying it is missing something is the cartridge step, not a separate puzzle; the wheel screen refusing to advance is the missing ink; the door rejecting a number is simply the wrong one of six. If you are stuck for more than five minutes in the Print Shop, the useful question is rarely "what is the code" — it is "which object is still sitting in my bag unused".
There is a second, subtler structure worth noticing: the level hands you the numbers before it hands you the locks. The jerseys are readable from the first second of the run, and the wheel is fully visible from 5:10 — nearly three minutes before the recording types 54. This is a game that expects you to write things down, and the ending makes that literal: the door code is a number you are holding on a piece of paper. Anyone playing without a notepad ends up walking the floor twice, and the route between the till, the computer and the copier is the longest walk in the shop.
The wheel: how 8, 13, 18, 24, 39 give you 54.
The wheel is the only genuine puzzle in the Print Shop, and it is gentler than it looks. Six slices, five numbers, one question mark, laid out so that each number has a partner directly across the circle. Read the pairs rather than the sequence and the rule falls out immediately:
- 8 sits opposite 24, and 8 × 3 = 24.
- 13 sits opposite 39, and 13 × 3 = 39.
- 18 sits opposite the question mark, so the blank is 18 × 3 = 54.
Two independent pairs is enough to fix a single rule, and the third pair confirms it: this is not a sequence puzzle where you have to guess whether the step is +5 or +6, it is a pairing puzzle where the same operation has to hold twice before you commit. That is also why the numbers look scrambled going round the circle — 8, 13, 18, 24, 39 is not an arithmetic series in order, and players who try to read it clockwise as one sequence spend a long time on differences that do not matter.
The answer is confirmed twice over in our footage. In the full run the value 54 is typed at 8:02 and the copier reports PRINTING at 8:36; in the second recording the same 54 goes in and the same PRINTING follows within seconds. The sheet afterwards does double duty: it shows the whole wheel with the blank filled in, so you can check your own answer, and it is the list you take to the door. One puzzle, two uses, which is a tidier bit of design than it first looks.
One detail that trips people up: the keypad on the monitor is not a phone pad. It is two rows of five, 1 2 3 4 5 on top and 6 7 8 9 0 underneath, so the digits of 54 are not where your thumb expects them. The input line sits between the keypad and the PRINT button, and the X beside it clears the field — useful, because there is no backspace on this pad and a mistyped first digit otherwise means cancelling out of the whole screen and starting again.
The exit door: the sheet is the code list.
The way out is the grey-framed door on the back wall with the tall blue glass panel. It carries a 3×3 keypad with an LCD on the frame — 1 to 9 in three rows, then X, 0 and a return arrow — and a keyhole in an oval plate directly underneath. The keypad is the lock that ends the level, and the clue for it is the thing you just printed.
Here is what three different players typed, and what happened. In the full run: 54 at 9:58, which clears the display and does nothing; 39 at 10:17, which turns the LCD red and clears it; then 8 at 10:23, which opens the door at 10:24. In the 2:55 recording: 54 at 2:29, red and cleared; 8 at 2:37, which flashes green; then 18 at 2:44, which opens the door. In the 4:44 recording: 8 at 4:20, red and cleared; 392 at 4:32, wrong and cleared; then 24 at 4:35, which opens the door.
Three runs, three different accepted values — 8, 18, 24 — and every one of them is one of the six numbers printed on the sheet in your bag. The rejected entries are instructive too: 54 is refused in the full run and in the 2:55 run, 39 is refused in the full run, and 8 is refused in the 4:44 run but accepted in the full run. A code that is right in one recording and wrong in another is not a code, it is a random draw. The door picks one of the six slices and you have to find which.
So the ending is a short brute force, and the sheet is the list to brute force from. Type 8, then 13, then 18, then 24, then 39, then 54, clearing with X between attempts, until the door swings. The panel tells you which attempt failed: a rejected number turns the LCD red, and the run that opened on 18 saw 8 flash green on the way in, so the display is not purely binary. The door opening is unmissable either way, because the camera drops straight back to the shop floor. In our three runs it never took more than three attempts, but that is luck rather than a rule: any of the six can be the answer on a given playthrough.
One more thing worth knowing before you get here: the level will not open the door until the Printed picture is actually in your inventory, not merely sitting on the printer's output tray. In the full run the sheet is collected at 9:26 and the door is opened at 10:24; in the 2:55 run the sheet is collected at 2:16 and the door opens at 2:45. If you have tried all six numbers and nothing works, check the bag first — you may be typing at a door that has not been armed yet.
The keyhole is still a loose end. There is an oval lock plate under the keypad in every run, and in none of them is there a key in it or a key picked up anywhere on camera — the level finishes on the keypad number alone. Whatever the cylinder is for, it is not part of the solution we recorded.
Where people get stuck.
- The till code order. The wall reads HARRY 3, NERO 13, JACOB 9, DANNY 51, so the natural entry is 313951 — and it is rejected. The working code is 133951, which leads with NERO's 13. This page cannot explain why 13 comes first: alphabetical order by name (DANNY, HARRY, JACOB, NERO) gives 513913, shirt-colour order gives the wall order, ascending gives 391351 and descending gives 511393, and none of them is 133951. Treat the code as the answer and the derivation as the level's one piece of unexplained design.
- Typing digits on a QWERTY. The till's overlay is a computer keyboard, not a number pad. The digits live on the top row, and the number row is small on a phone screen. Two of the three recordings fumble here — one of them types 313951 first and has to clear the field.
- Using the CD on the printer. The disc belongs in the desktop tower, not the copier, and the two machines sit on opposite sides of the room with drive-like slots on both. Our long run never uses the CD at all and still finishes, so if the monitor stays black when you Use it, you have not broken anything — go and put ink in the printer instead.
- Ignoring the cabinet. The first ink cartridge is in the low cabinet under the mug shelves, which reads as display furniture rather than storage. Players who skip it reach the printer, get the "missing something" banner, and go looking for a code instead of a consumable.
- Treating the wheel as a sequence. Read clockwise, 8, 13, 18, 24, 39 looks like it is building towards something and then breaks at the jump to 39. It is not a series; it is three pairs across the circle. Count the differences and you will be there for the full three minutes the reference run spends on this screen.
- Typing one door number and quitting. The keypad on the exit door is where most of the frustration in this level lives, and it is not because the code is hard. It is because there are six candidates and no pointer. All three of our recordings type at least one number that turns the LCD red. If the door does not move, try the next number from the sheet — do not go looking for a seventh clue, because there is not one.
- Assembling the six numbers into one long code. A very natural mistake given that the till code is a concatenation: type 81318243954, or 8-13-18-24-39-54 in some order, and watch it fail. The door wants a single number from the sheet, not the sheet as a sequence. In our footage the accepted entries are 8, 18 and 24 — one, two and three digits respectively.
- Arriving at the door without the sheet. The keypad is dead until the Printed picture is in your inventory. It is not enough that the printer has finished; you have to open the tray output and take it. If every number fails, that is the first thing to check.
- Assuming the mugs matter. Six mugs with coloured handles on the back-left shelves, in the same colour families as the jerseys, sitting directly above the cabinet that holds a cartridge — they look like a colour-order puzzle and they are not. Our run spends nearly a minute tapping around that shelf, and nothing there changes state.
Chapter 2 levels.
Chapter 2 keeps going past this room; the list below reflects what is written up so far.
- 1 Cell Phone Store guide
- 2 Cinemas guide
- 3 Pharmacy guide
- 4 Optical Store guide
- 5 Gym guide
- 6 Candy Shop guide
- 7 Food Court guide
- 8 Pet Shop guide
- 9 Indoor Playground guide
- 10 Restaurant guide
- 11 DIY Shop guide
- 12 Jewelry Store guide
- 13 Grocery Store guide
- 14 Exchange Office guide
- 15 Fashion Store guide
- 16 Art Supplies Store guide
- 17 Shoe Store guide
- 18 Sports Store guide
- 19 Bookstore guide
- 20 Furniture Store guide
- 21 Household Appliances guide
- 22 Print Shop you are here
- 23 Bakery guide
- 24 Toy Store guide
- 25 Restroom guide
- 26 Parking guide
FAQ.
What is the code for the cash register in Rooms & Exits Chapter 2 Level 22?
Type 133951 on the register's touchscreen. The digits are the four jersey numbers hanging around the shop — HARRY 3, NERO 13, JACOB 9, DANNY 51 — read as 13 · 3 · 9 · 51. Our two full recordings of the current build both end with 133951 on the register display, and both open the cash drawer and hand over the CD. The wall's left-to-right order, 313951, is typed on screen at 3:00 in our long run and rejected — the field clears and the drawer stays shut — so do not just copy the jerseys in the order they hang.
Where does the CD come from?
The cash drawer under the register. Once 133951 is accepted the drawer slides open and holds three things: a stack of small clear bags on the left, a small red object in the middle and a single iridescent CD on the right. The CD is the only one you need; tap it and it goes into the bag as CD.
What do I do with the CD?
Use it on the desktop computer, not the printer. The PC sits on the L-shaped counter under the yellow DANNY 51 jersey, with a tower beside the monitor. Put the CD in the tower and the monitor changes to a printer icon with a red cross and the line Nothing can be printed before the printer is fixed! That message is the level telling you the print job exists but the hardware is not ready yet.
Why does the big printer say it is missing something?
Because it has no ink. Tap the floor-standing printer on the right-hand wall and it reports The printer is missing something in order to work! Select an Ink cartridge in the inventory, press Use, and tap the printer: the cartridge goes in, the panel lights up with its colour rows and the print job unlocks. The cartridge itself is a fat orange block with a small code printed on the side; the first one in our run comes out of the low cabinet under the left-hand mug and plate display at 1:39.
What is the answer to the six-segment wheel?
54. The wheel on the computer monitor carries 8, 13, 18, 24, 39 and one question mark, and the numbers sit in opposite pairs that triple: 8 × 3 = 24 and 13 × 3 = 39, so 18 × 3 = 54. Type 54 on the monitor's two-row keypad (1 2 3 4 5 over 6 7 8 9 0) and press PRINT — the field does not submit itself. Both of our full recordings type 54 and both get PRINTING on the copier within seconds.
How do I get the Printed picture?
Solve the wheel, press PRINT, then wait for the floor printer to finish. Its panel reads PRINTING and a sheet lands on the output tray; collect it and the item is in your bag as Printed picture — a six-slice colour wheel with 8, 13, 18, 24, 39 and 54 printed into the slices. Do not skip the pickup: the exit keypad stays dead until the sheet is in your inventory, and the sheet itself is the door's code list.
What is the door code in the Print Shop?
There is no single door code. The exit keypad wants one of the six numbers printed on the Printed picture — 8, 13, 18, 24, 39 or 54 — and which one it accepts changes between playthroughs: our three recordings opened on 8, 18 and 24, and 8 was refused outright in the run that opened on 24. Type them one at a time, clearing with the X key between attempts, until the door swings. It is a single number each time, not the six run together, and the keypad does nothing at all until the sheet is in your bag.
Is there a key in Level 22?
There is a keyhole — an oval lock plate under the exit keypad — but we never see a key in it or a key being picked up in any of the three recordings, and every run finishes on the keypad code alone. So no, you do not need to hunt for a key to leave the Print Shop. If a key exists in this level, it is not what opens this door.
How long does the Print Shop take, and what does it pay?
Two of our three recordings end on the same results screen: +50 coins under Reward and 9:52 on the results clock in the full run. The third, a 2:55 run of the same shop, shows a different panel — a +5 efficiency figure and no coin reward — which we treat as a build difference rather than a level rule. Nothing is timed and there is no fail state — the clock is scoring, not pressure — so the only things that really cost you minutes are typing the till code in the wrong order and working through six door candidates at the end.
What difficulty is Chapter 2 Level 22?
The level-select card lists Level 22: Print Shop as Very Hard, inside the Chapter 2 block No Honor Among Thieves. That rating is about the number of separate locks rather than any one hard puzzle: a till code, a CD, a cartridge, a wheel and a door, and every one of them gates the next.
Next room in the chapter: Chapter 2, Level 23 — Bakery →
What this page could not verify
1. How the exit door picks its number. The keypad accepts one number from the printed sheet, and it is a different one in each recording: 8 in the full run, 18 in the 2:55 run, 24 in the 4:44 run — with 8 refused outright in the run that took 24. That is enough to rule out a fixed code, but not enough to say whether the game draws at random, keys the answer to something in the room we have not identified, or varies by build. What we can say is that all three accepted values appear on the sheet, that a rejected entry turns the LCD red, and that six attempts cover every candidate we have ever seen accepted.
2. Why the till code starts with 13. The digits are the four jersey numbers and the accepted order is 13 · 3 · 9 · 51, but no ordering rule we tested reproduces it. The code itself is solid — read twice, in two different videos — but the logic behind the order is not something this page can explain.
3. How many ink cartridges the printer wants. We see four separate cartridge pickups in the full run (1:39, 2:10, 4:04 and 4:39) and two in the 4:44 recording, and the printer's panel has a full row of colour swatches rather than one slot. Whether the machine needs one cartridge or several before it wakes up, we could not confirm: in every run the panel lights up on the first Use we can see clearly, and the inventory count is ambiguous because it doubles as the bag's slot counter.
4. The keyhole. Every recording shows an oval keyhole plate under the exit keypad; none shows a key in it, and none shows a key being picked up. The level finishes on the keypad number alone in all three runs. What the cylinder is for remains unexplained — it may be that the game simply reuses a door prop that normally takes a key.
5. One reward panel we cannot reconcile. Two recordings end on the same results screen — +50 coins, nine of ten efficiency segments, Time: 9:52 in the full run. A third, 2:55 recording of the same shop, clearly made on a different build or account, ends on a panel with an efficiency figure of +5, no coin reward and a piggy-bank prompt. We could not establish what separates the two, so the page quotes the +50 that two independent runs agree on and treats the 2:55 panel as an outlier.
6. The mug shelf. Six mugs, six handle colours, a cabinet underneath holding a cartridge. Our long run spends 48 seconds on that shelf and the frames show no reliable state change — brightness shifts on individual mugs are consistent with a hover highlight following the finger, not with a solved puzzle. If the mugs are a puzzle, we could not read its rule.
7. Whether the CD is required at all. The 4:44 recording puts the CD in the desktop tower and gets the print-job warning; our long run never uses it and reaches the same wheel and the same printout. Two recordings, two behaviours, and no third run that settles it — so the page presents the CD as the safe move and not as a gate.
Everything else on this page — the four jersey numbers, 133951 on the till display, the CD in the open drawer, both warning lines, the six wheel numbers, 54, PRINTING, the six numbers on the printed sheet, +50 and 9:52 — was read off the screen at least twice, from at least two different recordings where the number mattered.