 GridPaw
 Shikaku
 Akari
 Kakuro
 Nonogram
 Nurikabe
 Pictomino
 KenKen
 Binary
 Star Battle
 Hashi
 Slitherlink
 Murder Sudoku
 Meowdoku
 Crazy Cleanup
Rooms & Exits Chapter 2 Level 18 Walkthrough: Sports Store
The Sports Store is a shop, a gym and a billiards corner in one open floor, and it hides both of its codes in plain sight — seven cap colours on a wall for the till, five numbered billiard balls for the exit. Read it in the order the room wants: sweep the floor for tools, build the drill, read the caps, then walk to the back and count the balls. The whole run is under nine minutes if you know where to look, and most of that time is a sliding-block puzzle you do not actually need.
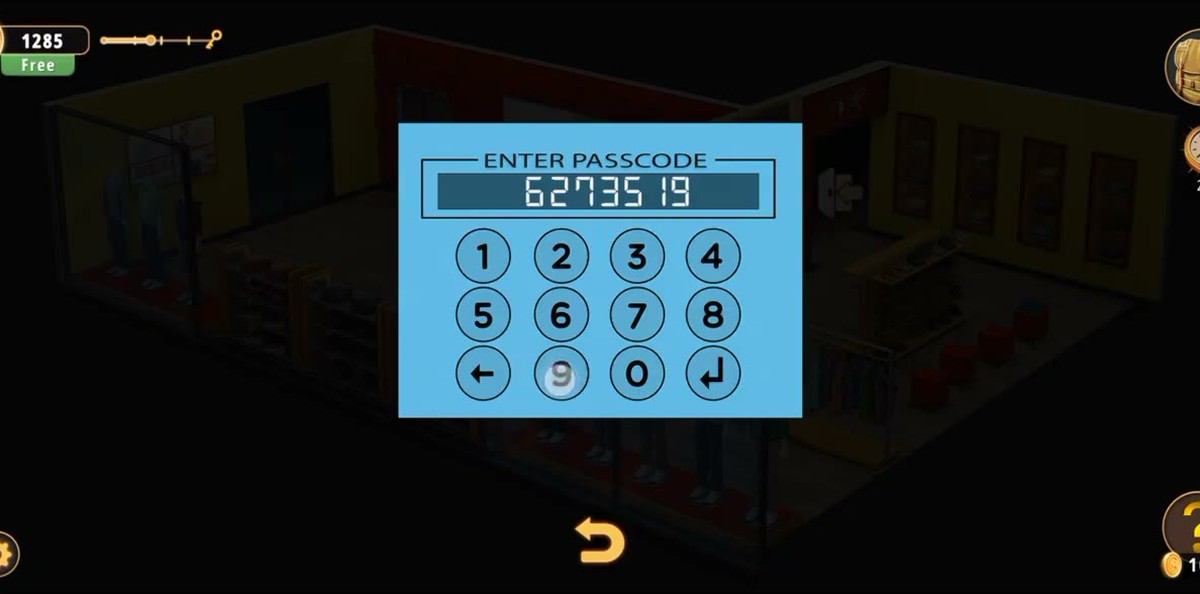
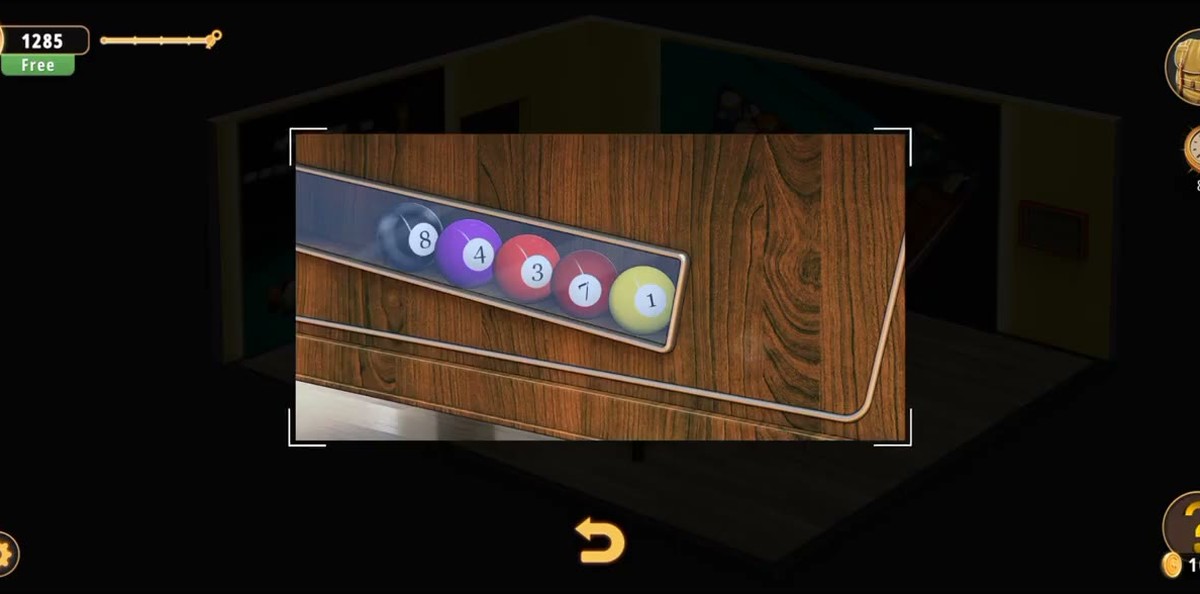
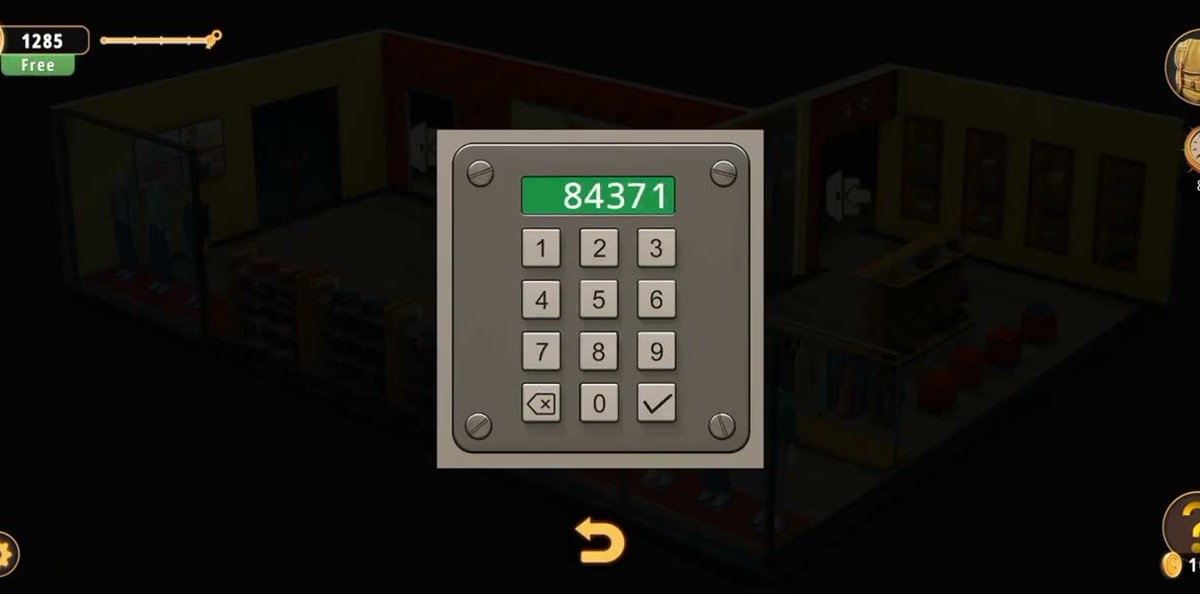
The exit keypad takes 84371, read straight off the five billiard balls in the glass display beside it — 8 · 4 · 3 · 7 · 1. The till on the shop floor takes 6273519, built from the seven cap colours on the wall. Finish pays +5 coins with the clock at 8:39.
- Take the loose gear on the floor: Football, Fastening tool, Screw, Billiard balls. Combine the tool and the bit, then the screw, into a Fastening tool with a screw.
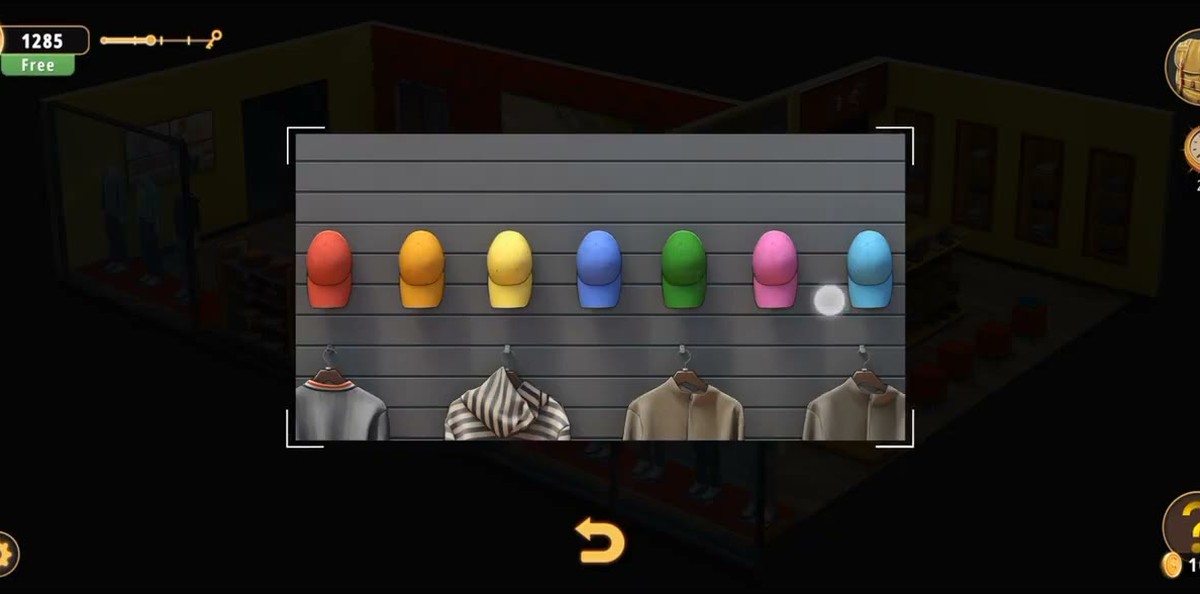
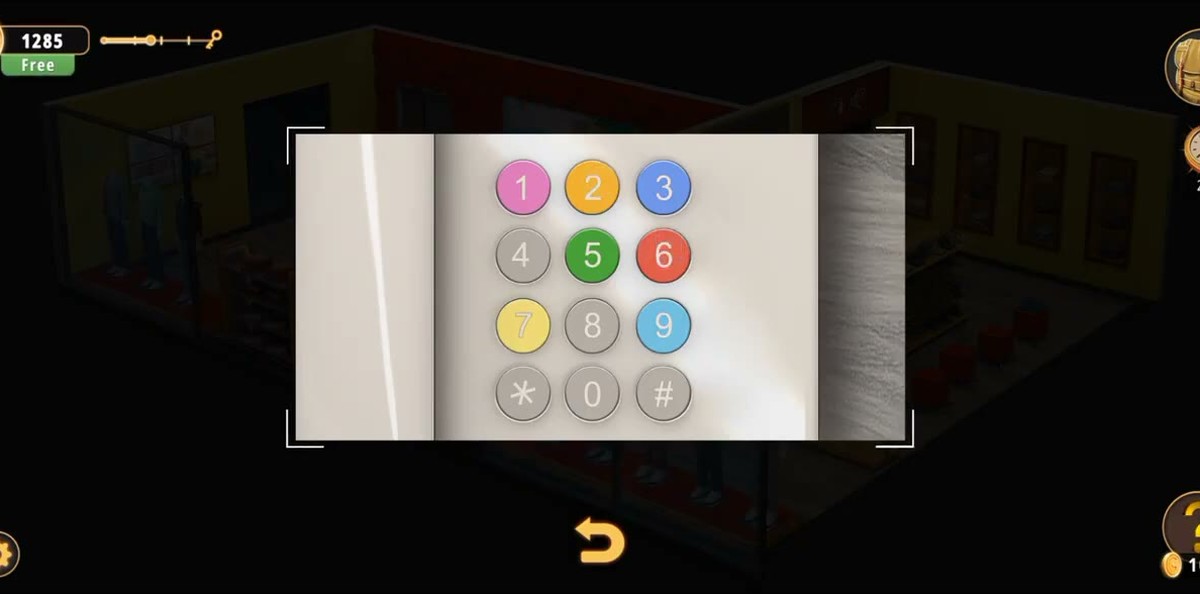
- Read the seven caps on the slatwall (red, orange, yellow, blue, green, pink, pale blue) and press the same colours on the keypad beside the counter → 6273519.
- Type the code into the checkout monitor's ENTER PASSCODE screen; the counter pays out its blue "done" screen.
- Clear the gym slide puzzle (a scrambled picture with one empty square) → Key. Cut the last billiard ball out of the punching bag base with the Knife (counter 5/6 → 6/6).
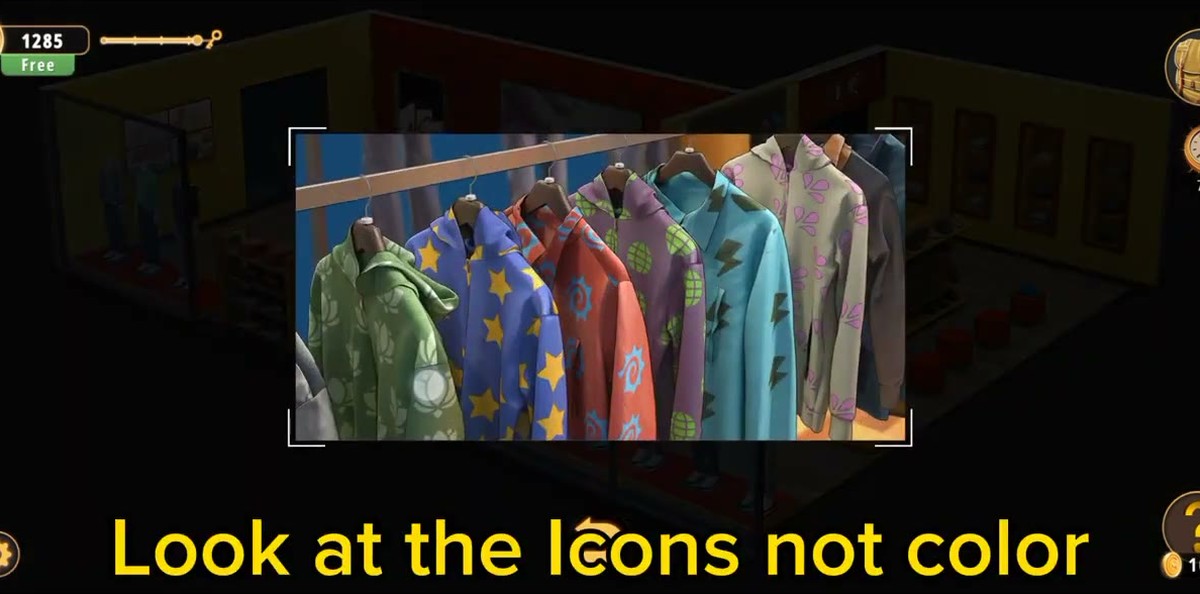
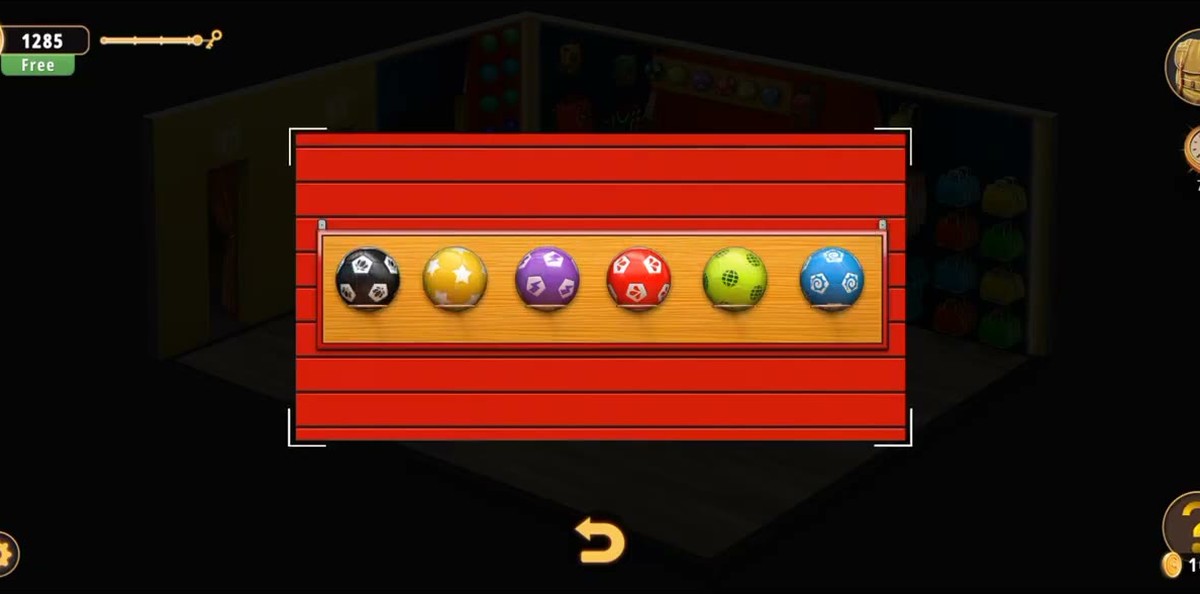
- Match the hoodie icons to the six icon balls — "Look at the icons not colour" is the game's own hint — and deal with the bottle colour order.
- Read the five billiard balls in the display: 8 · 4 · 3 · 7 · 1. Type 84371 into the keypad on the same stand, press the green tick, and walk out.

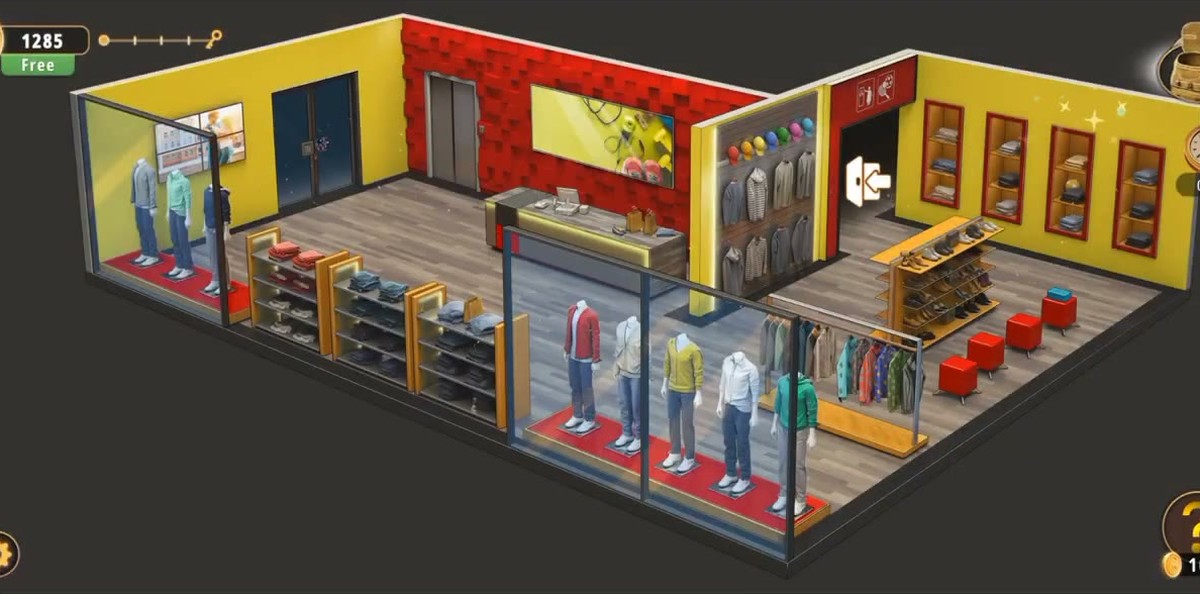
What this level actually is.
The Sports Store is the eighteenth room of Chapter 2, and it is the first room in the chapter that behaves like a shop rather than a corridor. Instead of one locked box in the middle of the floor, you get a working retail space: a window full of mannequins, a checkout counter with a live till, a cap display on a partition wall, a shoe wall, a gym bolted onto the back of the shop and a billiards corner in the last stretch by the exit. The camera is isometric and fixed. There are no corridors, no loading breaks and no way to get lost — which is exactly why people stall here, because nothing funnels you toward the object that matters.
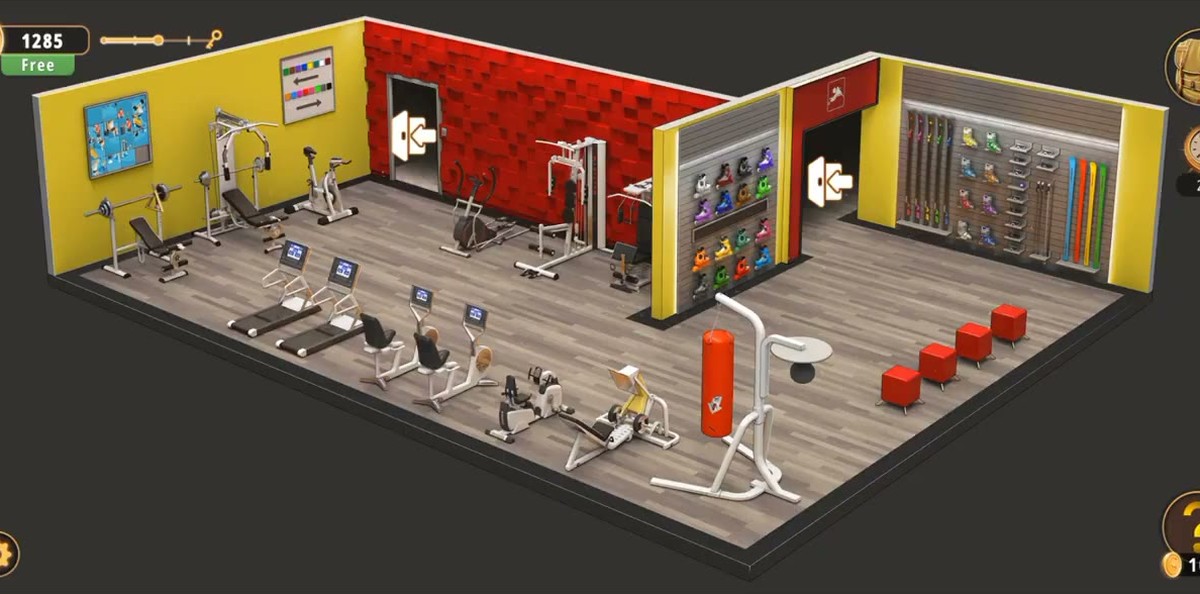
The room is laid out in one open plan. Front left: the shop window, with five mannequins on red plinths and a glass partition that you can see straight through. Left wall: folded stock on wooden shelves, then the checkout desk under the textured red wall, with a monitor, a keyboard, a receipt printer, a barcode scanner and a white telephone, with the twelve-key pad mounted on the wall beside the desk. Right of the desk: a yellow partition carrying the cap rack at the top and folded hoodies underneath. Behind that partition: the fitting-room doorway with a white arrow over it. Far right: a tall shoe rack in yellow and wood, four red stools, and four recessed display niches. Back: the gym, which is a whole second room stitched onto the shop — benches, treadmills, an elliptical, two cable machines, a punching bag on a stand, and a square picture panel on the wall. Then the billiards corner: a pool table with a rack, a display stand with a glass-fronted ball case, the exit keypad bolted to the same stand, and the shop's double doors.
Three things about the shape of this level are worth understanding before you touch anything. First, the shop floor is dense with pickups and almost none of them are locked: the football, the drill, the screw and the first billiard balls are all just lying there, and every one of them is either a tool, a component or a counter that ticks up. Second, the level is a chain of small locks, not one big one — the till, the gym panel, the icon puzzle, the bottles and finally the exit keypad — and each one hands you something the next one wants. Third, the exit code is not hidden: it is printed, in billiard balls, on the stand the keypad is screwed to. People miss it because they read the balls as decoration.
The map: what is where.
If you only read one part of this page, read this. Every interactive object in the Sports Store, and what it is actually for.
| Object | Where | What it gives you |
|---|---|---|
| Loose gear on the floor | Shop floor, front half | Football, Fastening tool and Screw in the first twenty seconds, then a scatter of Billiard balls. |
| Colour keypad | Wall panel beside the checkout counter | Twelve round keys, seven of them coloured. The cap colours are pressed here. |
| Checkout monitor | Checkout desk | The blue ENTER PASSCODE screen. Takes 6273519. |
| Cap rack | Yellow partition, above the hoodies | Seven caps in a fixed left-to-right colour order: the source of the till code. |
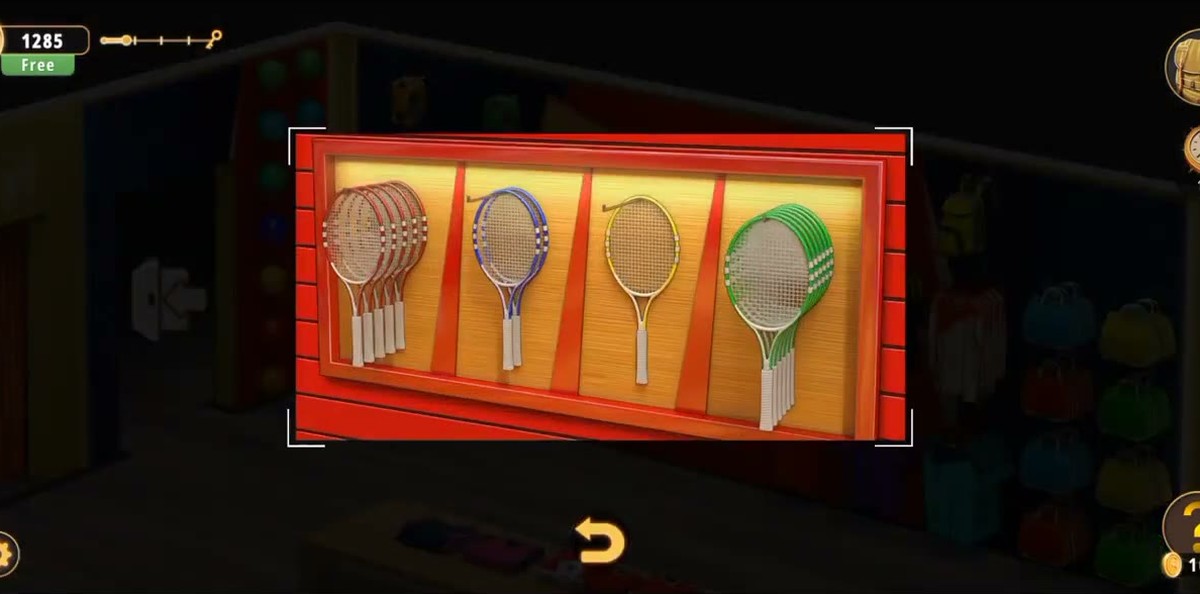
| Tennis racket bays | Shop floor, near the shoe wall | Four bays of rackets in red, blue, yellow and green — the count behind the four-dial panel. |
| Four-dial panel | Shop floor, wall-mounted | Four coloured dials and dot rows. Settled on 5216 in our second recording only. |
| Gym picture panel | Gym, back wall | Sliding-block puzzle of a gym scene with one empty square → Key. |
| Punching bag | Gym, on a weighted base | The Knife cuts a billiard ball out of the base. Takes the counter to 6/6. |
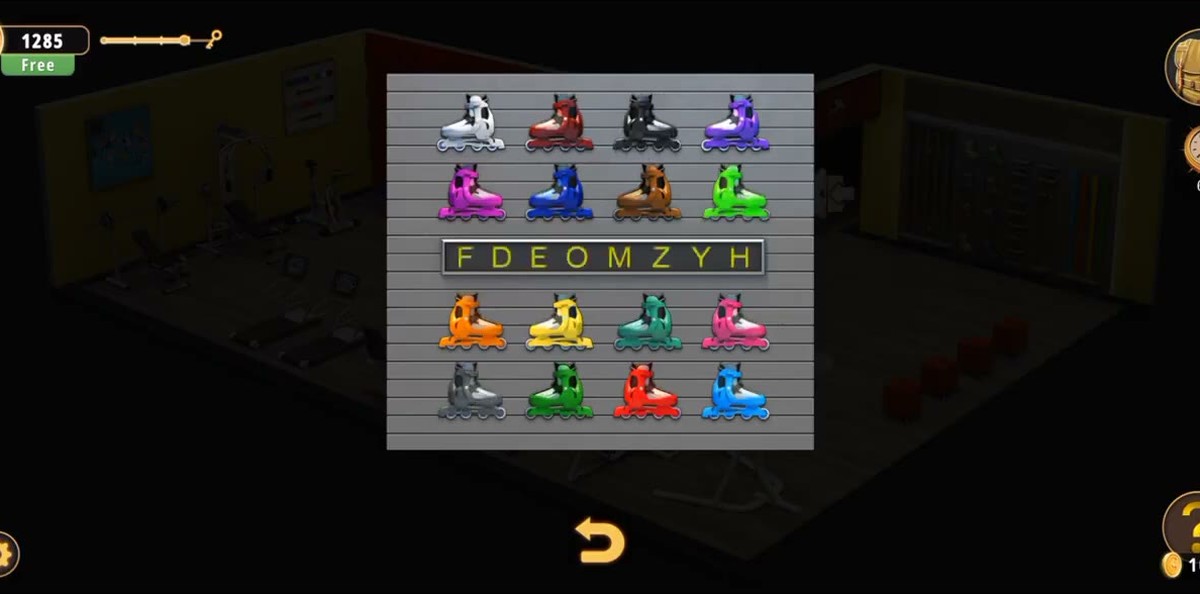
| Skate display | Gym wall, sales side | Sixteen inline skates in four rows of four, with an eight-letter strip FDEOMZYH above them. |
| Hoodie rack | Yellow partition, under the caps | Seven patterned hoodies: the icon reference for the ball puzzle. |
| Icon balls | Red-striped case, billiards corner | Six sports balls, each printed with an icon instead of a number. |
| Bottle shelf | Shop floor, near the counters | Coloured bottles that need ordering. The game's hint reads "Follow the colors to order Bottels". |
| Ball display | Billiards corner, wooden stand | Five billiard balls in a row: 8 · 4 · 3 · 7 · 1. This is the exit code. |
| Exit keypad | Bolted to the ball-display stand | Five-digit grey keypad with a green display. Takes 84371. |
| Double doors | Front of the shop | The way out. Opens once the keypad accepts the code. |
Step by step.
The one lock we can only half vouch for.
Between 1:09 and 1:22, on the shop floor near the shoe wall, there are two objects that belong together and that our two recordings treat differently. The first is a red-framed rack with four bays, each holding tennis rackets in a single colourway — red and white, blue and white, yellow and white, green and white. The second is a wall panel with four coloured columns, each carrying a dial and a row of six indicator dots; the panels are identical in shape to the dot-and-dial puzzle our first recording opens at 1:19 and abandons without finishing.
What we can say with confidence is the rule, because our second recording buys the game's own hint for it: "Count the courts". You count the rackets in each of the four bays, one count per colour, and set the four dials to those four counts. What we cannot say with confidence is the four-digit answer as a constant, because only one of our two runs gives us a readable value — 5216, red through green — and the other run leaves the panel without a legible readout. So this page prints 5216 as that player's answer and tells you the rule instead of swearing to the number: count your own rackets, in the order red, blue, yellow, green, and dial what you see. If your screen reads 5216, you are in company.
One detail worth knowing: this panel is optional. Neither recording needs it to leave — the exit is the five-digit keypad in the billiards corner — so if the dials fight you, walk away. It is the only lock in the Sports Store you can simply decline.
The mechanics, stripped down.
Four kinds of lock sit in this room, and knowing which is which saves you the most time.
1. A colour-code lock with no numbers on it
The till is the level's signature puzzle and it never shows you a digit. Seven caps encode an order of colours; the twelve-key pad encodes a digit per colour; the answer is the intersection of the two. This is worth spelling out because the failure mode is so specific: players stand at the till trying to type cap colours that are not on any keypad, or they count the caps and type 7. The caps are not a count, they are a sequence, and the sequence is only readable because seven of the pad's twelve keys are coloured. When a Rooms & Exits room colours part of a keypad and leaves the rest grey, that is always the invitation.
2. A picture puzzle that pays an item
The gym panel is a pure sliding-block puzzle: no clue, no code, no reference sheet anywhere in the room. It exists to convert your time into a Key, and the Key never gets used. That is not a bug in our reading — it is a pattern this game uses to make a room feel bigger than its solution. If you are short on patience, the panel costs you ninety seconds and buys you nothing you need; the exit does not care whether you solved it.
3. A pattern-match between two sets
The hoodies and the icon balls are one puzzle split across two walls. The game's hint — "Look at the icons not colour" — is doing real work here, because both sets are aggressively colourful and the colours are the one thing that does not line up. Match the printed symbols and ignore the fabric.
4. A code printed on the furniture
The exit is the simplest lock in the room once you see it, and the hardest to see: the five balls and the keypad share a stand, so the clue is physically attached to the lock. There is no puzzle to solve, no arithmetic, no reference — you read five digits off five balls in the order they sit. The only thing that can go wrong is reading three of them and pressing the tick, which is exactly what our first recording does on its first attempt.
Where people get stuck.
- The caps as a count. Seven caps does not mean the code starts with 7. It means there are seven positions to convert, one per coloured key. Players who type 7 first are one keystroke into a dead end.
- The grey keys. 4, 8, 0, star and hash are grey on the keypad, and that is not a graphics shortcut — it is the puzzle telling you which keys are part of the mapping. If you find yourself pressing 4 or 8, you have mis-read a cap.
- The drill. The Fastening tool looks complete and is not. It needs two combines — bit, then screw — before its name settles. An inventory entry that still reads "Fastening tool" is the tell that you have skipped the crafting step entirely.
- The punching bag. A billiard ball inside a weighted base is not somewhere anyone looks. If your counter is stuck at 5/6, the missing ball is in the gym, and the Knife from the shop floor is the tool.
- The key that opens nothing. The Key from the slide puzzle is the level's biggest red herring. The exit is a keypad. Do not go looking for a keyhole.
- Four digits instead of five. The keypad takes five. Our own recording types 8437, pauses, and then adds the 1. If the tick does nothing, count your digits before you doubt the code.
- The icon balls versus the billiard balls. Two different ball sets, thirty seconds apart, doing two different jobs. The icons match the hoodies; the numbered billiards give the exit code. Mixing them up is the most common mid-level confusion in this room.
Chapter 2 levels.
Chapter 2 runs twenty-six rooms through the mall; the list below reflects what is written up so far.
- 1 Cell Phone Store guide
- 2 Cinemas guide
- 3 Pharmacy guide
- 4 Optical Store guide
- 5 Gym guide
- 6 Candy Shop guide
- 7 Food Court guide
- 8 Pet Shop guide
- 9 Indoor Playground guide
- 10 Restaurant guide
- 11 DIY Shop guide
- 12 Jewelry Store guide
- 13 Grocery Store guide
- 14 Exchange Office guide
- 15 Fashion Store guide
- 16 Art Supplies Store guide
- 17 Shoe Store guide
- 18 Sports Store you are here
- 19 Bookstore guide
- 20 Furniture Store guide
- 21 Household Appliances guide
- 22 Print Shop guide
- 23 Bakery guide
- 24 Toy Store guide
- 25 Restroom guide
- 26 Parking guide
FAQ.
What is the exit code in Rooms & Exits Chapter 2 Level 18?
84371. The keypad on the stand beside the glass ball display takes five digits, and the display itself is the clue: five billiard balls in a row, left to right 8 · 4 · 3 · 7 · 1. Our two recordings of this level both finish with the same five balls in the same order and both type 84371, so on the evidence this is a fixed display and not something you assemble yourself.
What is the till passcode in the Sports Store?
6273519, seven digits, typed into the blue ENTER PASSCODE screen on the checkout monitor. Both recordings enter the same seven digits, and our frame-by-frame read of the input field agrees across four separate readings. The digits come from the wall of baseball caps: seven caps left to right, their colours matched to the seven coloured keys of the twelve-key pad on the counter.
How do the caps give the passcode?
There are seven caps on the slatwall above the folded shirts, and seven coloured keys on the twelve-key pad beside the counter. Read the caps left to right — red, orange, yellow, blue, green, pink, pale blue — and press the matching colour on the pad: red is 6, orange is 2, yellow is 7, blue is 3, green is 5, pink is 1, pale blue is 9. That reads 6-2-7-3-5-1-9. The grey keys (4, 8, 0) are not used, which is the tell that the mapping is colours, not positions.
Where does the exit code 84371 come from?
From the billiard balls. Five numbered balls sit in a glass-fronted display on a wooden stand in the shop, and the keypad is bolted to the same stand. Read the balls the way they sit — 8, 4, 3, 7, 1 — and type that into the keypad. Our second recording shows the display filling ball by ball during the run and ending in exactly that order, which is why we treat it as a fixed arrangement rather than a puzzle you solve.
How many billiard balls are in the level?
Six. The inventory counter runs 5/6 when you first open the bag at 1:55 and reaches 6/6 at 5:26 after the last one is cut out of the base of the punching bag with the Knife. The display that gives the exit code only uses five of them, so the sixth is spare — do not keep hunting for a sixth slot once the counter reads 6/6.
What does the gym picture puzzle give me?
A Key. The square panel on the gym wall is a scrambled picture of the gym floor with one empty square — a sliding-block puzzle. Rearrange it until the picture is whole and a silver Key goes into the bag at 5:18. In our footage we never see that key turn a lock: the exit takes the five-digit code, not a key, so treat the Key as a collectible rather than the way out.
How long does the Sports Store take, and what do I get?
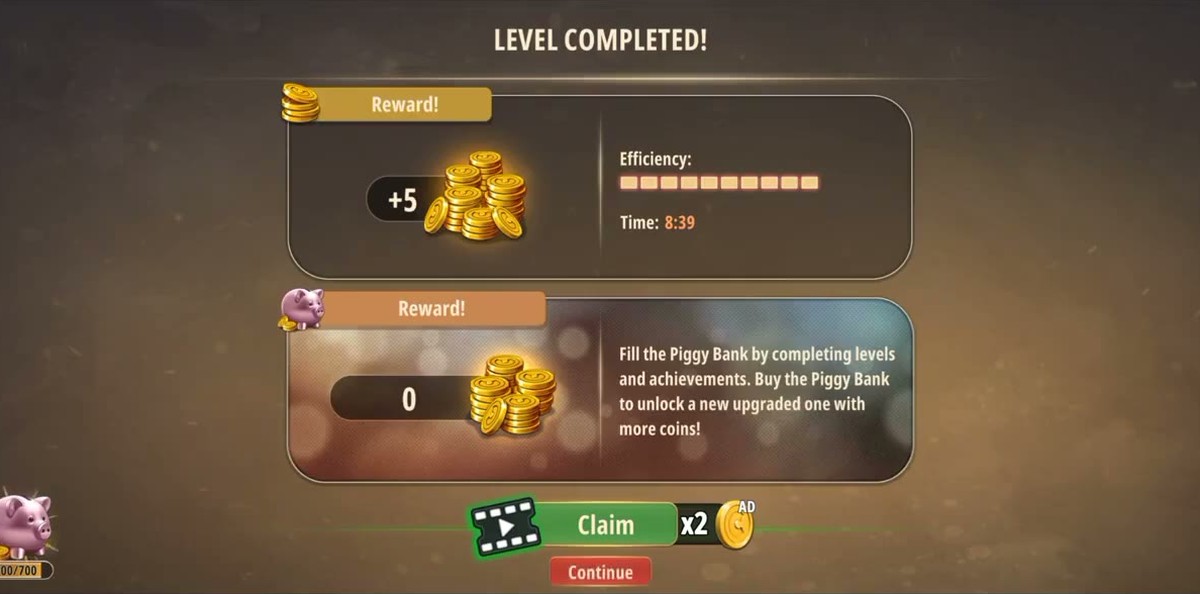
The results panel in our first recording reads Time: 8:39 and pays +5 coins, with a full Efficiency bar and the piggy bank at 600/700. It is one of the shorter Chapter 2 rooms — there is no timer, no fail state and no penalty for wandering, so the only thing that really costs you minutes is hunting for the exit code before the ball display makes sense.
Why does my title card say Level 22?
Because the build in our first recording prints Level 22 — Sports Store on the title card, while the game's own level list and this site's chapter index call the same room Level 18. The room, its layout and both codes are identical across our recordings, so treat the number on the card as numbering drift between builds rather than a different level.
Do I need the tennis racket count?
Only for the four-dial panel on the shop floor, which our second recording settles on 5216 — one count per colour bay. The game's own hint for that panel reads "Count the courts", and the panel takes the count of rackets in each of the four bays, red through green. Our first recording sets the same panel without a hint and we could not read its readout, so 5216 is printed here as that player's answer, not as a constant we confirmed twice.
What are the eight letters on the skate display?
A strip of eight letters — FDEOMZYH — runs along the top of the inline-skate display at 6:14. We read it twice off the same frame (optical character recognition and a visual pass) and it agreed, but we never saw it typed anywhere in either recording, so we cannot tell you what it unlocks. If your room shows a different string, trust your screen, not this page.
Previous written guide: ← Chapter 2, Level 17 — Shoe Store
Next written guide: Chapter 2, Level 19 — Bookstore →