GridPaw cat puzzle icon GridPaw

Rooms & Exits Chapter 2 Level 10 Walkthrough: Restaurant

Unofficial fan-made guide. Not affiliated with Webelinx Games, the developer of Rooms & Exits: Escape Room Games.
Rebuilt frame by frame from a recorded playthrough of the current build — 11 minutes 27 seconds of footage, extracted at one frame per second and re-read at full resolution, then checked against a second, independent recording of the same room. Three numbers carry the level: the briefcase code 6743, the plate-and-fork total 18 and the four-letter word FOOD. Each was read twice and agrees. The one value our two reads disagreed on — the oven's heat dial — is left out rather than guessed. The clip runs at roughly double speed, which is why an 11:27 video ends on a 24:13 clock.
Chapter 2 · No Honor Among Thieves 26 of 26 with full written steps · 26 with a video
Quick answer

The Restaurant is four panels: 6743 on the briefcase, 18 on the plate-and-fork board, FOOD on the four-letter lock, and one oven setting you have to work out from the dials. Finish worth +50 coins.

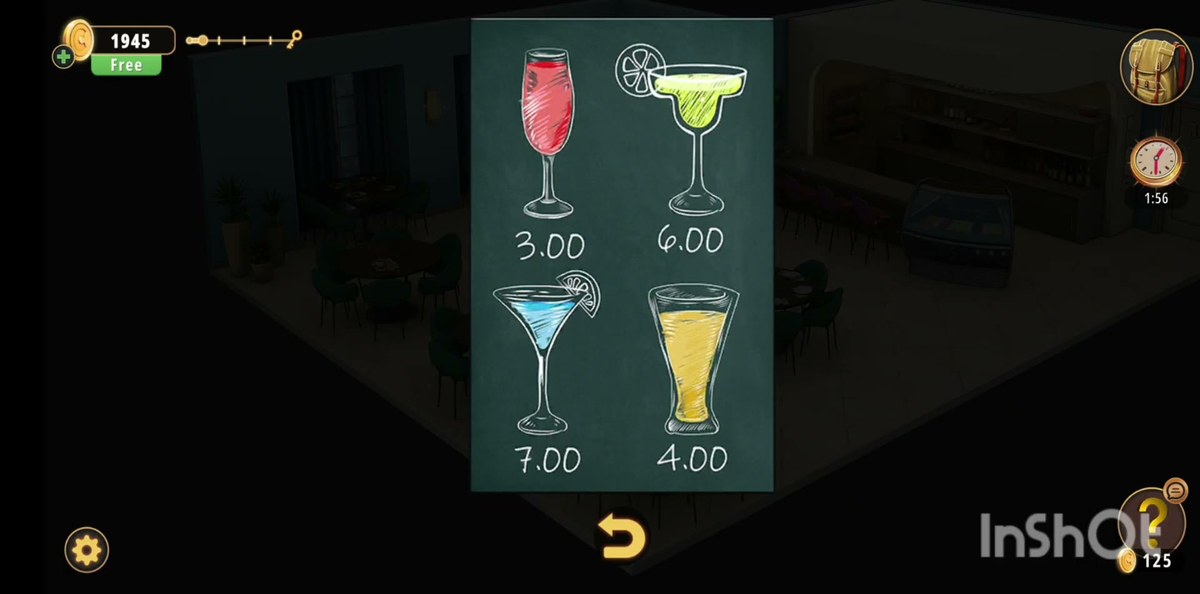
  1. Read the chalkboard menu behind the bar: four drinks at 3.00, 6.00, 7.00 and 4.00.
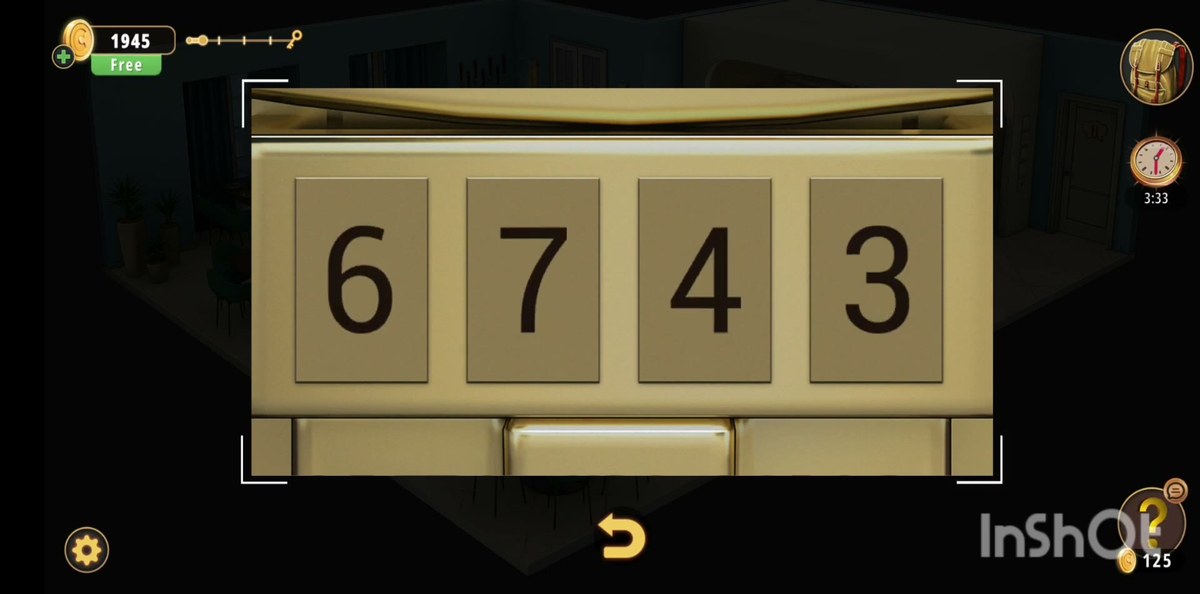
  2. Open the burgundy briefcase on the floor with 6743.
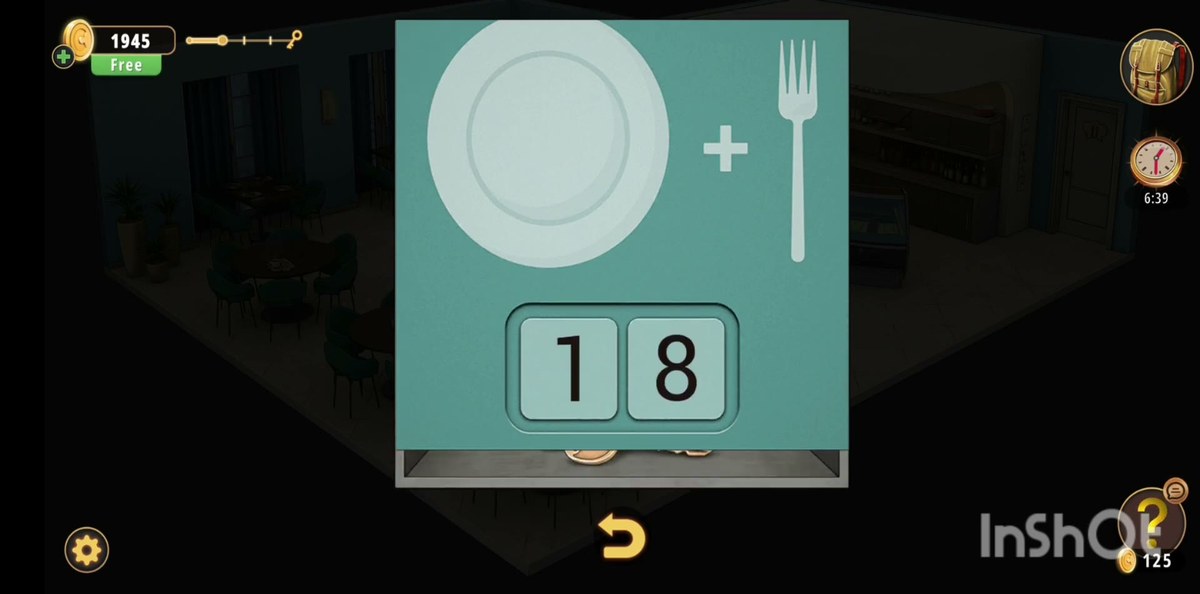
  3. Count plates and forks on the dining tables and enter the total in the teal panel: 18.
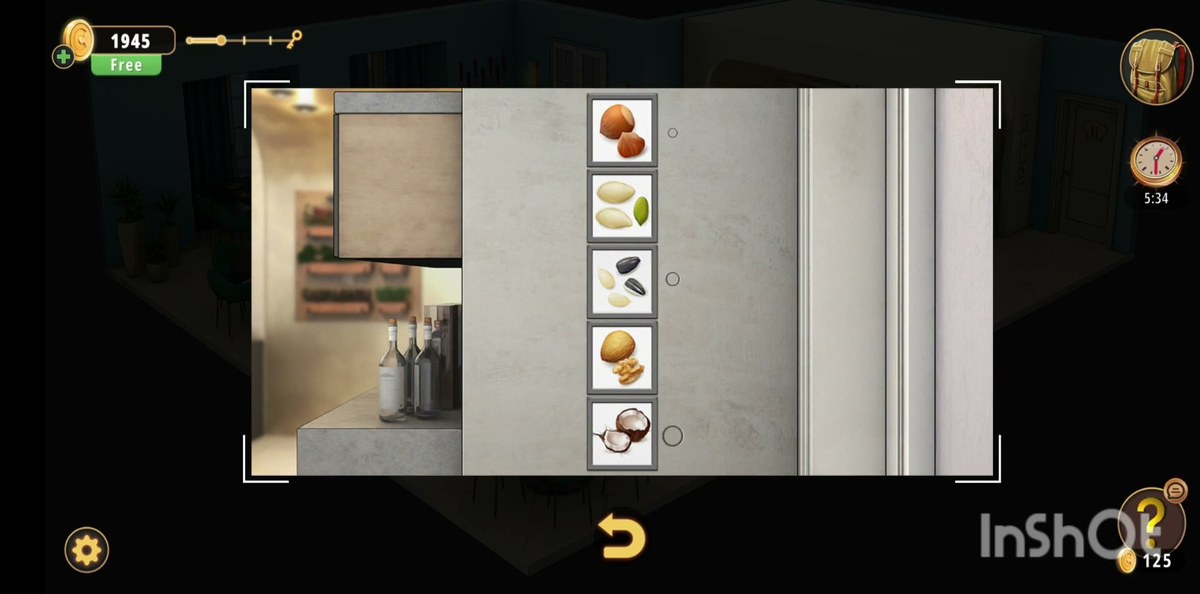
  4. Sort the five nut cards on the pale cabinet, smallest at the top, largest at the bottom.
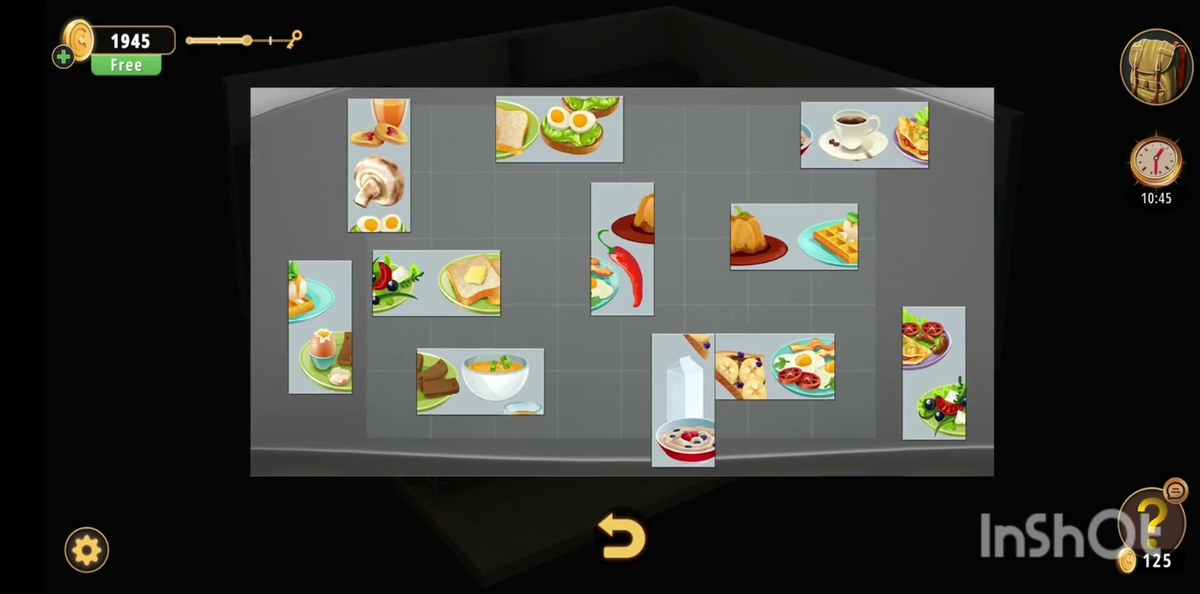
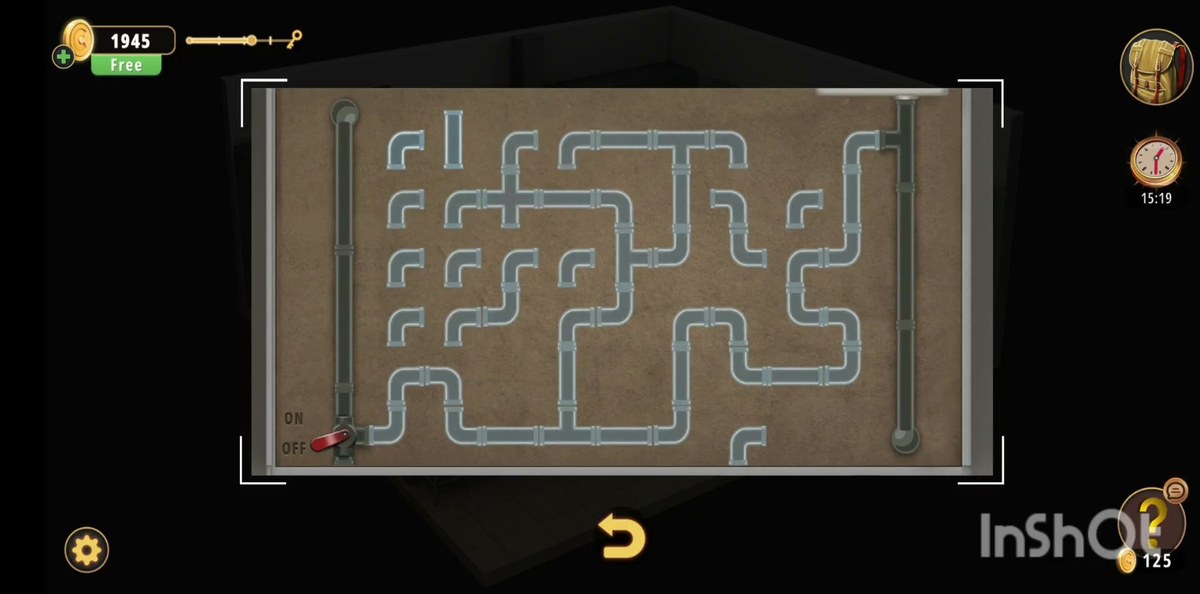
  5. Go through the chef's-hat door into the kitchen: fridge, food jigsaw, pipe panel.
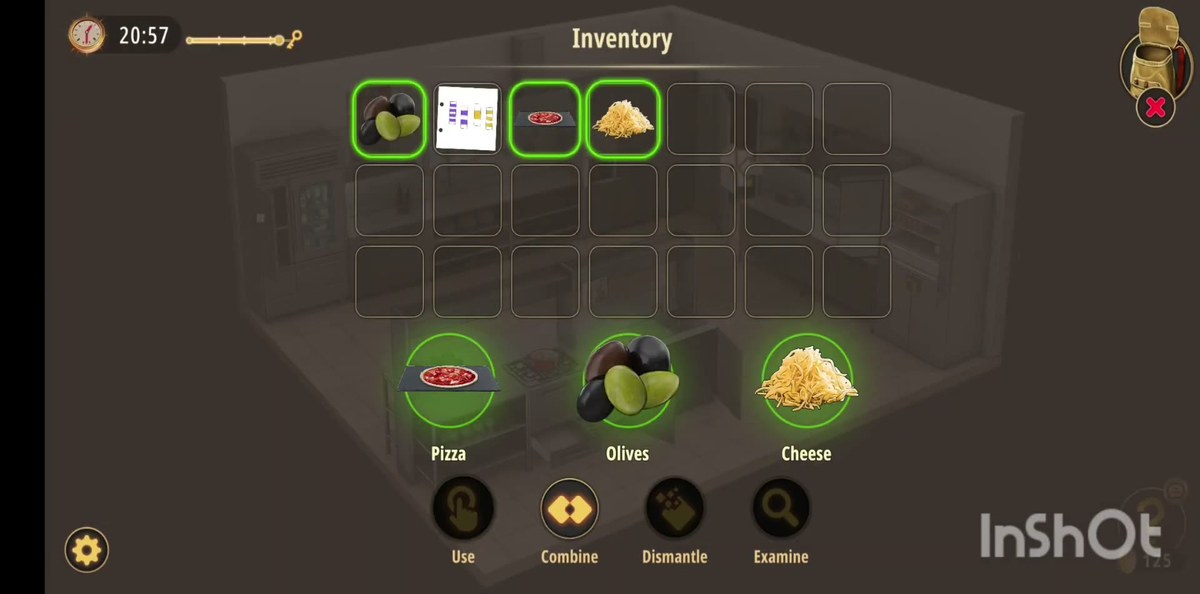
  6. Collect Dough, Tomato, Onion, Chili pepper, Cheese and Olives, then Combine them into a Pizza.
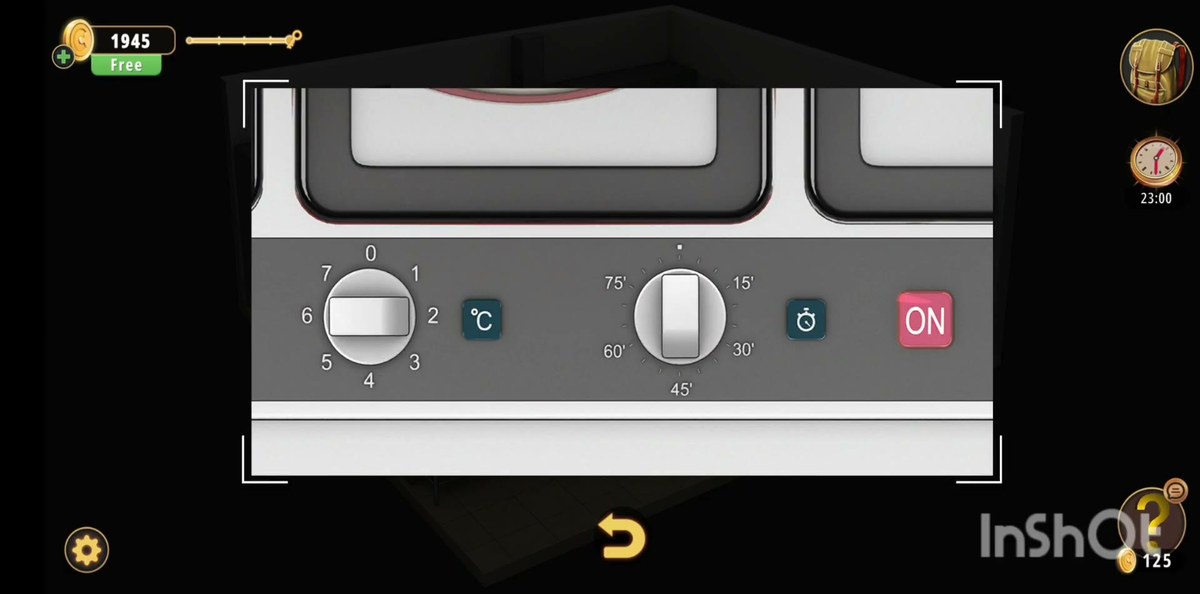
  7. Fit the Oven button, set the timer to 75, press the pink ON button and bake it.
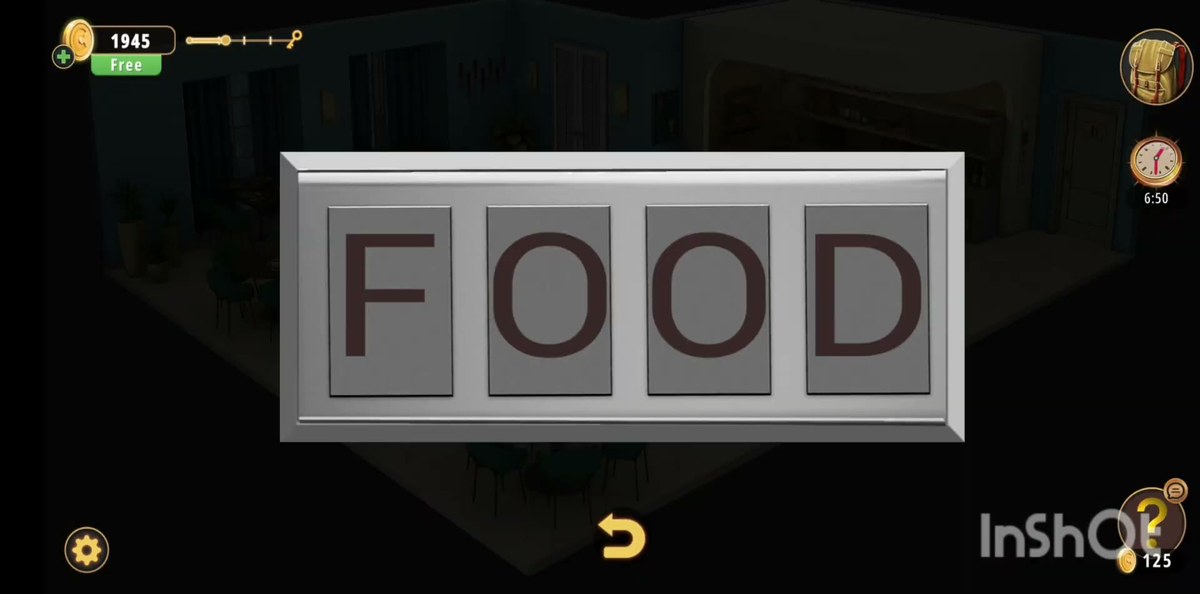
  8. Set the four-letter panel beside the service doorway to FOOD and leave — +50 coins.
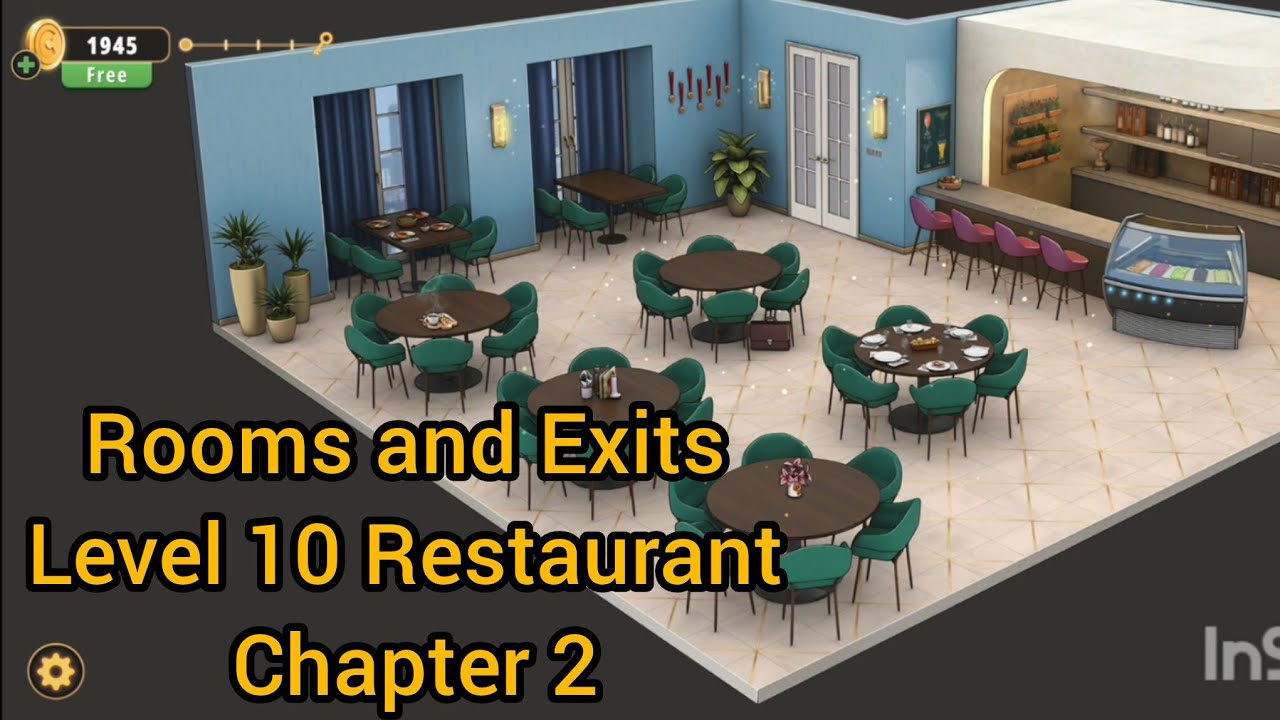
Rooms & Exits Chapter 2 Level 10 Restaurant walkthrough
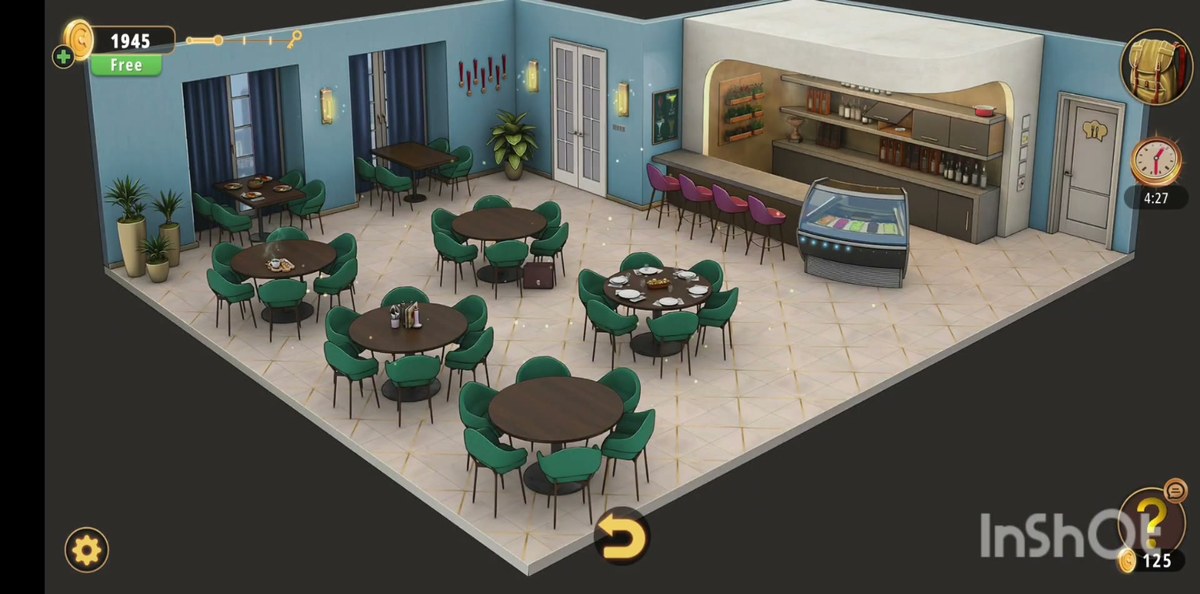
Rooms and Exits Chapter 2 Level 10 Restaurant: the wide dining floor with round tables and green chairs, the bar with purple stools on the right, the ice-cream display freezer and the white double doors at the back

What this level actually is.

The Restaurant is the tenth room of Chapter 2 and the first one in the chapter that is genuinely two rooms. The dining floor is a single open space: round tables with emerald-green chairs on a pale tiled floor, blue-grey walls with warm sconces, tall planters in the corners, and a pair of rectangular tables in the back-left under the windows. The right-hand third is the bar — a long counter, five purple stools, bottle shelves stacked with wine and spirit bottles behind it, and a glass display freezer full of ice cream standing in front of the counter like a shop window. Between the bar and the tables hangs the drinks menu: a dark green chalkboard with four drinks chalked on it, and the prices underneath them are the first clue in the level.

Two doors matter. The white double doors with glass panels in the back wall are the ones the level keeps drawing your eye to, and the single white door on the far right with a chef's hat painted on it is the kitchen. The kitchen is where the food is, and the food is most of the level's second half. Once you accept that the room you start in is only half the room, the Restaurant stops feeling like a maze and starts feeling like a route.

The level's clock is misleading. Our capture finishes on 24:13, but the footage is only eleven and a half minutes because the recording is sped up to roughly double speed. The in-game timer is real, the video timestamps are compressed, and the two do not match — so use the times on this page to scrub the video, and judge your own pace by how many panels you have open rather than by the clock.

One more thing worth saying before the steps: the Restaurant has no inventory gate and no fail state. You cannot soft-lock it, you cannot lose an item, and you cannot anger anything. Every panel stays exactly where you left it, which means the only real cost of doing things out of order is walking time. That is why this guide can be followed in any order and still work — the sequence below is simply the one that minimises the walking.

The chain, in the order that works.

Every lock in the Restaurant feeds a different part of the level, and the parts overlap. This is the five-link version, which is all you need to keep your bearings:

  1. Chalkboard menu → briefcase. The bar's chalkboard menu carries four drinks and four prices. The briefcase on the dining floor carries four golden drums and a cocktail-glass emblem. Same four digits, same order.
  2. Dining tables → teal panel. Count the plates and the forks laid out on the tables, add them, and the plate-and-fork panel takes the total.
  3. Pale cabinet → nut board. Five framed cards of nuts and seeds, arranged smallest to largest.
  4. Kitchen → pizza. Fridge, food jigsaw and pipe panel on the way in; dough and toppings on the way through. Combine them into one item.
  5. Oven → FOOD. Bake the pizza, then set the four-letter panel beside the service doorway to the word the whole room is about, and the level ends.

Read that way, the Restaurant is a cooking level wearing an escape-room coat. The dining room is the clue hunt, the kitchen is the assembly line, and the two number panels on the floor are there to make sure you actually looked at the tables before you went through the door.

Step by step.

Step 1 · 0:00 Read the floor before you touch anything The opening minute is the only wide shot you get without a panel covering half the screen, so use it. Left and centre: the round tables, the rectangular tables under the windows, the planters, the sconces. Right: the bar, the five purple stools, the bottle shelves with their wine bottles, the ice-cream freezer. Back wall: white double doors. Far right: the white chef's-hat door. The very first thing our recording does is walk the dining floor and stop at each table — that is not idle wandering, it is the count you will need at 3:00.
Watch: 0:00
Step 2 · 0:48 The chalkboard menu behind the bar: four drinks, four prices A dark green chalkboard menu in a wooden frame, hung where the bar meets the dining floor. It carries four drinks in a two-by-two grid, and every drink has a price chalked underneath it. Read them in reading order — top-left, top-right, bottom-left, bottom-right — because that is the order the digits reappear in a minute's time. Nothing on the board is a puzzle by itself. It is a price list, and the four prices happen to be four single digits: 3, 6, 7, 4. The green chalkboard menu in the Restaurant with four drinks in a two-by-two grid and the prices 3.00, 6.00, 7.00 and 4.00
Watch: 0:48
Step 3 · 1:28 The burgundy briefcase on the floor: 6743 Under the dining tables, on the pale tiled floor, there is a dark red briefcase with a gold clasp and a small cocktail-glass emblem stamped on the lower right of the front panel. Tap it and the camera pushes in on four golden drums in a row, with a line of four gold buttons underneath them. Each button steps its drum. Set the drums to 6 · 7 · 4 · 3. That is the state our capture leaves them in, read twice from separate frames at full resolution, and 6-7-4-3 is exactly the chalkboard's four prices in the order the board is laid out — the same numbers the cocktails cost, lined up left to right. The case releases and the contents go into the bag. The golden four-drum lock on the burgundy briefcase in the Restaurant, set to 6 7 4 3
Watch: 1:28
Step 4 · 1:40 The bag: fifteen slots and four verbs The backpack icon at the top right opens a grid of fifteen slots, three rows of five, with four verbs underneath: Use, Combine, Dismantle, Examine. Learn them here, because every remaining step in the Restaurant is one of those four verbs applied to the right item. By this point the bag already holds a fruit basket labelled 2/3 — the fraction counts how many pieces of the same thing you are carrying, not how many uses are left — plus loose fruit, and a Piece of paper that reads as a recipe card rather than a note. Do not dismantle either of them. The paper is the only place the game writes the cooking order down, and the fruit is for a table, not for the pizza.
Watch: 1:40
Step 5 · 2:32 The nut board on the pale cabinet: five cards, smallest to largest On a pale, textured cabinet door near the bar shelves there is a vertical stack of five small framed pictures, each with a small circular marker beside it. The pictures are nuts and seeds, and the stack starts scrambled: in our capture the top card is hazelnuts, then pumpkin seeds with a pistachio, then sunflower seeds, then walnuts, and the bottom card is a cracked coconut. The rule is a size sort: smallest seed at the top, biggest nut at the bottom. Coconut is the largest thing on the board and belongs in the bottom slot; sesame and sunflower are the smallest and belong at the top; hazelnut, pistachio and walnut fill the middle. Work the markers until the stack runs small to large and the board accepts it. The five framed nut and seed cards on the pale cabinet door in the Restaurant: hazelnuts, pumpkin seeds, sunflower seeds, walnuts and a coconut
Watch: 2:32
Step 6 · 3:00 The plate-and-fork panel: count the tables, enter 18 A teal panel with a white plate, a plus sign and a white fork across the top, and two digit boxes underneath, both starting at 0 and 0. This is the one puzzle in the Restaurant that the room itself answers, and it answers it literally: the panel wants the total number of plates plus forks that are set out on the dining tables. Do the count table by table. The big setting gives 8 plates and 5 forks, which is 13. A second setting gives 4 plates and 1 fork, which is 5. Add the two and you have 18 — and 18 is exactly what both recordings we checked leave in those two boxes. Enter it and the panel clears. The teal plate-and-fork panel in the Restaurant with the two digit boxes reading 1 and 8
Watch: 3:00
Step 7 · 3:08 The four-letter panel beside the service doorway A grey metal panel, four square segments in a row, one letter behind each segment, standing in front of the dining room like a sign. When our capture first reaches it the four letters already read F · O · O · D — and because the panel sits in a restaurant, it is easy to read it as decoration and walk on. It is not decoration. This is the last lock in the level, and you will come back to it at the very end with the wheels scrambled, which is the mistake this page exists to save you from. Remember the word. Do not touch the wheels yet if you can help it. The grey four-letter panel in the Restaurant with the wheels spelling F O O D
Watch: 3:08
Step 8 · 5:00 The food jigsaw on the grey board A sixteen-piece jigsaw laid out on a grey board, and the picture is not a photograph but a grid of illustrated dishes — juice and biscuits, eggs and mushrooms, avocado toast, coffee beans, a bowl of olives and peppers, a waffle, a chilli pepper. The pieces are scattered off the picture, so this is a straightforward assemble-it puzzle with no code attached: fit the pieces back onto the board and the board releases whatever it was holding. It is worth knowing what this puzzle is not. It does not give you a number, it does not open the oven, and it does not care in which order you solve the other panels. It is one of the level's two honest time-sinks, the other being the pipe panel, and both of them are pure spatial work. The sixteen-piece food jigsaw scattered on a grey board in the Restaurant kitchen
Watch: 5:00
Step 9 · 5:52 The pipe panel: connect it, then turn the valve ON This is the long one. A rectangular service board set into a dark wall, tiled with grey metal pipe sections — straights, elbows and T-pieces — and the board gives you nothing but the layout. On the left edge there is a vertical pipe with a red valve handle and the words ON and OFF beside it; on the right edge there is the outlet the line has to reach. Rotate the sections until a continuous run of pipe links the valve to the outlet, then turn the valve from OFF to ON. The recording spends about two and a half minutes here, which tells you the layout is not solved in three moves: work from the valve outwards rather than from the middle, because every dead end you create in the centre has to be undone later. The wall-mounted pipe puzzle in the Restaurant with grey pipe sections, a red valve marked ON and OFF on the left and an outlet on the right
Watch: 5:52
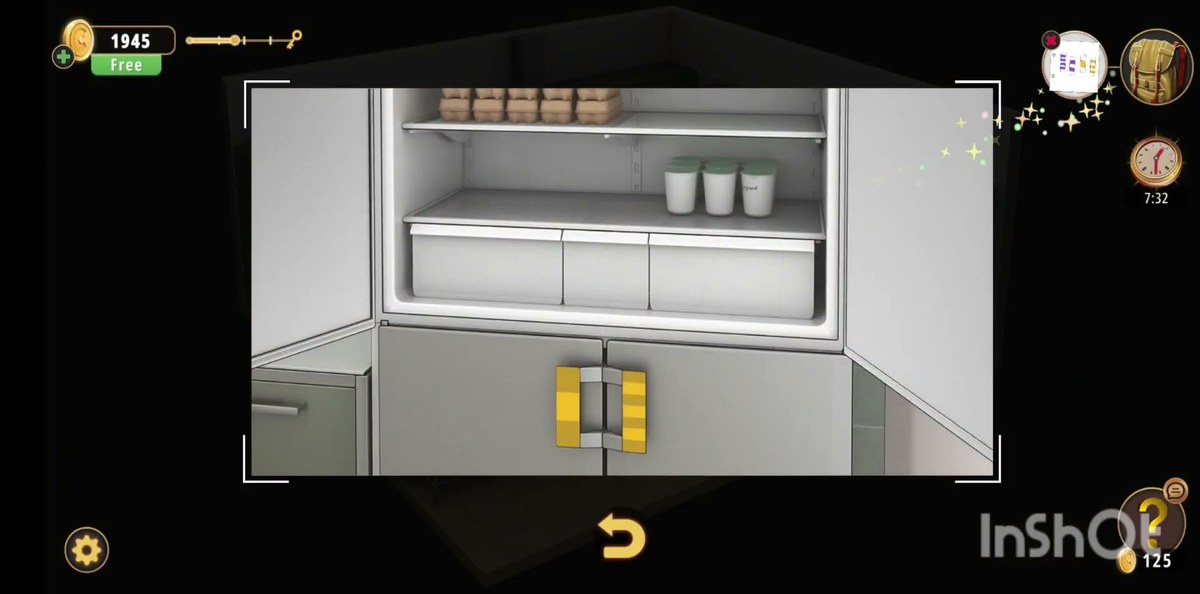
Step 10 · 8:40 The kitchen fridge and its block-handle doors Through the chef's-hat door the room changes completely: green cabinets, a stone worktop, an island, a stovetop with a red pot on it. The first thing the camera goes to is a stainless side-by-side fridge. Its top-left door is already open, and inside you can see brown egg cartons on the top shelf, a row of white tubs with green lids on the shelf below, and a wide drawer at the bottom. The lower doors are the interesting part. Instead of a handle they carry a two-part clasp made of alternating yellow and grey blocks that meet in the middle — a sliding-block lock, not a keyhole. Note it, take what the open compartment gives you, and come back to the blocks when you have the ingredients you actually need. The stainless side-by-side fridge in the Restaurant kitchen with the top-left door open showing eggs and yogurt tubs, and a yellow and grey block handle on the lower doors
Watch: 8:40
Step 11 · 9:06 The kit: oven button, scoop, grater and the food itself The kitchen hands out items in a steady drip, and every one of them is labelled the moment it lands in the bag. The ones that matter are Oven button — a loose control knob, and the reason the oven will not run when you first find it — plus an ice-cream scoop, a grater, a chicken drumstick, Chili pepper, Sausage, Cheese, Olives and the pizza base ingredients. Two habits pay off here. First, open the bag after every pickup: the label at the bottom names the item, and the labels are the only reliable text in the level. Second, keep the Oven button until the end — it is small, it disappears into a crowded grid, and players who tidy their inventory by dismantling things lose the one item the oven cannot work without.
Watch: 9:06
Step 12 · 9:52 Build the pizza: Combine, one topping at a time The assembly is done entirely inside the bag. Select Dough, press Combine, then tap Tomato — the two merge and the slot now reads Pizza. From there it is the same two taps for each topping: select the Pizza, press Combine, tap the next ingredient. The order our second recording follows, read straight off the inventory labels, is Dough + Tomato → Pizza, then Onion, then Chili pepper, then Cheese, with Olives going in as well. The finished pizza is a single item with a dark wooden board under it, and it is the thing you carry to the oven. If your bag shows Pizza, Cheese and Olives glowing at once at the end, you are where our capture is at 9:52 — three steps from the finish. The Restaurant inventory screen showing the Pizza, Cheese, Olives and the folded recipe paper in a grid of fifteen slots
Watch: 9:52
Step 13 · 10:48 The oven: fit the knob, set the timer, press ON A brushed-metal control panel with two dials. The left dial runs 0 to 7 and is the heat control; the right dial is a timer marked 15, 30, 45, 60 and 75 minutes. Between them sits a °C button, and to the right of the timer there is a wide pink ON button. The panel will not respond until the missing knob is in place, so use the Oven button from the bag first. Then set the timer to its top mark, 75, choose a heat setting on the 0-7 dial, and press ON. Our capture leaves the timer hard against 75; the heat dial is the one reading we could not settle — two passes over two different frames gave two different numbers — so set it yourself and watch the panel rather than trusting a number from a video. The oven control panel in the Restaurant kitchen with a 0 to 7 heat dial, a timer marked 15 to 75 minutes, a degrees Celsius button and a pink ON button
Watch: 10:48
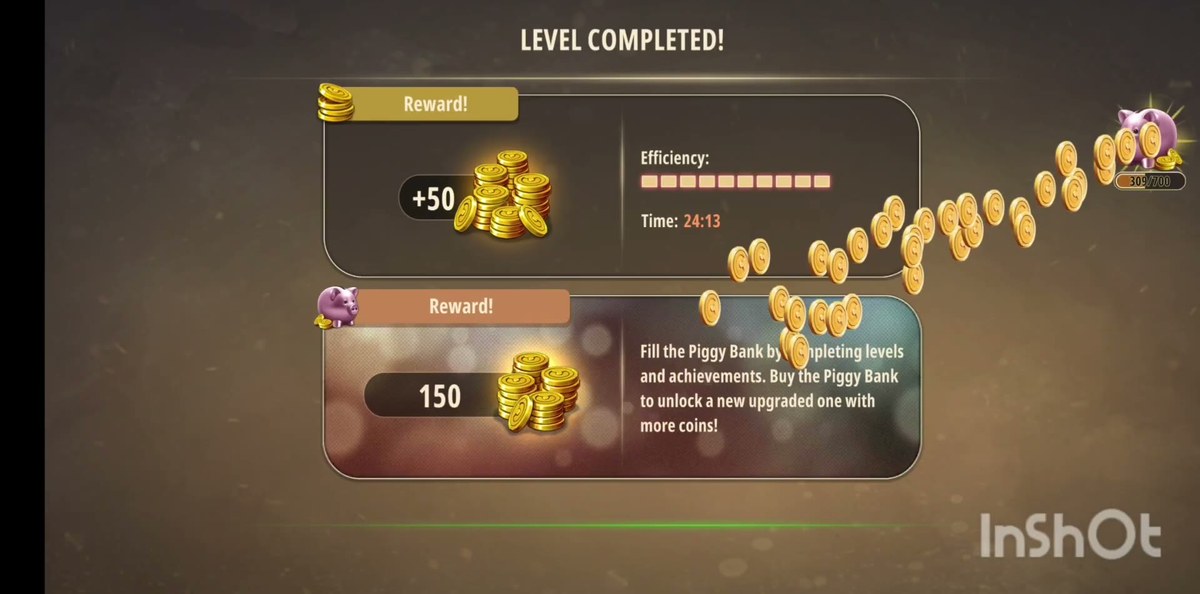
Step 14 · 11:26 Set the panel to FOOD and finish: +50 coins Back out in the dining room, the grey four-letter panel is the last thing between you and the exit. Turn the four wheels to F · O · O · D — the word the panel was already showing when you first found it at 3:08, and the word both recordings we checked end on. The panel releases, the exit opens, and the results screen lands: LEVEL COMPLETED, a +50 coin reward, a full ten-square efficiency bar, a completion time of 24:13, and 150 coins added to a piggy bank reading 309/700. That is the whole restaurant. The coins are the only thing that carries out of the room. The Level Completed results screen for Rooms and Exits Chapter 2 Level 10 with a +50 coin reward, full efficiency and a time of 24:13
Watch: 11:26

Three numbers on three panels.

The Restaurant gets a reputation for being cryptic, and it is not. It has three number panels and every one of them is answered by something already in the room. What makes it feel cryptic is that the answers are written in three different languages: a menu price list, a head count and a word.

The briefcase is answered by the chalkboard

Four drinks, four prices, four drums. The board is laid out two by two and the prices in reading order are 3.00, 6.00, 7.00, 4.00, which is four digits in a row: 3, 6, 7, 4. The briefcase on the floor has a cocktail glass stamped on it, which is the game telling you the two objects belong to each other, and the drums finish on 6-7-4-3. If you read the board column by column instead of row by row you will be one digit out and the case will not open; read it left to right, top to bottom, the way a page works.

The teal panel is answered by the tables

This is the only panel in the level where the clue is not written anywhere — you have to count. The plate, the plus and the fork are literal: plates, plus forks. Take the settings table by table, write the two numbers down if you need to, and add them. Eight and five make thirteen, four and one make five, and thirteen plus five is eighteen. Both recordings we checked end with 1 and 8 in the boxes, which is as close to a confirmation as a counting puzzle ever gets.

The letter panel is answered by the room

Four wheels, one word, and the word is the name of the business you are standing in. Our capture finds the panel already reading F-O-O-D and then scrambles it by accident later, which is why the last two minutes of the video are spent turning wheels back to where they started. If you remember one thing from this page, remember that the final code is FOOD and that you have already seen it.

What the kitchen actually wants.

The kitchen half of the level is an assembly line with three stations, and the temptation is to treat all three as puzzles to be solved in sequence. They are not. The jigsaw and the pipe board are spatial work that opens things; the fridge, the ingredients and the oven are a chain that produces one item — the pizza — and it is the pizza, not the puzzles, that the level is actually asking for.

The route that wastes the least walking is: enter the kitchen, clear the jigsaw and the pipe board while you are already standing there, empty the open fridge compartment, collect every labelled ingredient you pass, and only then open the bag and start combining. Combining early is what makes people lose track — a half-built pizza in the grid looks like clutter, and clutter is what gets dismantled.

The oven is the last station and it has a hard dependency: no knob, no heat. Fit the Oven button, set the timer to 75, pick a heat setting, press the pink ON button. If the panel does nothing at all, the knob is still in your bag. If the panel lights up but nothing cooks, the timer is not on a mark — the dial only accepts the five printed positions, not the spaces between them.

What we could not verify: the oven's heat dial. Two passes over two separate frames of the same panel gave two different numbers for the left dial, so this page gives you the range (0 to 7), the timer setting (75) and the button to press, and leaves the heat number to you rather than printing a value we could not read twice. The same caution applies to two other details: the exact accepted order of the five nut cards (we read all five pictures clearly, but not a rejected-then-accepted sequence, so the size rule above is the rule the board is built on rather than a recorded solution), and what the pipe board feeds once the valve is ON — the recording turns it on and moves on, and we could not see the other end of the line.

Where people get stuck.

Chapter 2 levels.

Chapter 2 opens with the Cell Phone Store and runs twenty-six rooms; the list below reflects what is written up so far. The room before this one is the Indoor Playground.

Chapter 2 · No Honor Among Thieves 26 of 26 with full written steps · 26 with a video
  1. 1 Cell Phone Store guide
  2. 2 Cinemas guide
  3. 3 Pharmacy guide
  4. 4 Optical Store guide
  5. 5 Gym guide
  6. 6 Candy Shop guide
  7. 7 Food Court guide
  8. 8 Pet Shop guide
  9. 9 Indoor Playground guide
  10. 10 Restaurant you are here
  11. 11 DIY Shop guide
  12. 12 Jewelry Store guide
  13. 13 Grocery Store guide
  14. 14 Exchange Office guide
  15. 15 Fashion Store guide
  16. 16 Art Supplies Store guide
  17. 17 Shoe Store guide
  18. 18 Sports Store guide
  19. 19 Bookstore guide
  20. 20 Furniture Store guide
  21. 21 Household Appliances guide
  22. 22 Print Shop guide
  23. 23 Bakery guide
  24. 24 Toy Store guide
  25. 25 Restroom guide
  26. 26 Parking guide

FAQ.

What is the four-digit code in the Restaurant in Rooms & Exits Chapter 2?

6743. It goes into the burgundy briefcase on the dining-room floor, the one with the cocktail-glass emblem on the front. The four golden drums read 6, 7, 4, 3 in our capture, and those are the four prices on the chalkboard menu behind the bar — 3.00, 6.00, 7.00 and 4.00 — taken in reading order.

What number goes into the plate-and-fork panel?

18. The teal panel has a plate, a plus sign and a fork above two digit boxes. Count the plates and forks set out on the dining tables: one setting gives 8 plates and 5 forks (13), a second gives 4 plates and 1 fork (5), and 13 plus 5 is 18. Both recordings we checked finish on 18.

What is the four-letter code in the Restaurant?

FOOD. The grey panel beside the service doorway holds four letter wheels. It already reads F-O-O-D when you first find it at 3:08, and the level ends once the wheels are back on that word after being scrambled.

How do I build the pizza?

Open the bag, select Dough, press Combine, then tap Tomato — the slot becomes Pizza. Then select the Pizza and repeat Combine for each topping: Onion, Chili pepper and Cheese are the order our second recording follows, with Olives going in as well. Do not dismantle the half-built pizza; it reads as clutter and that is how people lose it.

How do I use the oven?

Fit the Oven button first — the panel is inert without it. The left dial runs 0 to 7, the right dial is a timer at 15, 30, 45, 60 and 75, and there is a °C button plus a pink ON button. Set the timer to 75, choose a heat setting and press ON. We could not read the heat number twice, so this guide does not print one.

How long does the Restaurant take?

Our capture finishes in 24:13 of level time, but the clip is sped up to roughly double speed, so it is eleven and a half minutes of footage. Nothing is timed and there is no fail state — the only thing that stretches the level is walking between the dining room and the kitchen without a list.

Previous room: ← Chapter 2, Level 9: Indoor Playground

All Rooms & Exits guides →