 GridPaw
 Shikaku
 Akari
 Kakuro
 Nonogram
 Nurikabe
 Pictomino
 KenKen
 Binary
 Star Battle
 Hashi
 Slitherlink
 Murder Sudoku
 Meowdoku
 Crazy Cleanup
Rooms & Exits Chapter 3 Level 3 Walkthrough: Study Room
The Study Room is room 3 of Chapter 3, Murder Dressed in White, and it is the chapter's computer level: a laptop that takes an eight-digit password, then a five-digit verification code, then hands you a five-digit code for a keypad on the wall. There is also a hidden rotary safe behind a hinged panel, and a book full of economics that looks like a cipher key and is not. This page gives you 20062015, 45837 and 62850, shows where each one comes from, and tells you which props are dead ends so you stop reading them.
Study Room is room 3 of 15 in Chapter 3. Four locks, three of them in one chain:
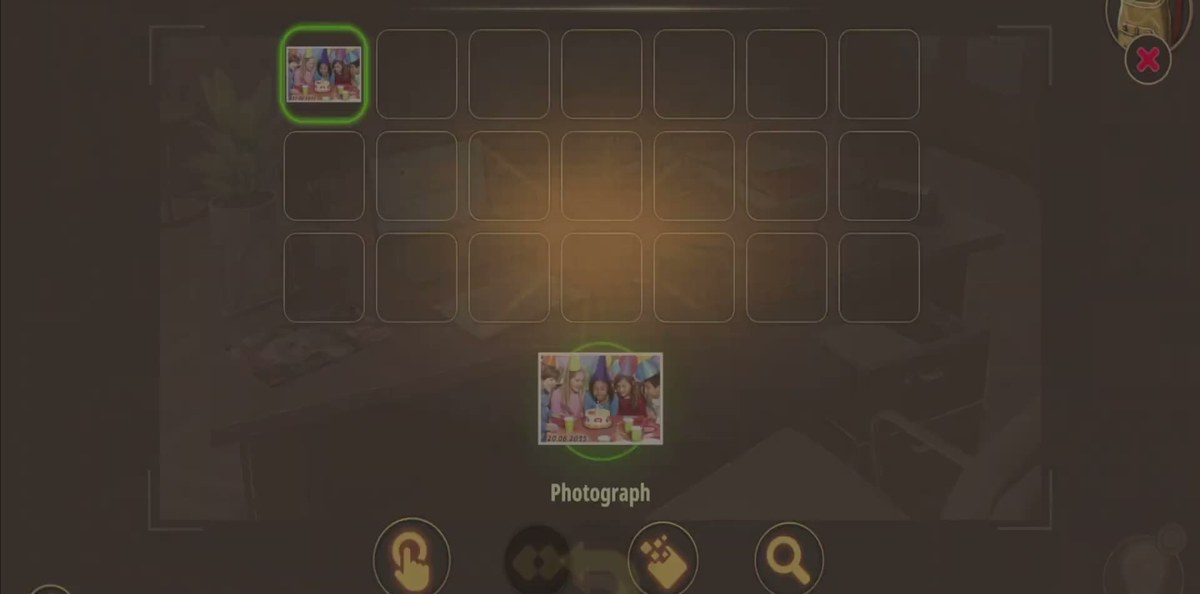
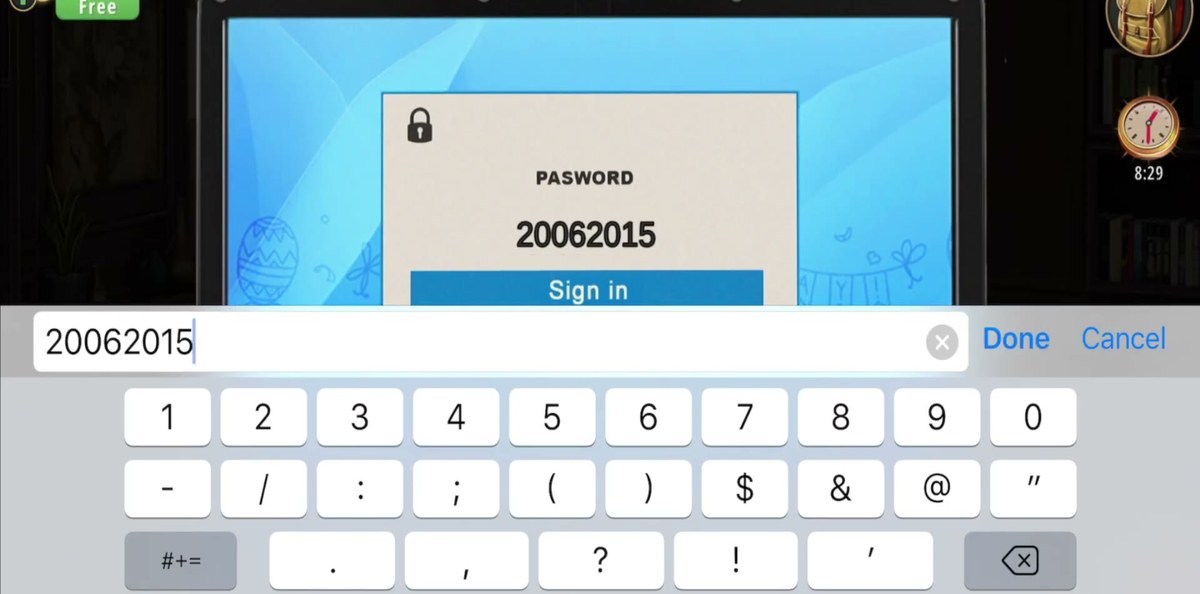
- Laptop password: 20062015 — read the Photograph in your inventory; it is dated 20.06.2015.
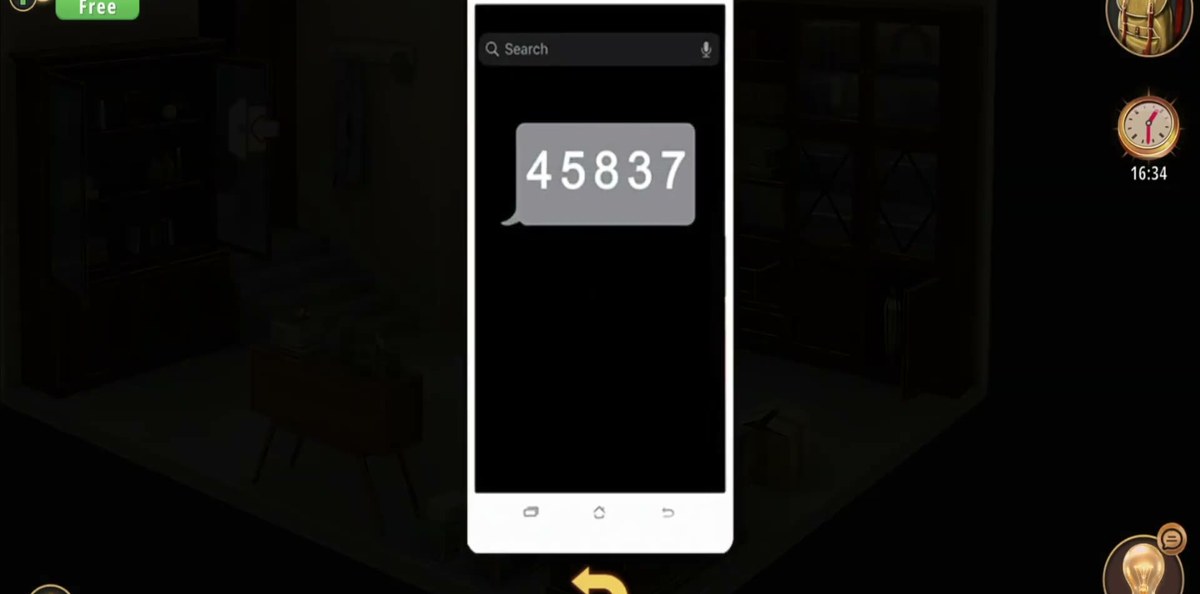
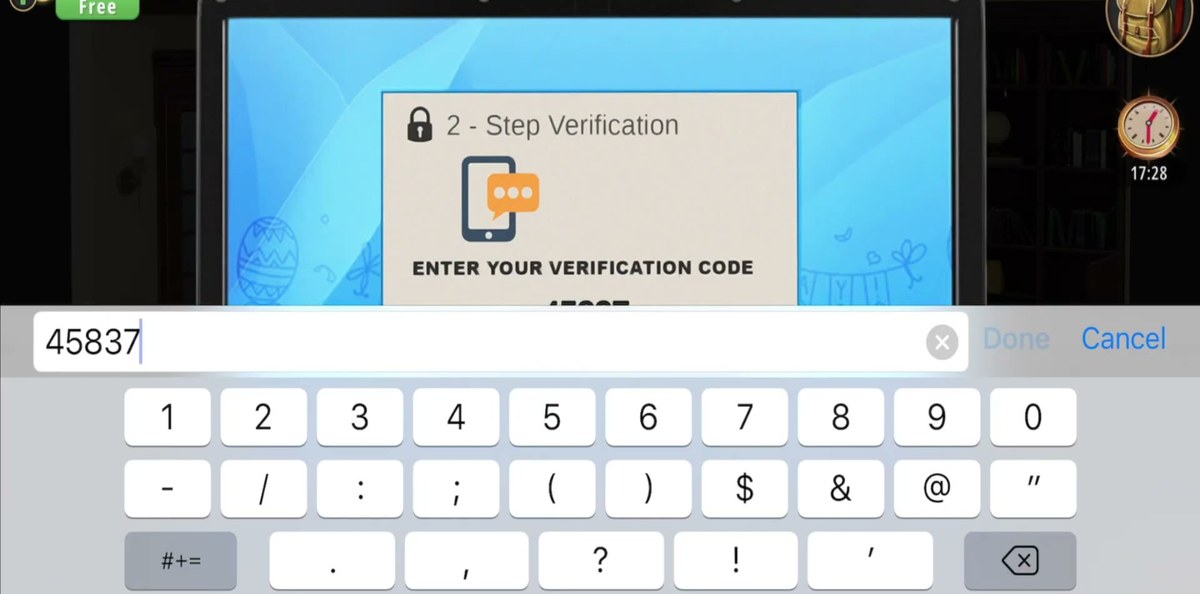
- 2-step verification: 45837 — five digits, shown in the message bubble on the phone on the desk.
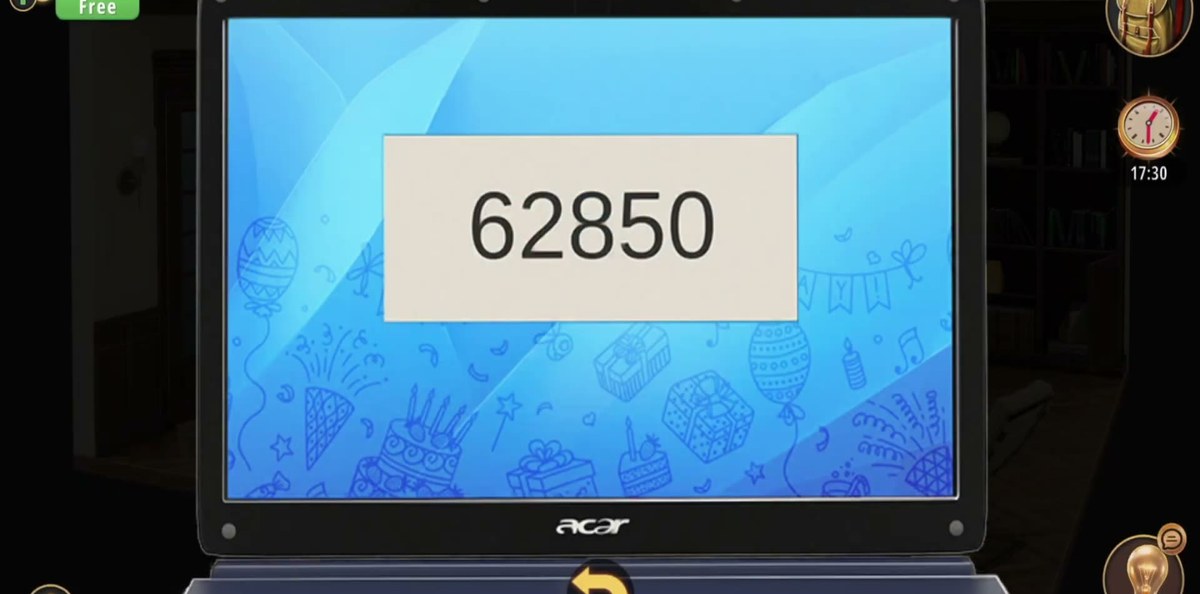
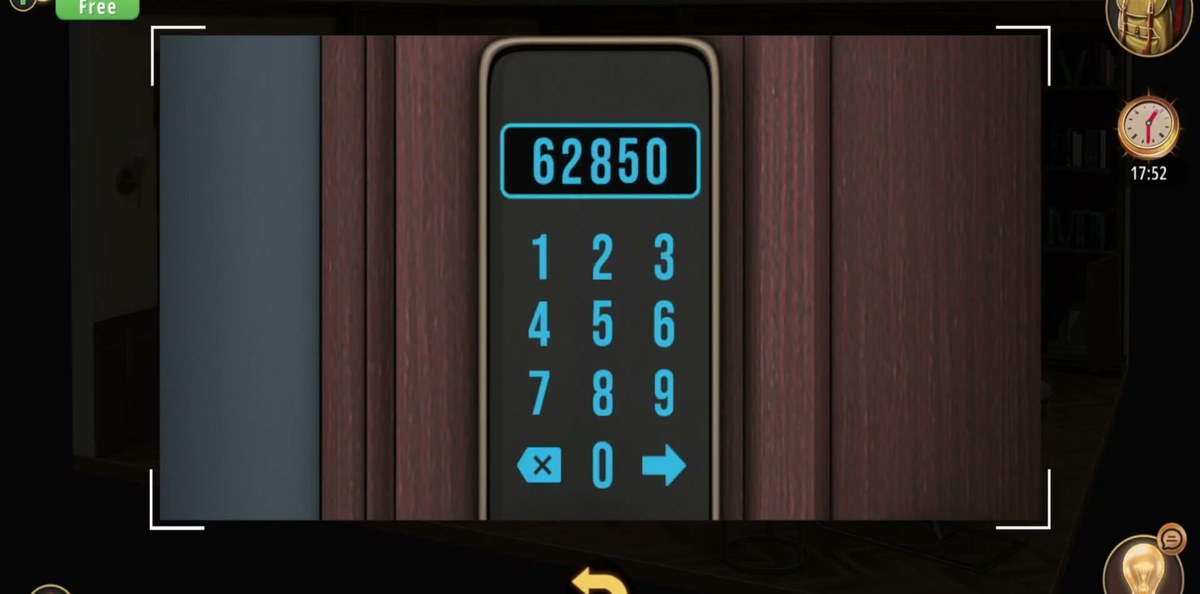
- Final keypad: 62850 — the laptop displays it once you are logged in, then you type it on the five-digit keypad.
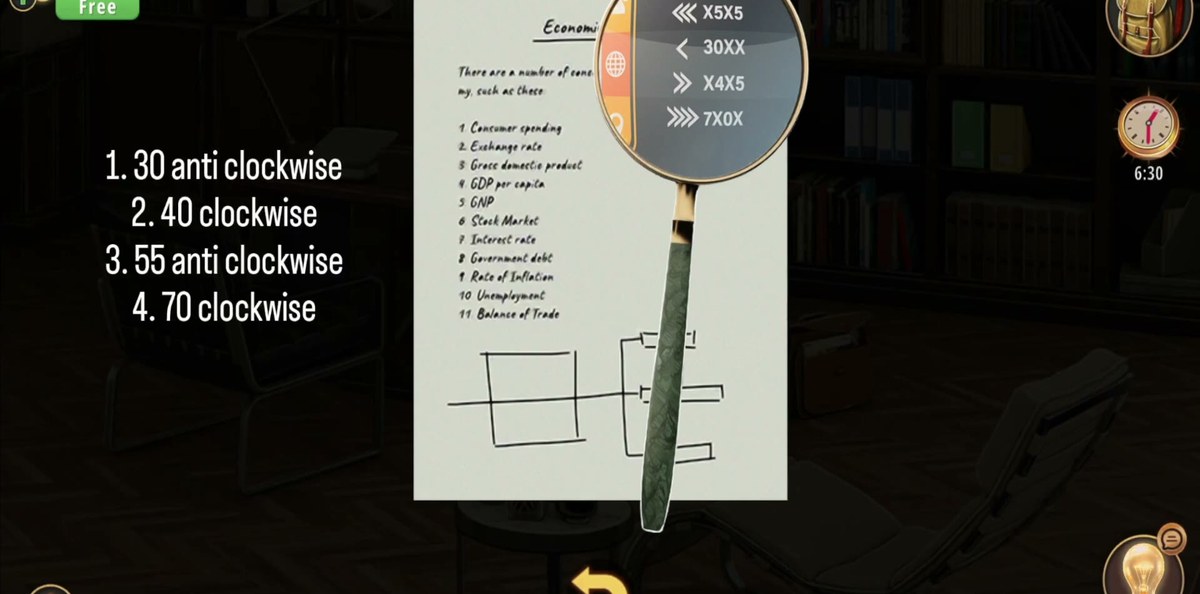
- Hidden wall safe: 30 anti-clockwise, 40 clockwise, 55 anti-clockwise, 70 clockwise — the game's own hint text, and the dial the player works at 2:51.
The order matters: password → verification → keypad. The safe is a side branch and does not feed the chain.
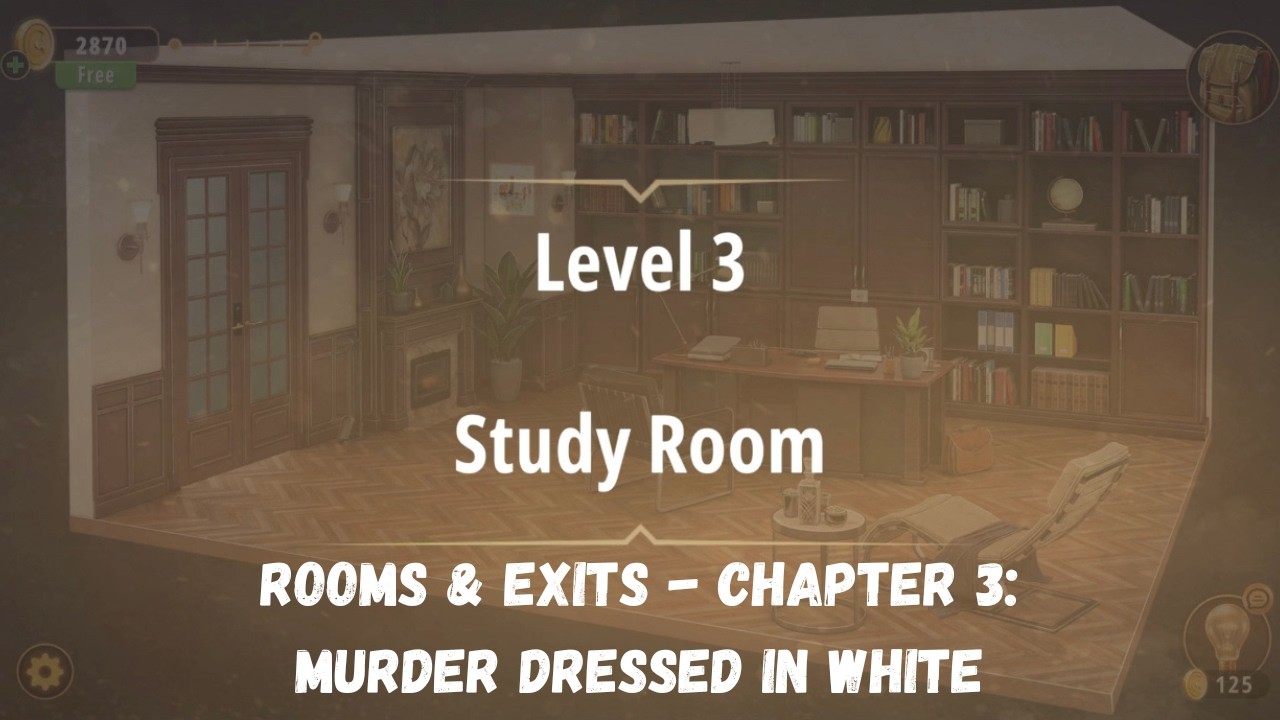
The 5:13 run used for every frame on this page.
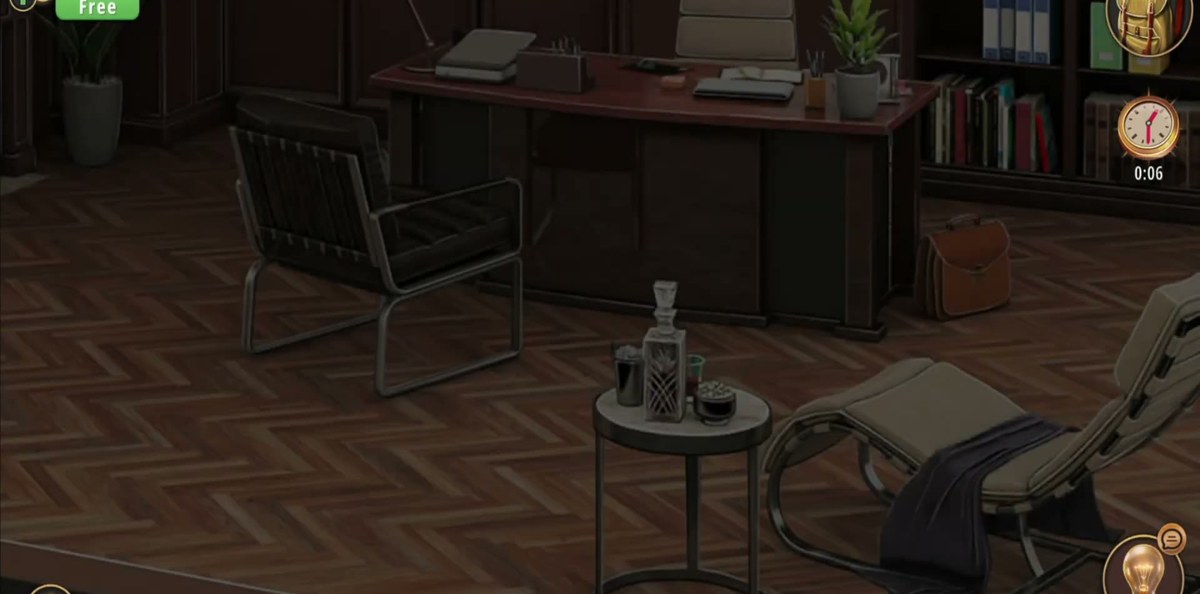
What this level actually is.
A gentleman's study, and the richest room in the chapter visually: dark panelled walls, herringbone parquet, a heavy wooden desk with a black office chair, floor-to-ceiling bookshelves, a lit fireplace with a mantel, a lounge chair with a blue throw, and a marble-topped side table carrying a decanter, an ice bucket, a glass of amber liquid and a bowl of snacks.
The puzzle structure is a single linear chain plus one side branch. The chain runs Photograph → laptop password → 2-step verification → laptop reveals a code → keypad, and it is genuinely linear: you cannot skip the verification, and the keypad code is not written anywhere in the room — the laptop prints it for you. The side branch is the rotary wall safe behind the hinged panel, which takes a four-turn dial combination and sits outside the main chain.
Everything else is noise, and there is a lot of it: five inventory items with no lock to use them on, an eleven-entry economics list, a shelf of books with Roman-numeral hints, and a glowing round mechanism that never pays off. The recording spends most of its middle three minutes on that noise.
The map: what is where.
| Object | Where | What it does |
|---|---|---|
| Laptop (Acer) | On the desk | Password 20062015, then 2-step 45837, then displays 62850. |
| Photograph | Carried item | Dated 20.06.2015 — the source of the laptop password. |
| Phone | On the desk | Message bubble reads 45837 — the 2-step verification code. |
| Keypad | On the wall / panel | Five-digit pad with 0–9, X and an enter arrow. Takes 62850. |
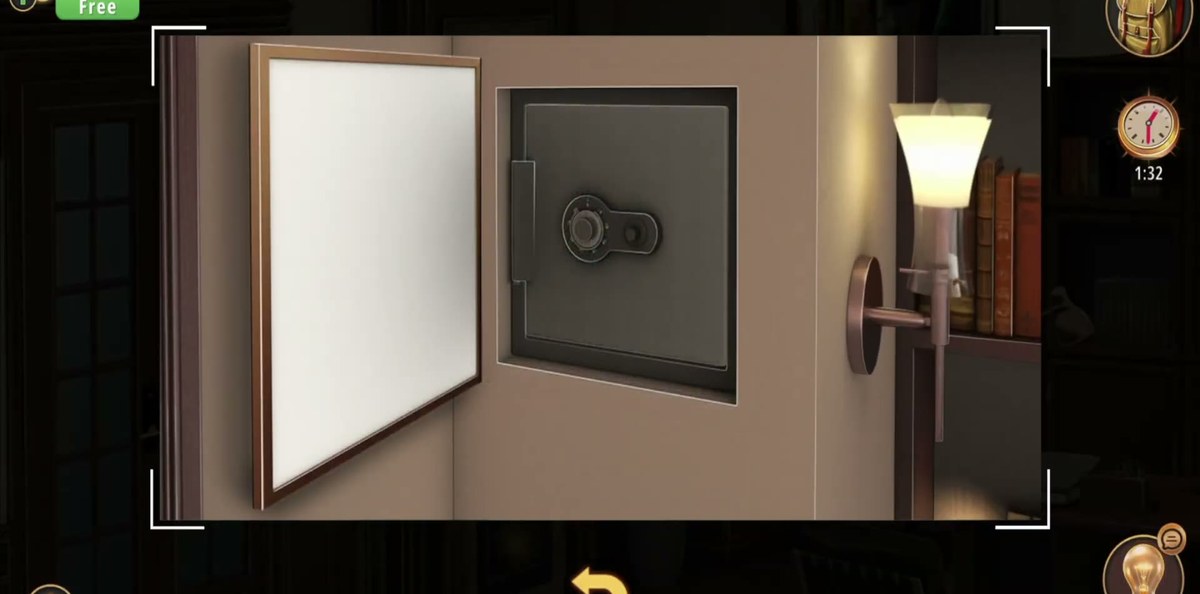
| Hidden safe | Behind a hinged white panel, right of the fireplace | Rotary dial safe. 30 CCW, 40 CW, 55 CCW, 70 CW. |
| Hinged panel | Wood-panelled wall | Already open at 0:54; hides the safe. Wall sconce to its right. |
| Round glowing mechanism | Dark wood wall | White square core. Touched at 0:44, never explained. |
| Economics book | On the desk | Printed list of eleven economic indicators. Looks like a cipher key; unused. |
| Bookshelves | Back wall | RUDYARD KIPLING, JUNGLE BOOK, BOLTON, BERTHA RUNKLE. Roman-numeral hint: IV=4, III=3, VI=7. |
| Side table | Beside the lounge chair | Decanter, ice bucket, glass, snacks. Scenery with a close-up at 0:05. |
| Blanket / Shovel / Brush / Ash / Light bulb | Carried items | All picked up in the run, none used on a lock. |
| Fingerprint | Carried item | Produced by the Brush at 1:41; no lock consumes it. |
Step by step.
Order follows the recording. Timestamps are video time; the links jump to the matching second.
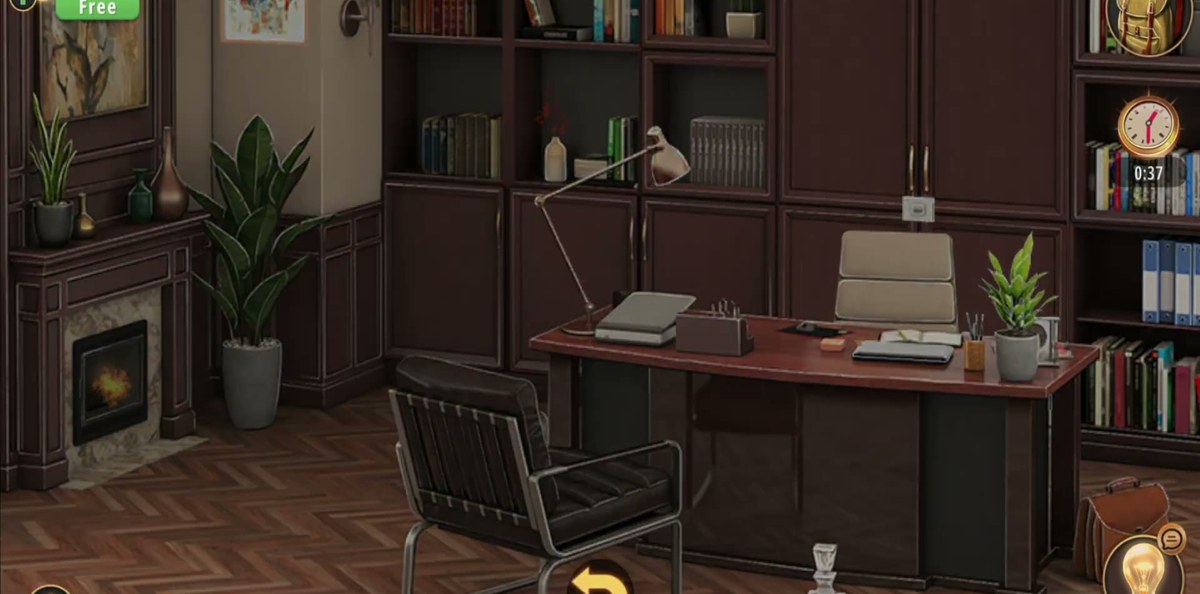
Books and numerals: what the shelf is for.
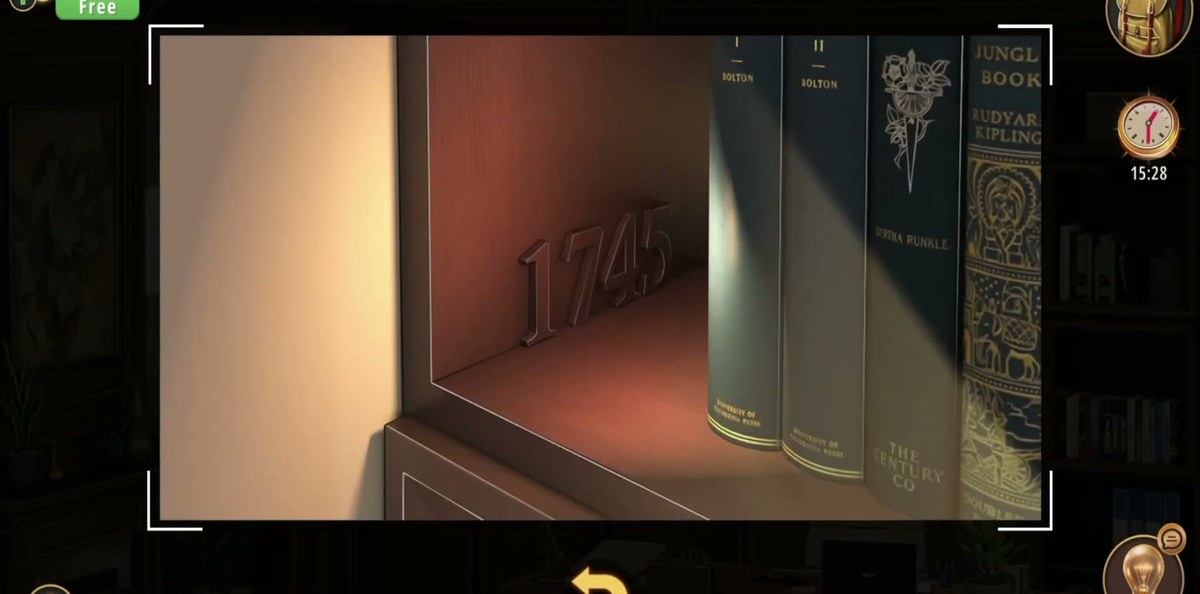
The bookshelves get a lot of screen time and the readable spines are RUDYARD KIPLING, JUNGLE BOOK, BOLTON and BERTHA RUNKLE, plus one stamped spine number that OCRs as 1745 but shifts between frames. The game's own hint for this shelf says: Look at the bookshelves with the Globe on, notice the blue books and how they stand — IV = 4, III = 3, VI = 7. So the shelf is a counting puzzle: blue books standing in Roman numerals, read as digits. It is not a printed code and it does not feed the laptop.
That hint also tells you something useful about the level's design: when a shelf looks like a cipher, the game will eventually say so in a hint, and the hint will be about how the books stand rather than what is printed on them. If you are stuck on the books, count the blue spines rather than reading titles.
Where people get stuck.
"The laptop password does not work." It is 20062015, eight digits, no dots, no slashes. The Photograph prints it as 20.06.2015 and the two most common mistakes are keeping the separators and typing 20062015 with a leading zero dropped — there is no leading zero, but there are two zeros in the middle: 2-0-0-6-2-0-1-5.
"I am past the password but stuck on verification." The code is not in the laptop, the books or the safe. It is on the phone on the desk: 45837. If your phone shows nothing, you have not picked it up yet — it is a carried item, not a wall object.
"Where is the code for the keypad?" The laptop prints 62850 only after verification. Players hunt the room for a five-digit number on a wall and there is not one; the laptop is the only source.
"The safe dial does nothing." It takes four alternating turns, not four digits: 30 anti-clockwise, 40 clockwise, 55 anti-clockwise, 70 clockwise. Turn anticlockwise first — starting clockwise resets the dial, which is why people report that "the first number will not take".
"What do I do with the Blanket, Shovel, Brush, Ash and Light bulb?" Nothing, in this run. They are collected and never consumed. The same goes for the Fingerprint the Brush produces and for the economics book's eleven-entry list.
"The round glowing mechanism must be a button." It responds once, early, and never again. It is not the safe and not the keypad. Do not build a theory around it.
Where Study Room sits in Chapter 3.
Chapter 3 is Murder Dressed in White. Study Room is room 3 of 15, between Living Room and Guest Toilet, and it is the chapter's device level: two of its three codes exist only on screens. That is worth knowing before you start, because it changes where you look — the laptop and the phone are locks and clue-holders, not scenery.
It is also the longest chain in the chapter's opening run. Guest Toilet after it has a single safe and a single key; Study Room has a password, a second factor, a derived code and an optional rotary safe. If you are working through in order, do the laptop before you touch anything else — the verification step is a wall you cannot climb without the phone, and the phone is easier to find once you know you need it.
- 1 Dining Room guide
- 2 Living Room guide
- 3 Study Room you are here
- 4 Guest Toilet guide
- 5 Workshop guide
- 6 Guest Bedroom guide
- 7 Master Bathroom guide
- 8 Kids Playroom guide
- 9 Backyard guide
- 10 Garden guide
- 11 Kitchen guide
- 12 Driveway guide
- 13 Kids Bedroom 1 guide
- 14 Storage Room guide
- 15 Garage guide
- 16 Attic guide
- 17 Terrace guide
- 18 Basement guide
- 19 Garden Shed guide
- 20 Kids Bedroom 2 guide
- 21 Hobby Room guide
- 22 Master Bedroom guide
- 23 Entertainment Room guide
- 24 Hallway guide
Previous room: Chapter 3 Level 2 — Living Room
Next room: Chapter 3 Level 4 — Guest Toilet
Frequently asked questions.
What is the laptop password in Rooms & Exits Chapter 3 Level 3 Study Room?
It is 20062015 — eight digits, the date on the Photograph item. Open the Photograph in your inventory and the date reads 20.06.2015; strip the dots and you have the password. We read it twice: full-frame OCR of the login screen shows the field filled with 20062015, and a 3x crop of the same field reads the same eight digits. The build-up is visible frame by frame too — 20, then 20062, then 2006201, then 20062015 — so there is no ambiguity about the digits.
What is the 2-step verification code?
45837, five digits. It is on the phone: pick it up and the message bubble shows 45837. Type it into the laptop's 2-Step Verification — ENTER YOUR VERIFICATION CODE screen. We read it twice from two different places: the phone message itself at 4:23, and the verification field at 4:44 with the digits already typed in. Both give the same five digits.
What is the code 62850 for?
62850 is the final lock — the five-digit keypad. You do not find it written on a wall: the laptop displays it once you are past the password and the 2-step code. Then you walk to the keypad and enter 62850. Confirmed twice: the laptop screen at 4:46 and the keypad display at 5:08 both read 62850.
What is the combination for the hidden wall safe?
The safe behind the hinged panel opens on 30 anti-clockwise, 40 clockwise, 55 anti-clockwise, 70 clockwise. That sequence is the game's own hint text for this level, shown as four numbered lines — 1. 30 anti clockwise / 2. 40 clockwise / 3. 55 anti clockwise / 4. 70 clockwise — and it matches the dial the player works between 2:51 and 3:05. Note the directions: two turns anticlockwise, two clockwise, alternating.
Where is the safe?
Behind a hinged white panel on the wood-panelled wall, beside a wall sconce with a warm glow. The panel is already open when the player reaches it at 0:54 and the safe inside is dark grey with a rotary dial. It is not in the desk, not behind a painting and not under the floor — it is a wall safe, high enough that the sconce sits to its right.
How do I get the phone message?
The phone is on the desk. Pick it up and the screen shows a search bar and a grey message bubble with 45837 in it — that is the whole interaction. There is no unlock step and no second message; the code is simply sitting in the bubble at 4:22 in the recording.
What does the book with the economy text do?
It is the level's biggest red herring. A thick book on the desk opens on a printed page headed The economy may be considered as having developed through the following phases or degrees of precedence, followed by a numbered list — 1 Consumer spending, 2 Exchange rate, 3 Gross domestic product, 4 GDP per capita, 5 GNP, 6 Stock market, 7 Interest rate, 8 Government debt, 9 Rate of inflation, 10 Unemployment, 11 Balance of trade. It reads like a key to an eleven-symbol cipher. It is not used: nothing in the run refers to any of the eleven entries.
What are the items Blanket, Shovel, Brush, Ash and Light bulb for?
They are inventory items picked up around the room — Blanket, Shovel, Brush, Ash and a Light bulb are all confirmed in the bag at different points. None of them is used on a lock in this run. The Brush and the Fingerprint it produces are examined, but no lock consumes either, so treat the collection as optional.
The books on the shelf have numbers — are they a code?
They have titles, not a code. Readable spines include RUDYARD KIPLING, JUNGLE BOOK, BOLTON and BERTHA RUNKLE, and one spine carries a stamped number that OCRs as 1745 but stays unstable between frames. The game's own hint for this shelf talks about the blue books and how they stand, using Roman numerals — IV = 4, III = 3, VI = 7 — so the books are a counting puzzle, not a printed code.
What is the circular glowing thing at 0:44?
A round mechanism set into dark wood with a bright white square at its centre. The player touches it early and it is never explained in the run. It is not the safe — the safe is the separate wall panel at 0:54 — and it is not the keypad used at the end, which is a flat five-digit pad. We list it as an unexplained interactive.
How long is Study Room and what is the reward?
The recording is 5:13. The in-game timer reads 17:53 at 5:09, so this was a long session by the player before the capture. The video ends at 5:12 on a completion animation with a gold emblem and a green progress bar, and no readable reward figure — so this page prints no coin amount for the level.
What order should I do the locks in?
Password first, then 2-step, then keypad. Specifically: read the Photograph (20.06.2015) → laptop password 20062015 → the laptop blocks you with 2-Step Verification → find the phone, read 45837 → enter it → the laptop displays 62850 → enter 62850 on the keypad. The wall safe (30/40/55/70) is a side branch on the same level and does not feed this chain.
What this page could not verify.
1. What the safe contains. The dial is worked between 2:51 and 3:05 and the combination is confirmed from the game's own hint, but the recording does not settle on a clear shot of the safe standing open with its contents. We therefore do not claim what is inside it.
2. The stamped number on the book spine. It OCRs as 1745 in some frames and as 11745 or J7A5 in others, and a 3x crop was still unstable. It is not used by any lock in the run, so we have left it out of the guide rather than pick a reading.
3. The reward for the level. The video ends at 5:12 on the completion animation, before any results card. No coin figure is legible, so none is printed.
4. The round glowing mechanism and the Fingerprint. Both are interactive and both are abandoned in the footage. We cannot tell you whether they belong to a puzzle that this player skipped or to nothing at all.