 GridPaw
 Shikaku
 Akari
 Kakuro
 Nonogram
 Nurikabe
 Pictomino
 KenKen
 Binary
 Star Battle
 Hashi
 Slitherlink
 Murder Sudoku
 Meowdoku
 Crazy Cleanup
Rooms & Exits Chapter 3 Level 22 Walkthrough: Master Bedroom
The Master Bedroom is room 22 of 24 in Chapter 3, Murder Dressed in White, and it is the longest room in this stretch — the in-game clock passes 17 minutes before the recording stops. It is also the only one of the three bedroom-side rooms where the puzzles are spread across a second space: a walk-in closet with its own vanity, mirror and tablet.
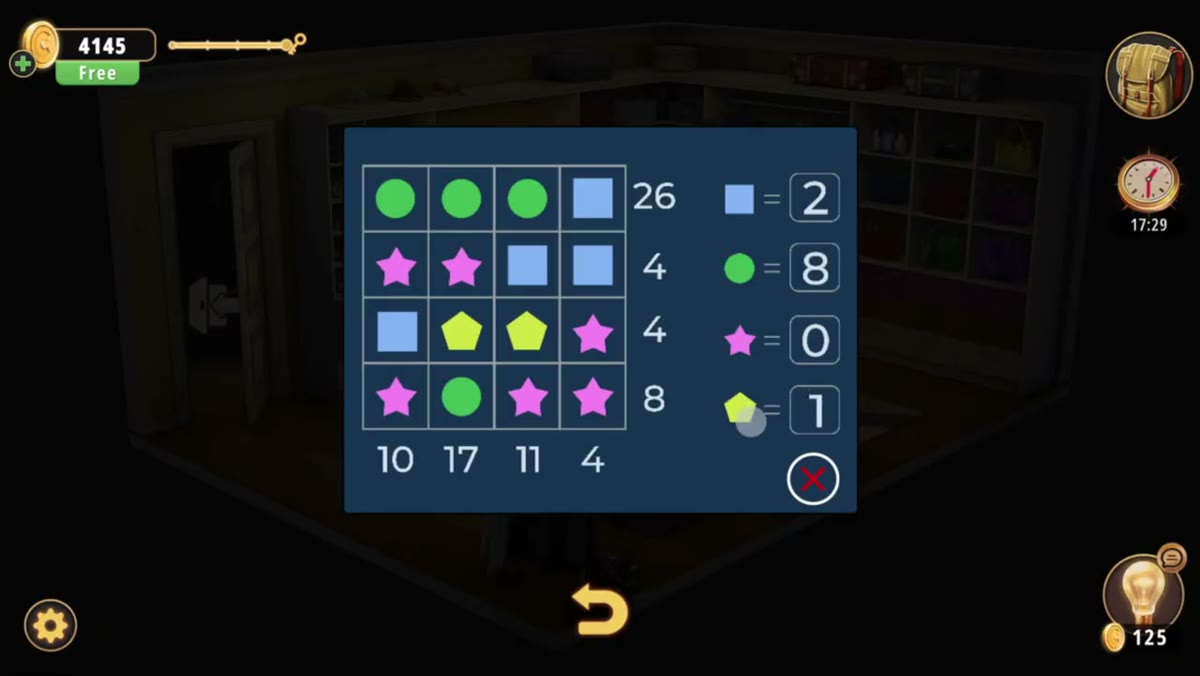
Four locks, no typed door code in the footage. The numbers the game actually prints: circle 8, square 2, star 0, pentagon 1.
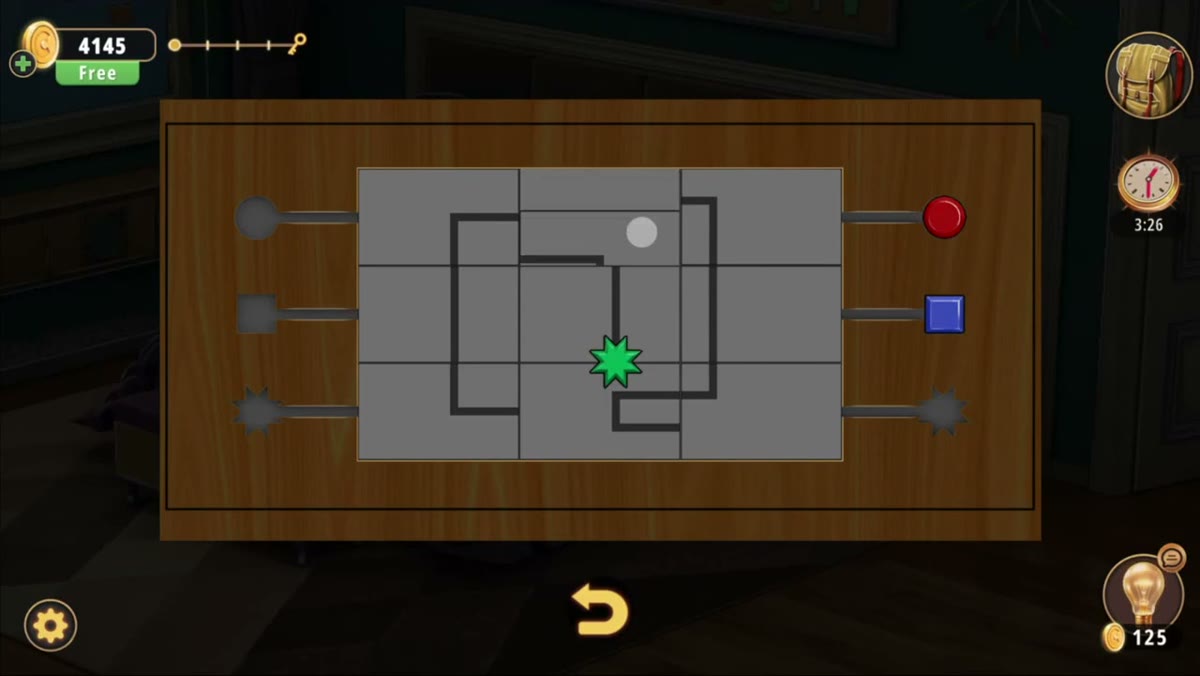
- Path board (0:20 to 1:20): a white ball, a green star, and three shape ports on each side.
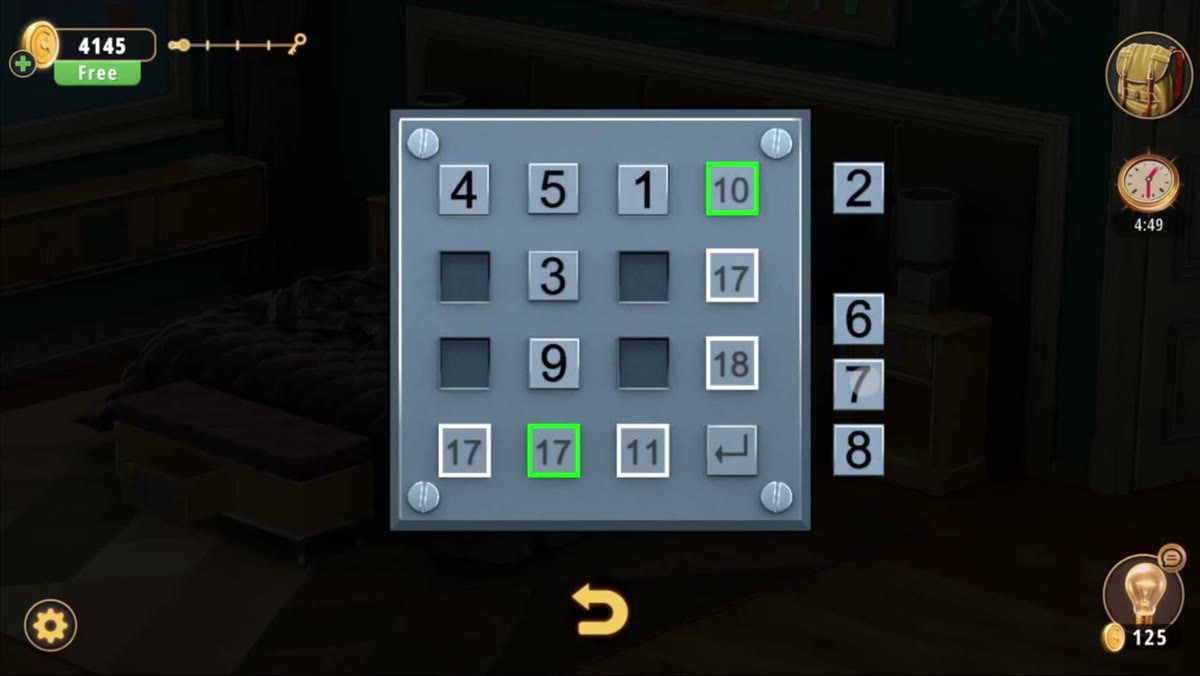
- 4x4 number board (2:10): top row 4, 5, 1, 10; side column 2, 6, 7, 8; left-arrow delete key in the corner.
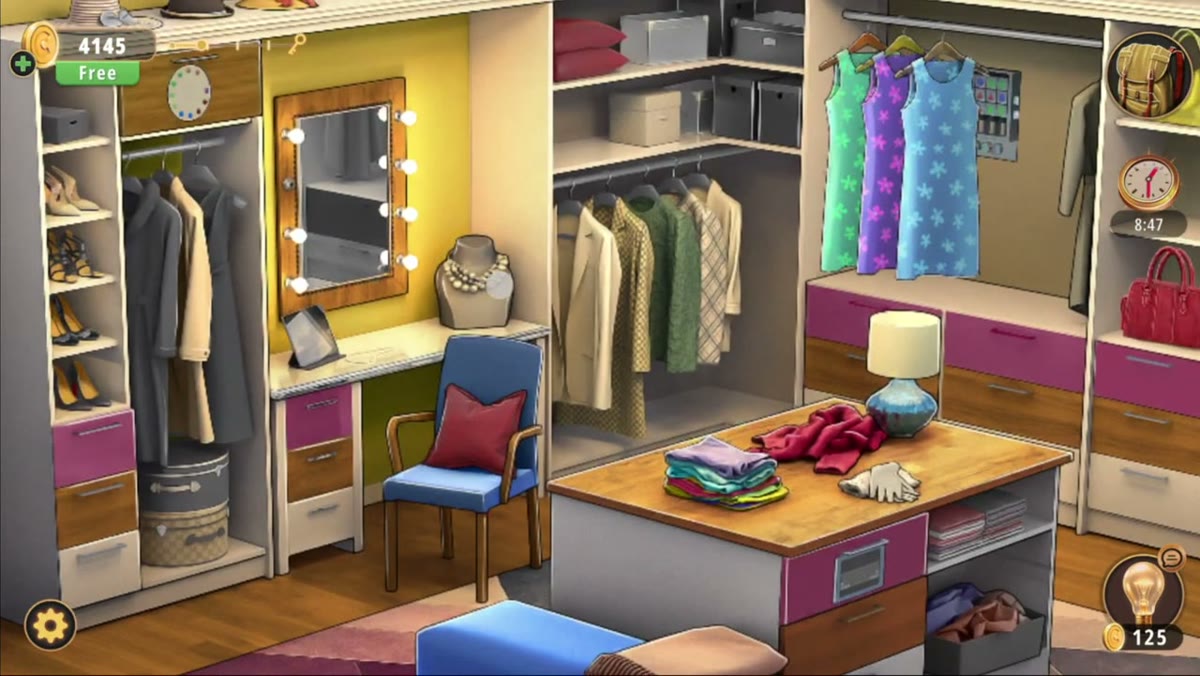
- Walk-in closet (3:24): rails, shoes, hatboxes, bulb mirror, tablet on the vanity.
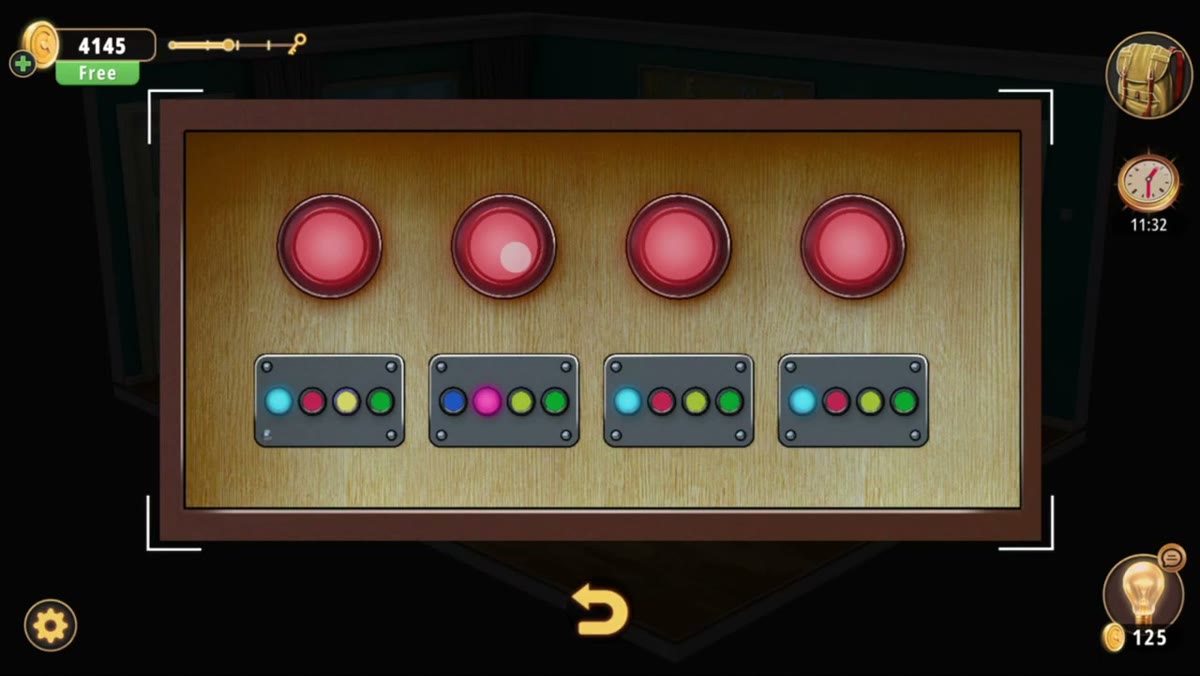
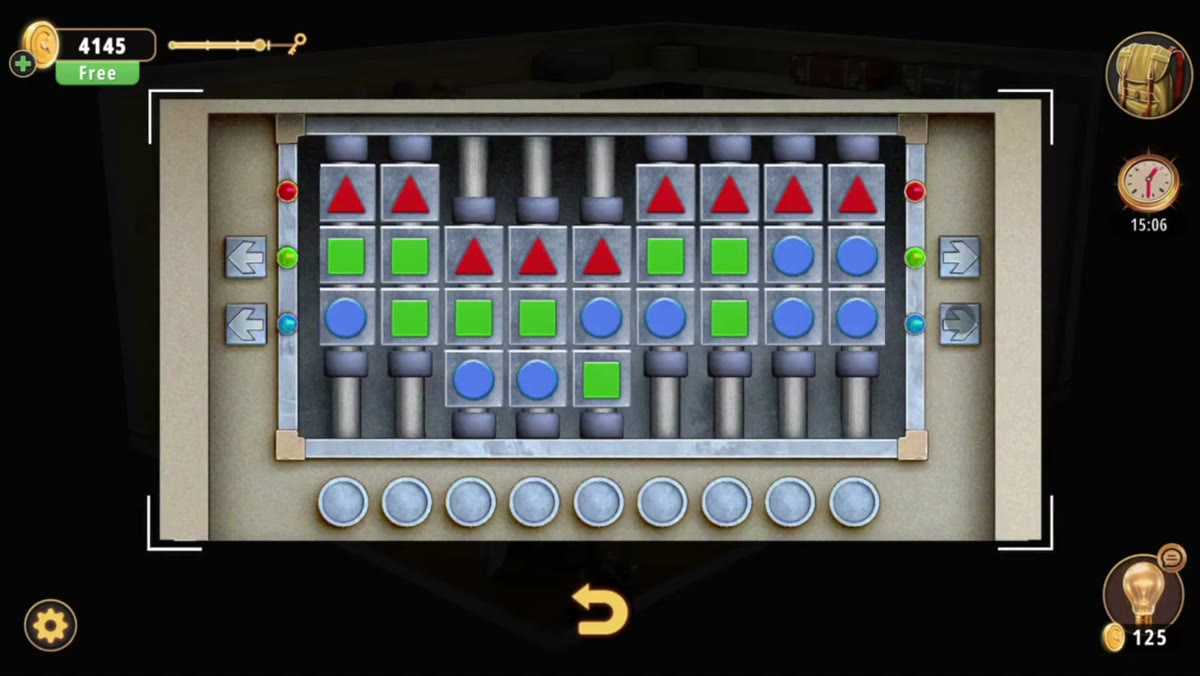
- Four red buttons (4:30) over four modules of four coloured lights, and a 3x8 shape grid (6:36) with eight plungers and shift arrows.
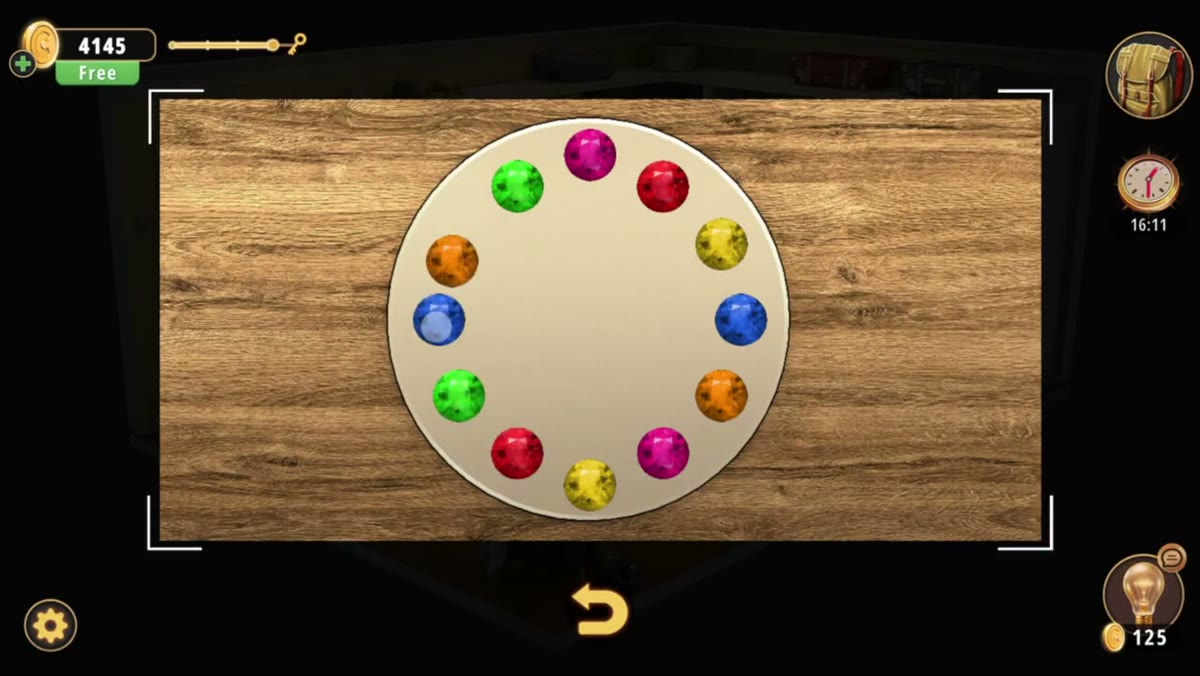
- Twelve-gem circle (7:30): six colours repeated twice around the ring.
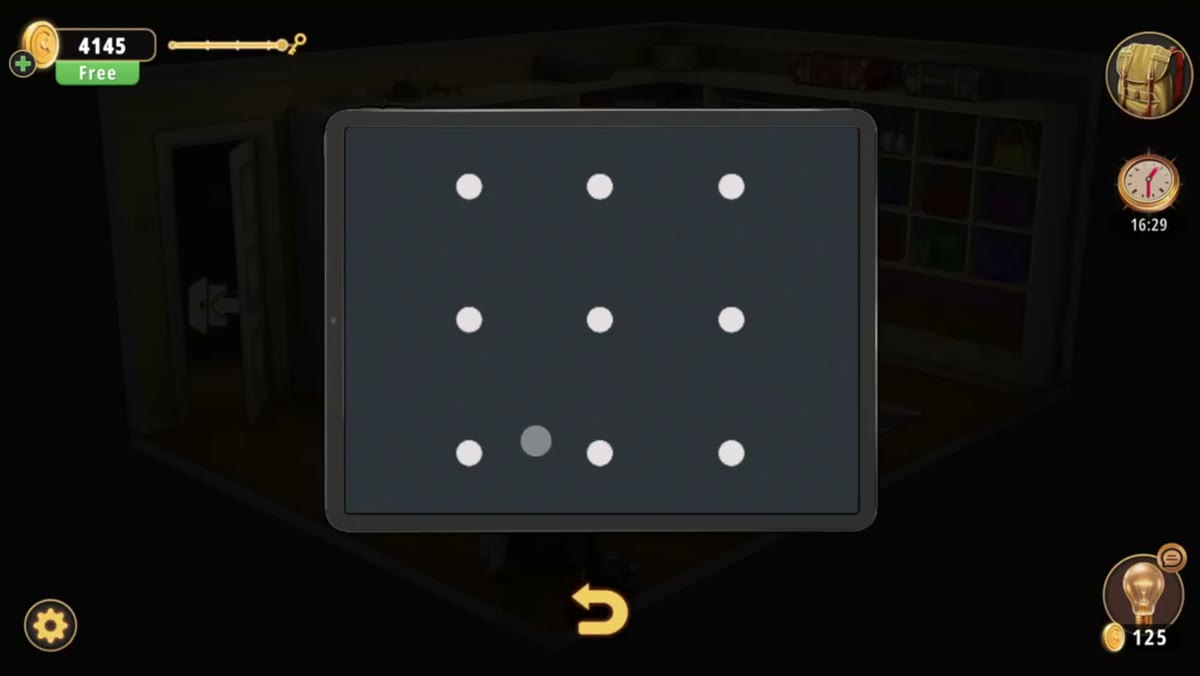
- Tablet (7:48 and 8:12): 3x3 dot pattern, then the shape algebra screen.

The Master Bedroom run used for every frame on this page.
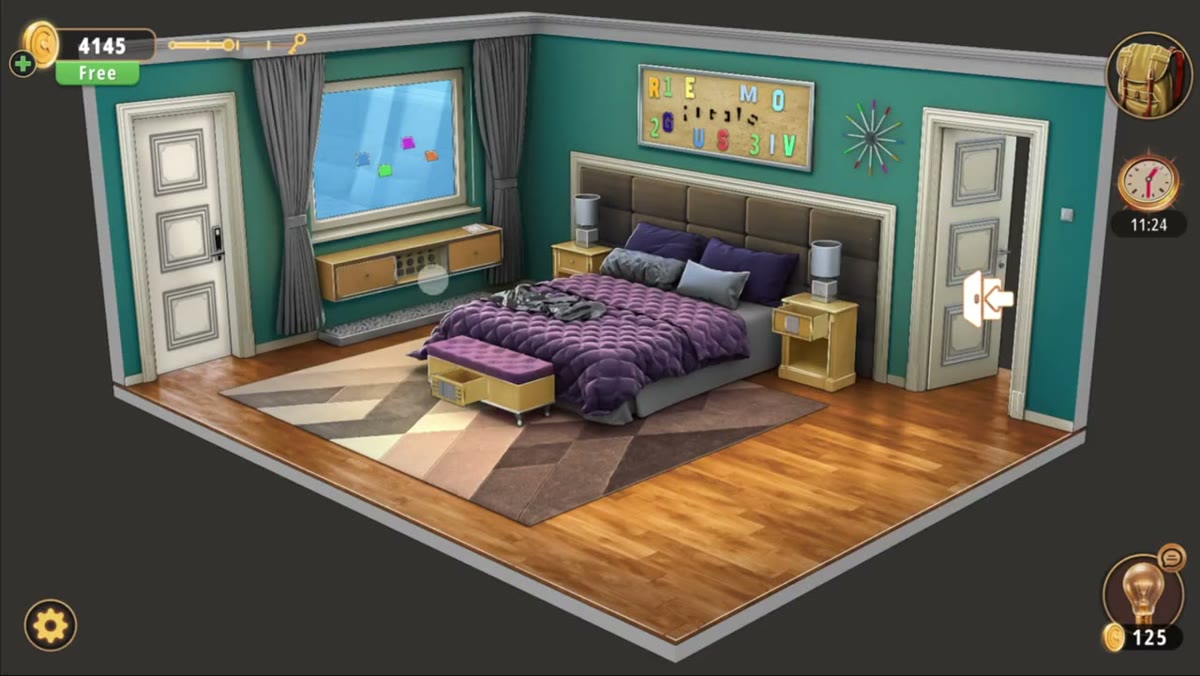
What this level actually is.
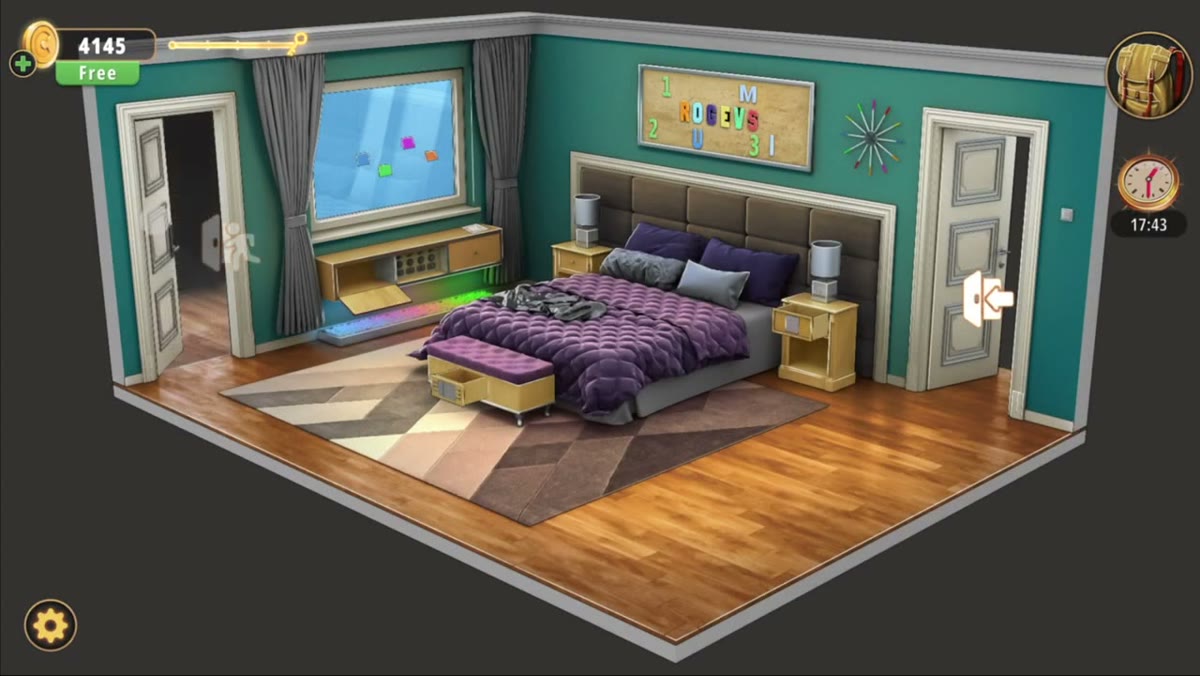
A grown-up bedroom in teal, seen isometric, with three walls and two doors. The left wall has a tall white panelled door and a wide window with grey curtains; outside the glass there are bright abstract shapes rather than a normal sky, which is the game's way of saying the window is decorative. Below the window sits a light wood console table with a stereo unit, and a full-size keyboard with coloured lights lies on the floor beneath it.
The centre is the bed: a tall dark brown upholstered headboard, a thick purple quilted comforter, purple and grey pillows, matching light wood nightstands with grey lamps on each side, and a purple upholstered bench at the foot with a drawer. Above the headboard hangs a large light-wood framed board of colourful magnetic letters and numbers, and to its right a spiky multicoloured sunburst clock.
The right side is the second door, which stands ajar with an interaction arrow. That door leads to the walk-in closet — a separate dressing room with shoe shelves, hanging rails, magenta drawers, hatboxes, a bulb-framed vanity mirror and a centre island. Between the bedroom and the closet, this level has more interactive surface than any room since the Garden Shed, and it uses it for four unrelated lock types.
The map: what is where.
Everything we could identify, and what it is for.
| Object | Where | What it does |
|---|---|---|
| Path board | Full-screen puzzle, wooden frame | 5x3 grid, white ball to green star, three shape ports each side. |
| White ball | Top right of the path board | The piece you move; it follows the grey channels. |
| Green star | Bottom centre of the path board | The goal marker. |
| 4x4 number board | Full-screen, metal plate with four screws | Top row 4, 5, 1, 10; blanks to fill; left-arrow delete key bottom right. |
| Side number column | Right edge of the number board | Four keys reading 2, 6, 7, 8. |
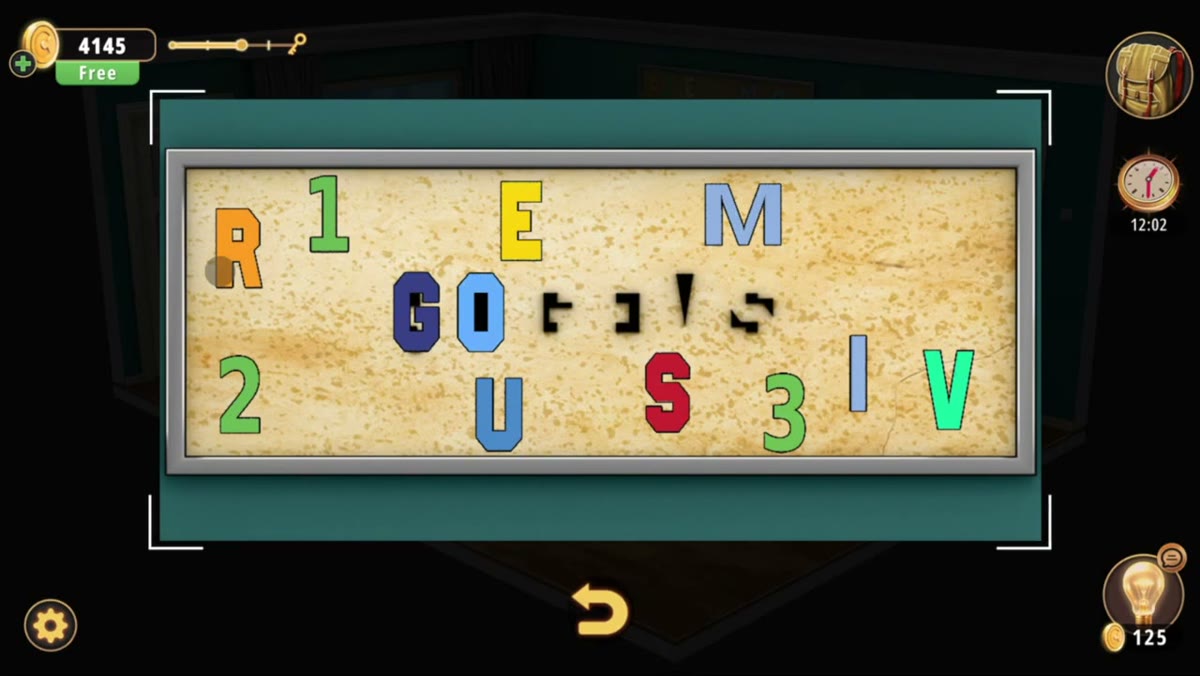
| Magnetic letter board | Above the bed | Colourful letters and digits in a jumble; see the unverified note. |
| Walk-in closet | Through the right-hand door | Rails, shoe shelves, hatboxes, vanity with bulb mirror, centre island. |
| Tablet | On the closet vanity | 3x3 dot pattern, then the shape-algebra screen. |
| Four red buttons | Dark wooden panel | One per module, four modules of four coloured lights below. |
| 3x8 shape grid | Metal panel | Red triangles over green squares over blue circles; eight plungers; shift arrows both sides. |
| Twelve-gem circle | Wooden surface | Six colours repeated twice around a disc. |
| Sunburst clock | Wall right of the letter board | Decorative, multicoloured spokes. |
Step by step.
Timestamps are video time. The in-game clock runs at roughly half speed against the video — at 4:22 of video it already reads 11:24 — so use these to navigate, not to estimate the level's real length.
Where people get stuck.
You are looking for a door code. The Master Bedroom's locks are boards and devices, not a keypad on the door. The right-hand door in the last frame is an exit arrow, not a lock screen.
The path board will not accept the ball. The ball has to leave through the port that matches its shape, and there are three ports on each side. If the ball is sitting on a channel that dead-ends at a mismatched port, tilt the board to bring a different channel under it rather than pushing harder.
You fill the number grid in reading order. The four keys on the right — 2, 6, 7, 8 — are a separate input column, not part of the grid. The top row is prefilled with 4, 5, 1, 10, and the blanks are the cells you complete; the left-arrow key is a backspace, so you can undo a wrong entry without resetting the board.
The red buttons look like a colour match. They are not: each button drives the four lights in its module, and two of the four modules start on different colour orders. Work out what each press changes before you try to make all four modules agree.
You try to read the letter board as a word. The magnets scatter across three rough rows and no pass produced a clean word — the readable letters are R 1 E M / G O / 2 U S 3 I V. If a puzzle is asking you for a name, take it from the tablet or the gems, not from this board.
You expect a reward screen at the end. This recording does not have one. If you are following along and your run ends with a results card, you have played further than this video, not less far.
Where the Master Bedroom sits in Chapter 3.
Chapter 3 is Murder Dressed in White and runs 24 rooms. The Master Bedroom is 22 of 24, between the Hobby Room (Level 21) and the Entertainment Room (Level 23). It is the last of the three bedroom-side rooms and the only one with a second interior space attached.
Structurally it is the chapter's widest room: four independent locks, two of them on a tablet, one on a wooden board and one on a metal panel, plus a gem ring. None of them shares a mechanic with the others, which is why the in-game clock runs past seventeen minutes. If you are working through in order, budget two sittings rather than one.
- 1 Dining Room guide
- 2 Living Room guide
- 3 Study Room guide
- 4 Guest Toilet guide
- 5 Workshop guide
- 6 Guest Bedroom guide
- 7 Master Bathroom guide
- 8 Kids Playroom guide
- 9 Backyard guide
- 10 Garden guide
- 11 Kitchen guide
- 12 Driveway guide
- 13 Kids Bedroom 1 guide
- 14 Storage Room guide
- 15 Garage guide
- 16 Attic guide
- 17 Terrace guide
- 18 Basement guide
- 19 Garden Shed guide
- 20 Kids Bedroom 2 guide
- 21 Hobby Room guide
- 22 Master Bedroom you are here
- 23 Entertainment Room guide
- 24 Hallway guide
Previous room: Chapter 3 Level 21 — Hobby Room
Next room: Chapter 3 Level 23 — Entertainment Room
Back to: All Rooms & Exits walkthroughs
Frequently asked questions.
What is the code in Rooms & Exits Chapter 3 Level 22 Master Bedroom?
There is no single typed code. The Master Bedroom uses four separate locks: a wooden path board (roll a white ball from the top right to a green star), a 4x4 number board with a side column of 2, 6, 7 and 8, a 3x8 shape grid with eight plungers, and a tablet that holds both a 3x3 dot pattern and a shape-algebra screen. The only hard numbers the game prints are on the tablet: green circle = 8, blue square = 2, purple star = 0, yellow pentagon = 1.
How do I solve the path board?
It is a maze on a wooden board, five cells wide and three high, with a white ball parked near the top right and a green starburst near the bottom centre. Three shape ports run down the left edge and three match on the right — a circle, a square and a star — so the ball's route has to leave through the port that matches its shape. You tilt and turn the board rather than dragging the ball; the ball follows the grey channels.
What are the numbers on the 4x4 board?
The grid reads 4, 5, 1, 10 on the top row, then 3 and 17, then 9 and 18, then 17, 17, 11 with a left-arrow delete key in the bottom-right corner. A separate vertical column of four keys runs down the right side: 2, 6, 7, 8. The blank cells on the main grid are part of the puzzle — you fill them — and the green outlines mark the two cells currently selected.
What is behind the door on the right?
A walk-in closet. It is a built-in dressing room with shoes on open shelves, hanging rails with coats and dresses, magenta drawers, stacked hatboxes, a Hollywood-style bulb mirror over a white vanity, a tablet propped on the counter and a pearl necklace on a display bust. A centre island holds folded clothes and white gloves.
How do the four red buttons work?
Four large red buttons sit in a row across a dark wooden panel, and under each one is a module of four coloured lights — blue, green, orange and pink in the left-hand module, pink, orange, green and blue in the second, then back to blue, green, orange, pink for the last two. The buttons drive those lights, so treat it as a sequence-and-state puzzle rather than a colour-matching one: you are trying to make each module show a required order.
What is the 3x8 shape grid?
A metal panel with eight columns and three rows of coloured shapes: red triangles on top, green squares in the middle, blue circles on the bottom. Eight round grey plungers sit under the columns, and there are shift arrows on both sides — green pointing right on the left edge, blue pointing left on the right edge. The arrows move whole columns, and the plungers lock them.
What is the twelve-gem circle?
A large off-white disc set into the wood, ringed by twelve faceted gems. Going clockwise from the top the colours run green, red, yellow, pink, orange, blue — and then repeat the same six colours a second time around the ring. That doubled sequence is the clue: the disc is asking you to pair positions, not to sort colours.
What does the tablet show?
Two screens. First a 3x3 dot pattern lock — nine dots, with the bottom row lit as the pattern is drawn. Then a shape-algebra grid: a 4x4 arrangement of green circles, purple stars, blue squares and yellow pentagons, with the values printed beside it — green circle 8, blue square 2, purple star 0, yellow pentagon 1 — row totals of 26, 4, 4, 8 down the right side and column totals of 10, 17, 11, 4 along the bottom.
Does the shape algebra check out?
Yes, completely. With circle 8, square 2, star 0 and pentagon 1, every row and every column lands exactly on the printed total. Row one is three circles and a square: 3 x 8 + 2 = 26. Row two is two stars and two squares: 0 + 0 + 2 + 2 = 4. Row three is a square and two pentagons: 2 + 1 + 1 + 0 = 4. Row four is a circle and three stars: 8. The columns give 10 (8 + 0 + 2 + 0), 17 (8 + 0 + 1 + 8), 11 (8 + 2 + 1 + 0) and 4 (2 + 2 + 0 + 0). That full reconciliation is why the four values are printed on this page as fact.
Does the recording show the level being completed?
No. This copy runs 8:27 and the last frame is still the bedroom, with the in-game clock at 17:44 and an interaction arrow on the right-hand door. There is no results card, no coin reward and no piggy-bank figure for the Master Bedroom in this footage, so this page prints none.
Why is the in-game timer so much longer than the video?
The upload is time-lapsed. At 4:22 of video the in-game clock already reads 11:24, and by the last frame at 8:27 it reads 17:44. That is roughly a 2:1 compression, so the video timestamps on this page are for navigation only — do not read them as the level's real duration.
Where does the Master Bedroom sit in Chapter 3?
It is room 22 of 24 in Chapter 3, Murder Dressed in White: straight after the Hobby Room (Level 21) and before the Entertainment Room (Level 23).
What this page could not verify.
1. The ending. The file stops at 8:27 in the bedroom with the clock at 17:44. No results card, no coins, no piggy bank. This page therefore contains no reward line for Level 22, and any figure you see elsewhere is from a different recording.
2. The letter board. Three passes read the close-up as R 1 E M / G O [fragment] / 2 U S 3 I V, and earlier wide shots suggested M above the G with digits 1, 2, 3 and 31 at the edges. The board is real and the letters are magnetic, but no pass produced a clean word, so no word is printed as an answer.
3. The 3x8 grid's target arrangement. The panel, the eight plungers and the shift arrows are all clear, but the solved state is never held long enough to transcribe column by column. This page teaches the controls rather than printing a layout.