 GridPaw
 Shikaku
 Akari
 Kakuro
 Nonogram
 Nurikabe
 Pictomino
 KenKen
 Binary
 Star Battle
 Hashi
 Slitherlink
 Murder Sudoku
 Meowdoku
 Crazy Cleanup
Rooms & Exits Chapter 3 Level 18 Walkthrough: Basement
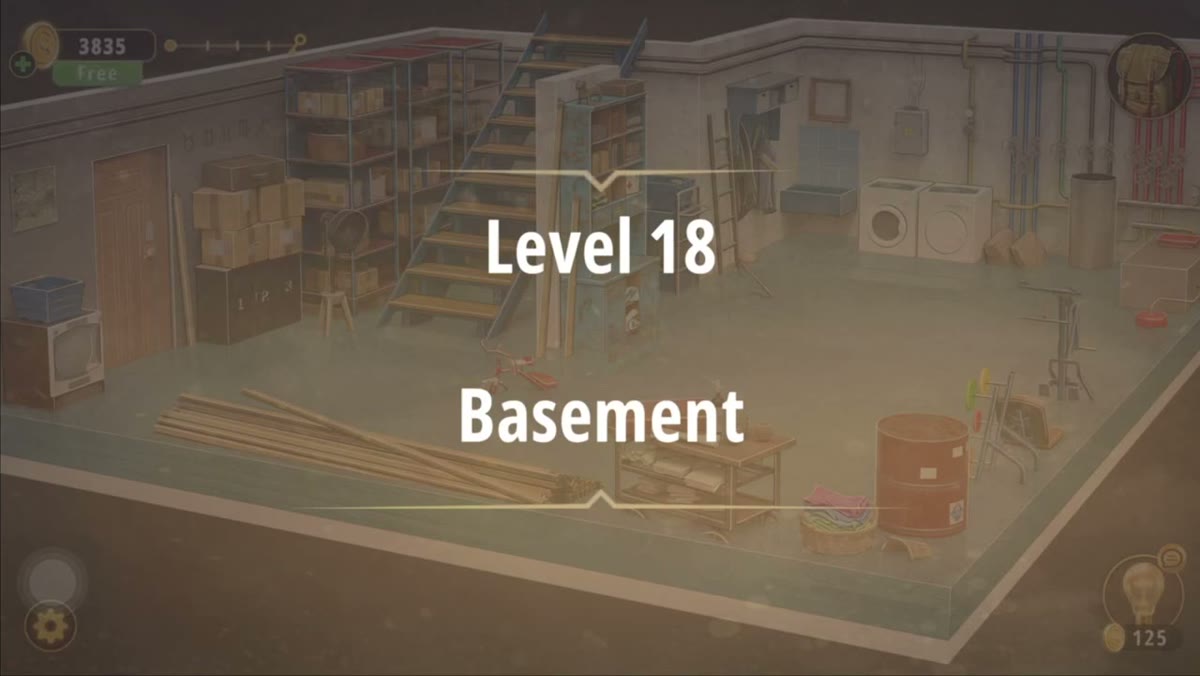
The Basement is the eighteenth room of Chapter 3, Murder Dressed in White, and it is the busiest utility space in the chapter. A concrete box with a blue-riser staircase, a numbered locker bank, a washer and dryer on a pallet, a wall sink, a water heater, a pipe manifold, a weight bench and a red barrel you would not want to stand next to. It also has more locks than any room around it: a coat-rack combination, a round-button keypad, a pipe valve list and two numeric keypads.
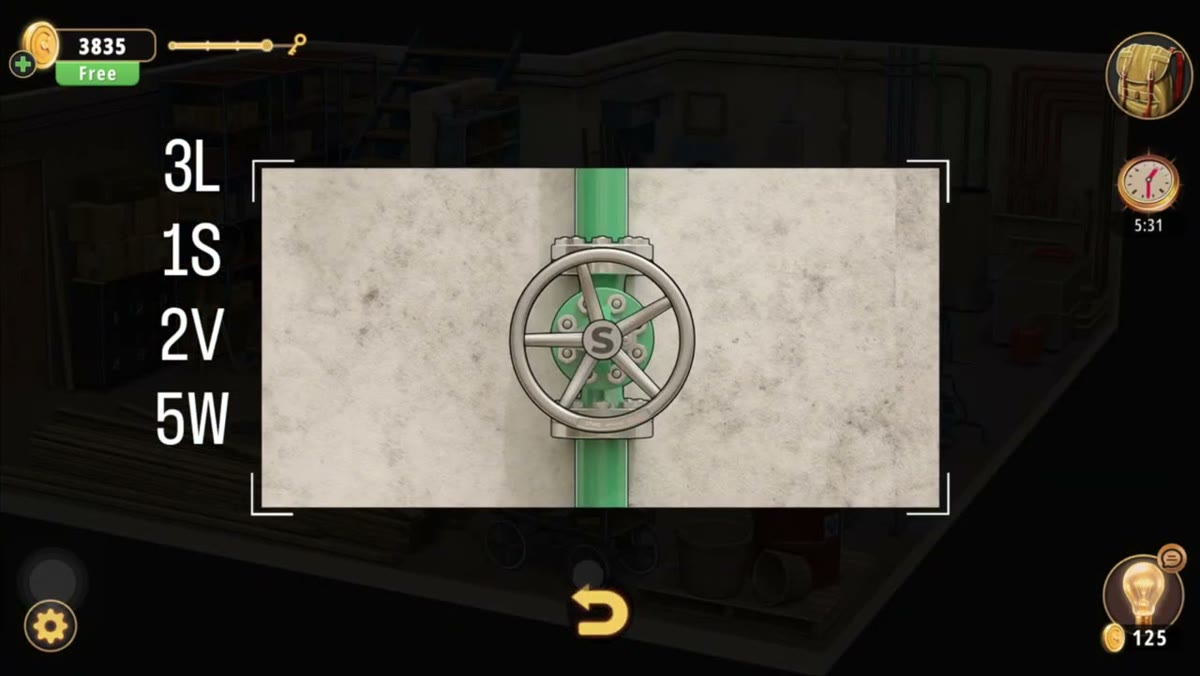
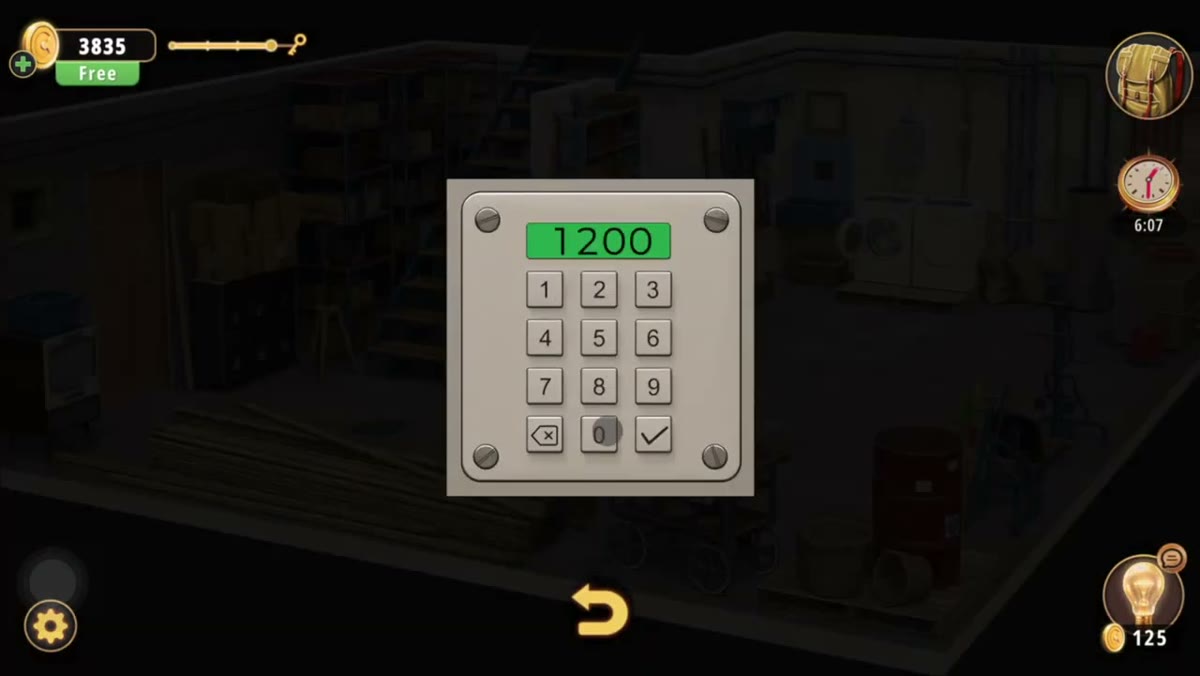
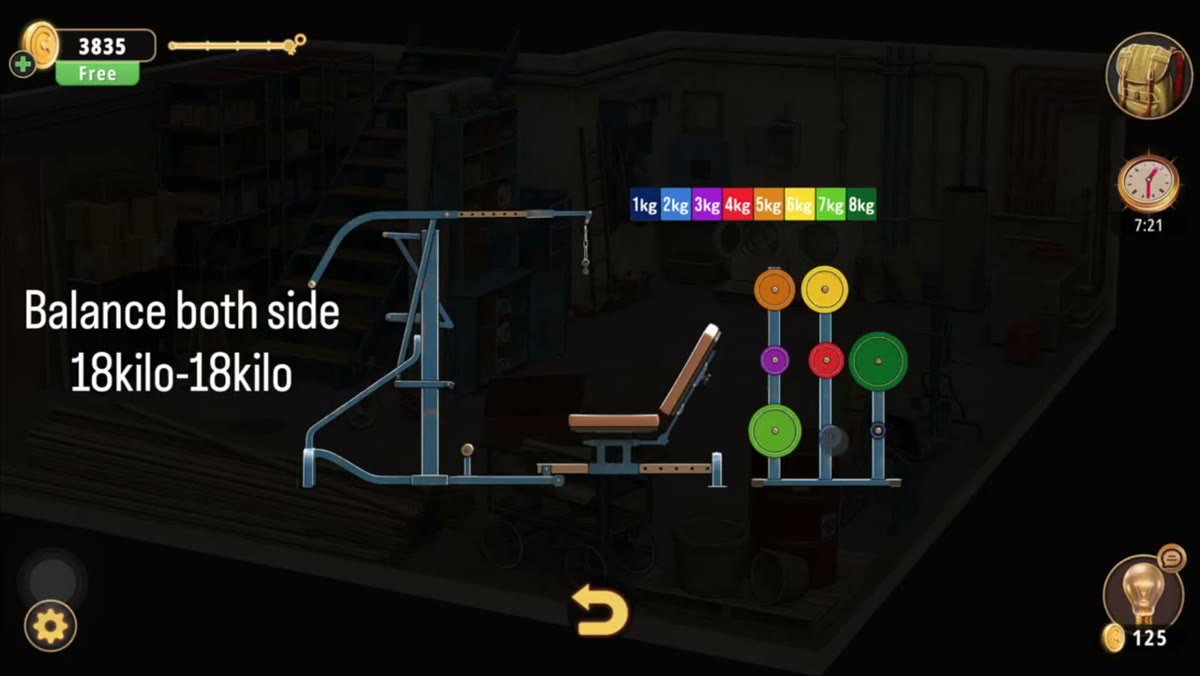
Basement is room 18 of Chapter 3. The pipe manifold is set from 3L, 1S, 2V, 5W; the wall keypad takes 1200; the barbell wants 18 kilos on each side.
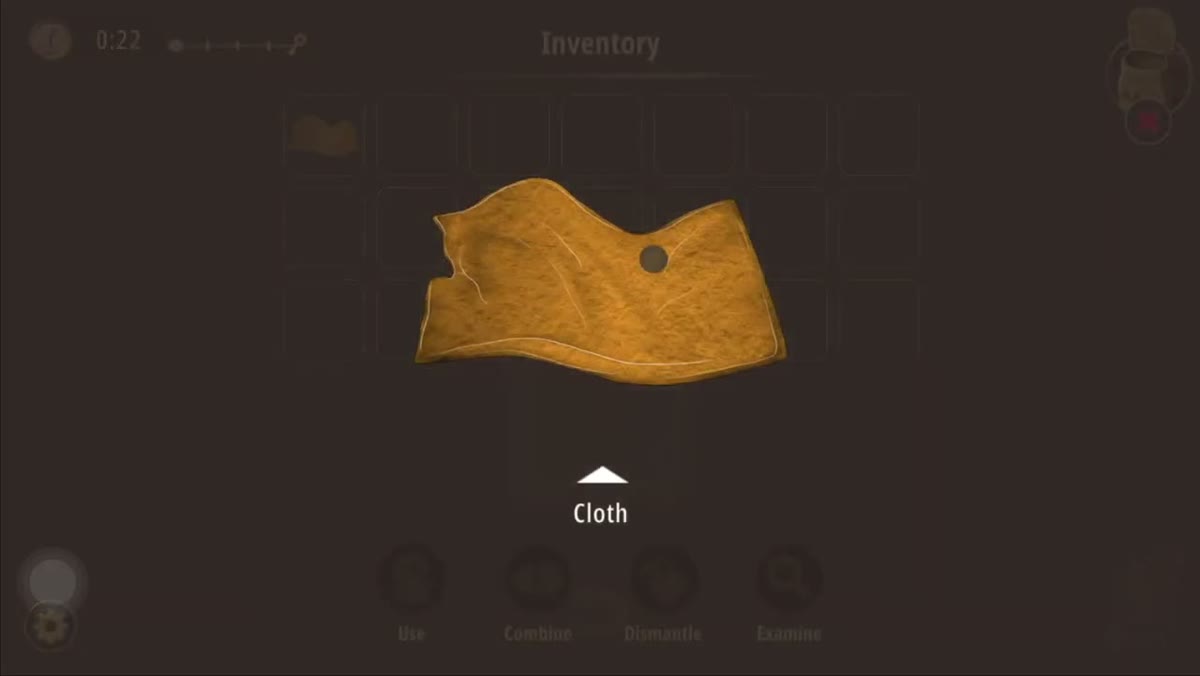
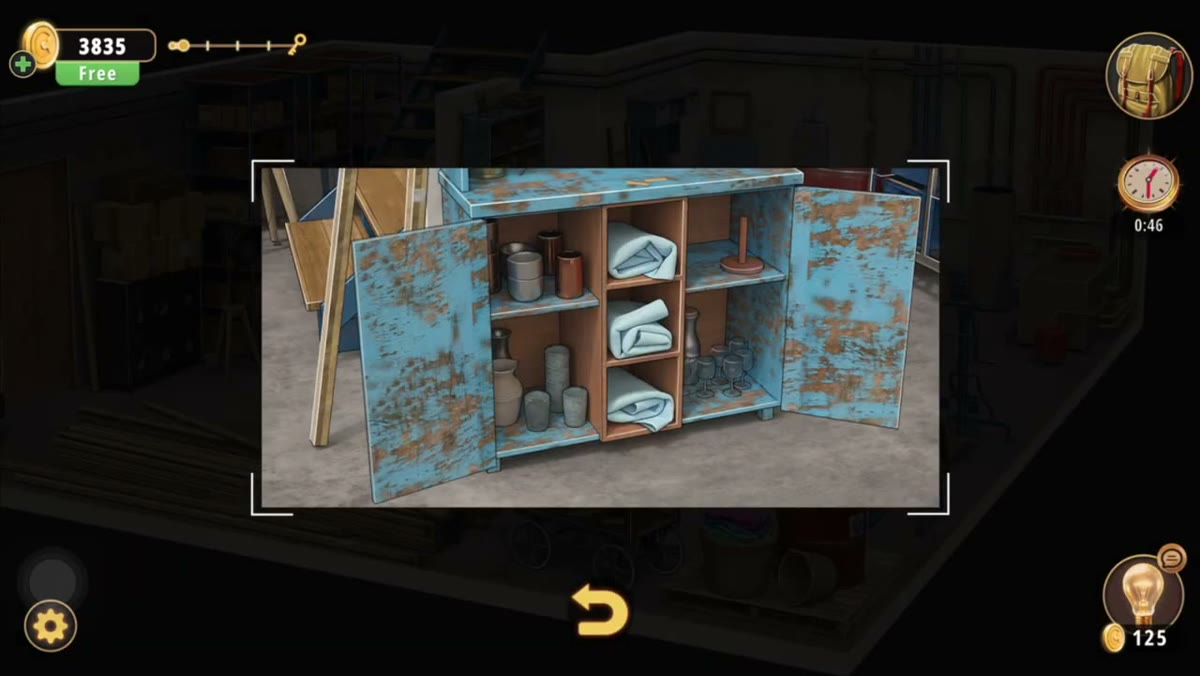
- Clear the left wall first: the blue cabinet (0:42), its drawers (1:06) and the Cloth pickup at 0:25.
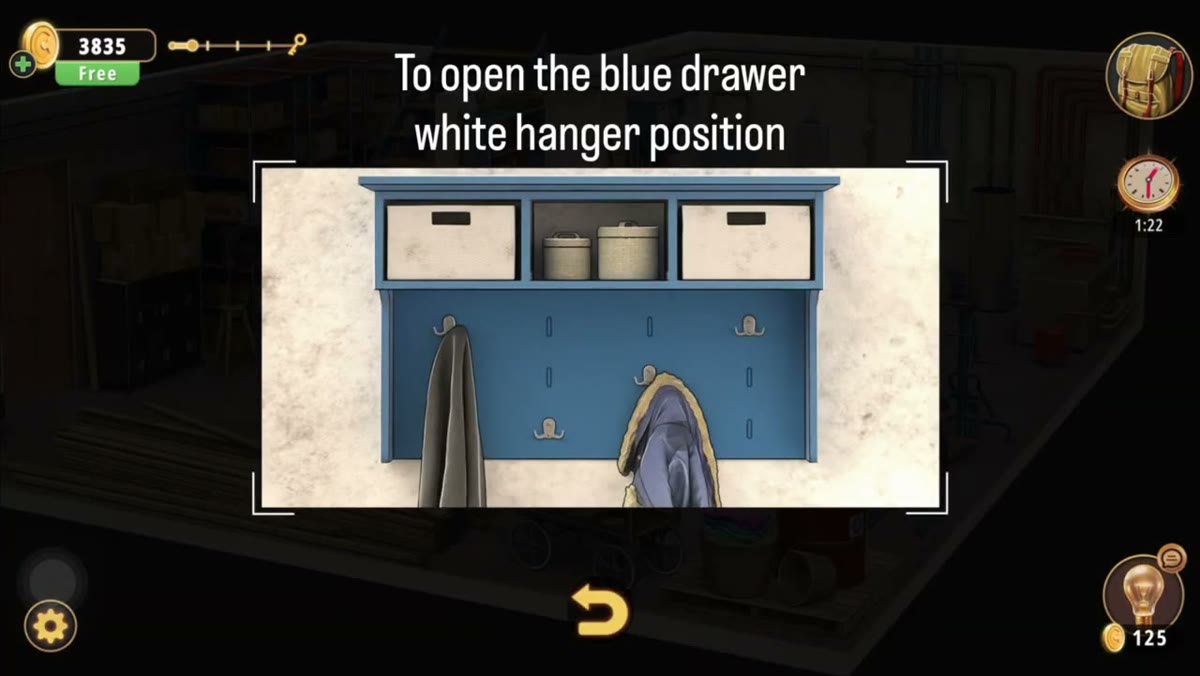
- Read the coat rack at 1:24 — white bins above, three blue hangers below — then work the round-button keypad at 1:30.
- Do the laundry chain: Rings at 2:06 and 2:12, Laundry at 2:24, washer at 2:36, ring tower at 3:06.
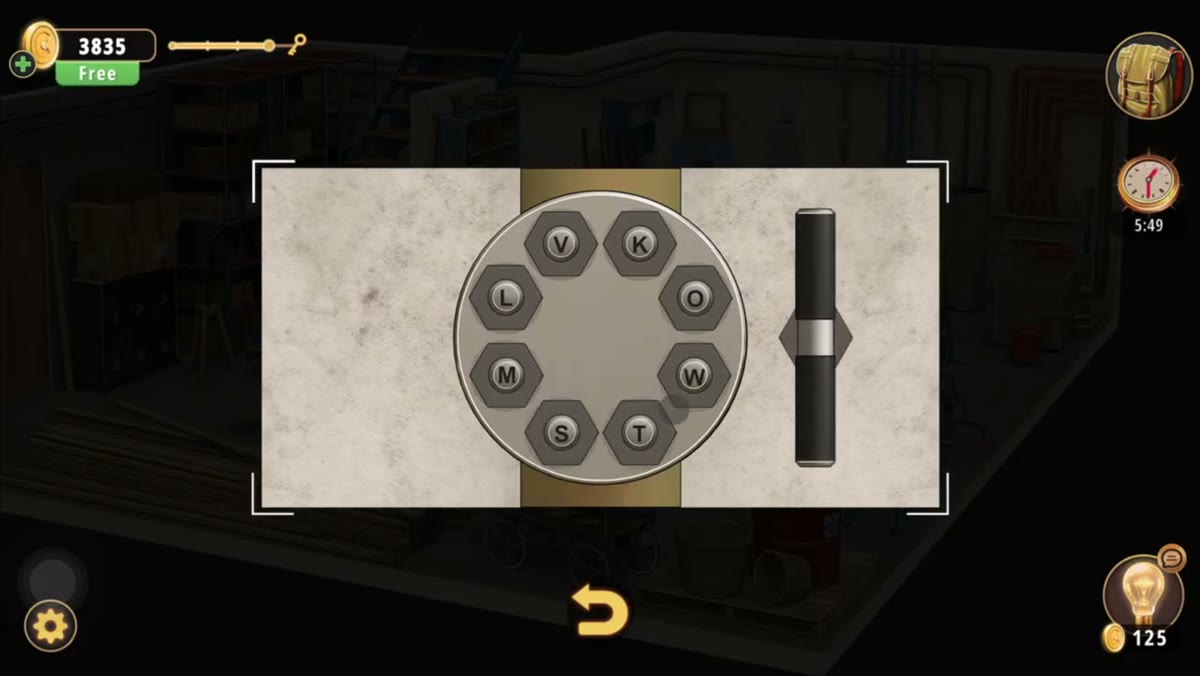
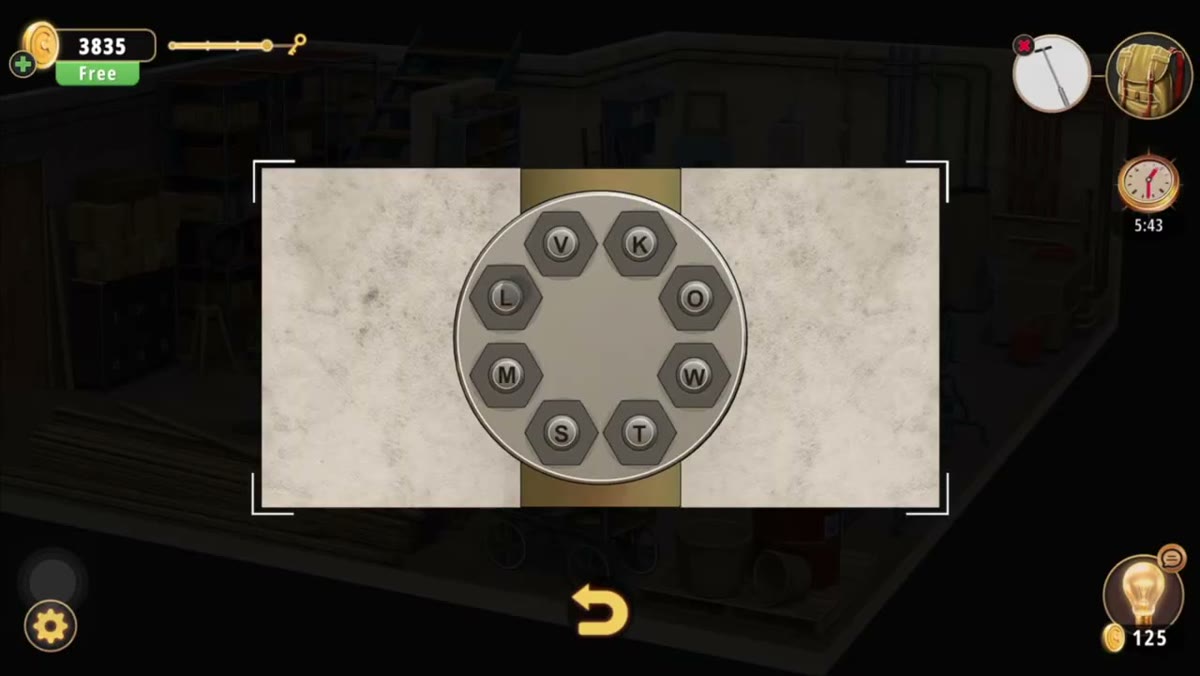
- Work the pipe room: the valve list at 4:54, five W wheels at 5:00, the letter dial at 5:06.
- Enter 1200 on the wall keypad at 5:30.
- Load the barbell to 18 kilo a side (6:30), take the horoscope from the bench compartment (7:06), and match it to the zodiac suitcase (7:36).

The Basement run used for every frame on this page.
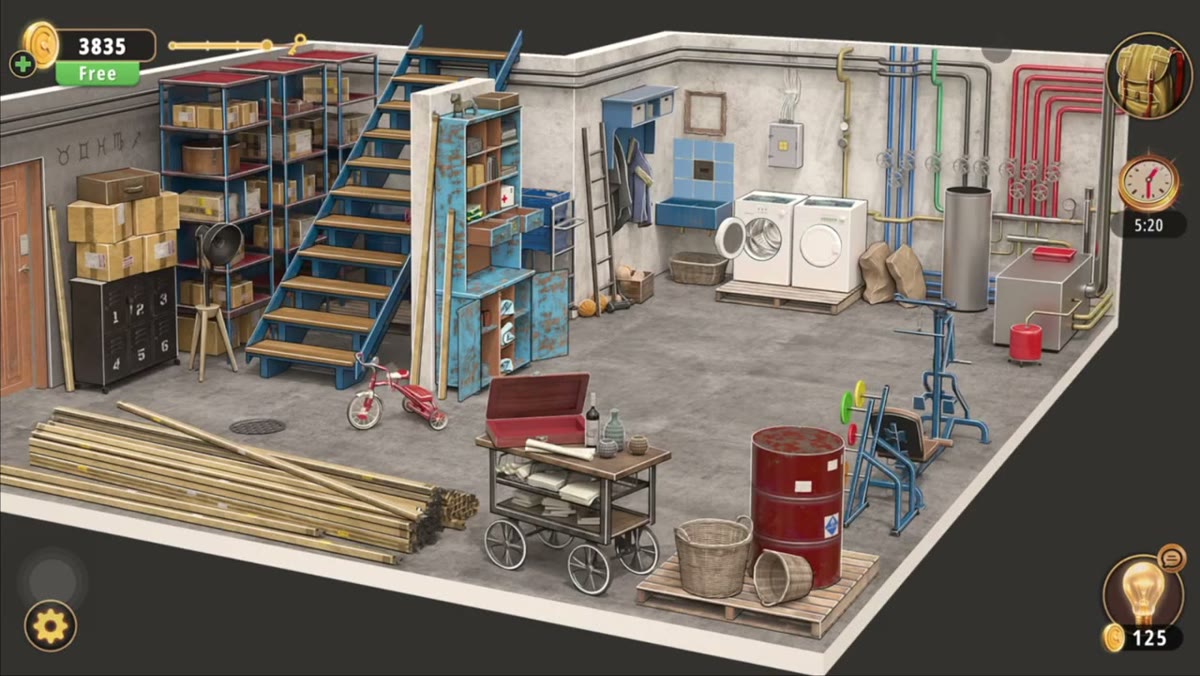
What this level actually is.
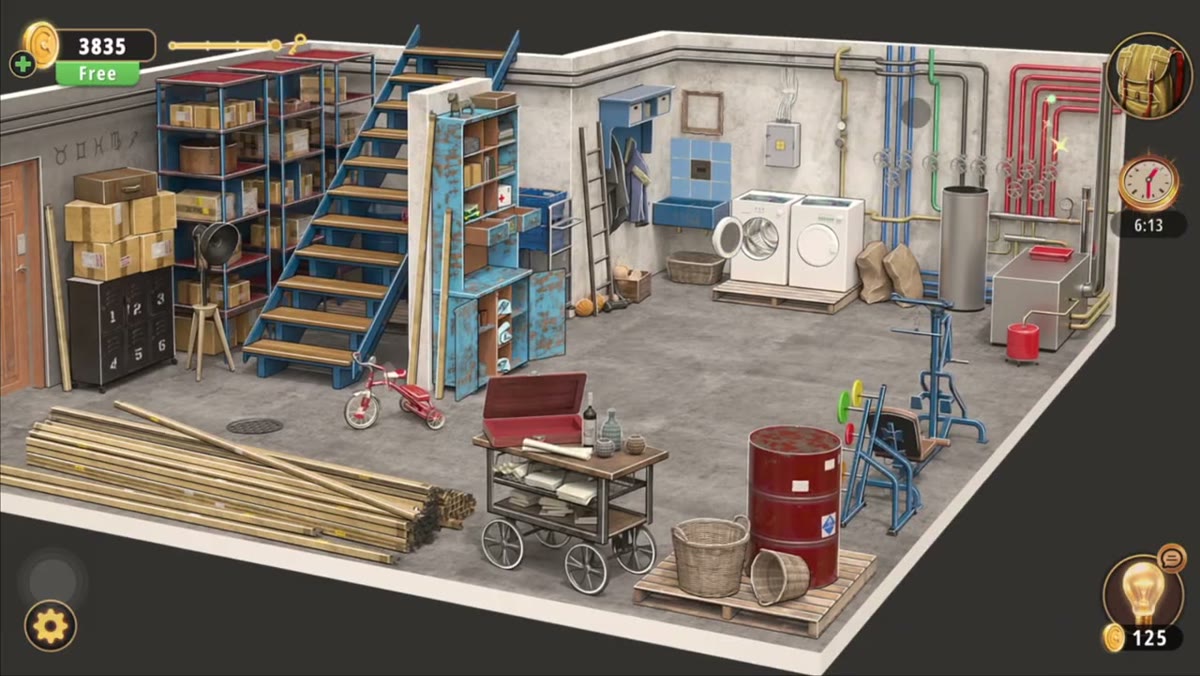
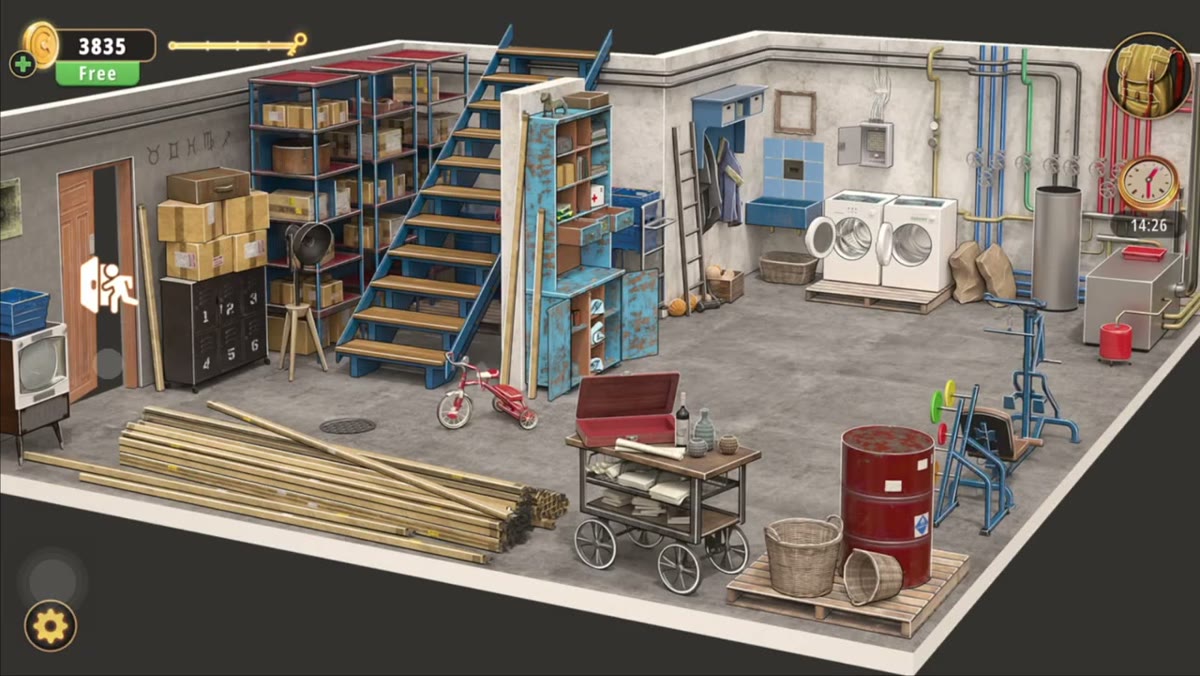
One room, no outdoors, seen from a high isometric angle with the staircase cutting diagonally up the middle-left. The left wall is storage: a wooden door, a black locker bank numbered 1 to 6, stacked cardboard boxes, a blue shelf unit and a pile of long planks on the floor. The back wall is plumbing: the sink, the washer and dryer on a pallet, two burlap sacks, exposed blue and green pipes. The right wall is the utility corner: the water heater, the red pipe manifold with its lettered valves, and a blue weight bench sitting in front of two red barrels.
It is also the only room in the back half of the chapter with a numbered locker bank, and that bank is a decoy in the sense that it looks like the level's main lock while the actual gates are a coat rack, a pipe manifold and a barbell. The zodiac glyphs painted on the concrete above the door are the other thing worth noticing early: they are not decoration, they are the key to the suitcase that appears forty minutes later in game time.
Structurally the Basement is three parallel chains that share one room. The storage chain (cabinet → coat rack → keypad) sits on the left, the laundry chain (rings → washer → tower) sits in the middle, and the utility chain (valves → dial → bench → horoscope → suitcase) sits on the right. Nothing forces an order, which is why recordings of this level look so different from each other.
The map: what is where.
Everything we could identify, and what it is for.
| Object | Where | What it does |
|---|---|---|
| Blue cabinet | Left wall, past the lockers | Shelves of shoes and bottles, cubbies with books, top drawers with a first-aid kit above. |
| Cloth | Early pickup, 0:25 | Yellow crumpled cloth with a hole; item card reads Cloth. |
| Coat rack | Blue wall rack, 1:24 | Three white bins above, three blue hangers below; hint line points at the blue drawer. |
| Round-button keypad | Wall panel, 1:30 | Grid of round yellow buttons with a green and a red confirm key. |
| Washing machine | Back wall, on a pallet | Takes the Laundry; drum spins from 2:36. |
| Rings | Pickups, 2:06 and 2:12 | Teal and purple rings, then more colours; feed the stacking tower. |
| Ring tower | Full-screen board, 3:06 | Two pegs and coloured rings; the recording has it rearranged by 3:12. |
| Pipe manifold | Right wall | Letter-stamped handwheels on green and red pipes; the list reads 3L / 1S / 2V / 5W. |
| Letter dial | Full-screen board, 5:06 | Eight lettered positions around a brass ring plus a vertical slider. |
| Wall keypad | Screwed plate, 5:30 | Green four-digit display; set to 1200. |
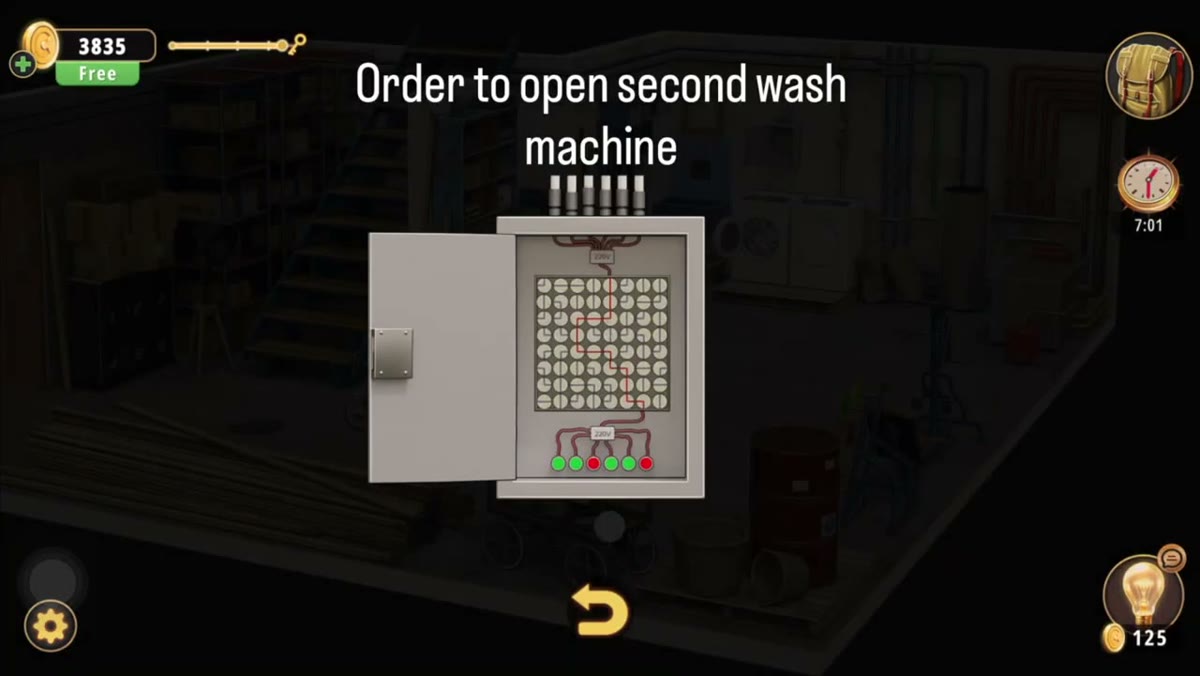
| Fuse panel | Open electrical box, 6:12 | Grid of red and green indicators over four green switches; hint line about the second wash machine. |
| Control panel | Wall unit, 6:18 | Six red lights, six green switches and an OFF/ON slider. |
| Weight bench | Right corner, blue frame | Barbell plus a plate rack labelled in single kilos from 1 kg up; label reads Balance both side / 18kilo-18kilo. |
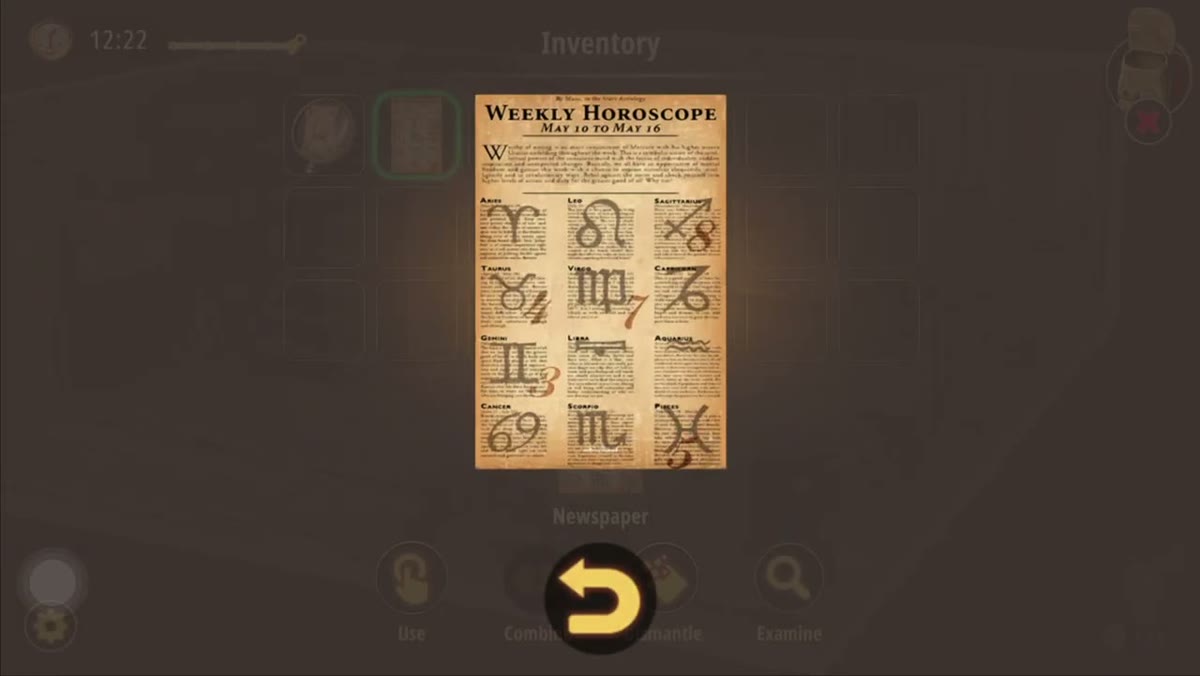
| Bench compartment | Under the seat, 7:06 | Hidden paper; becomes the Newspaper / WEEKLY HOROSCOPE in the inventory. |
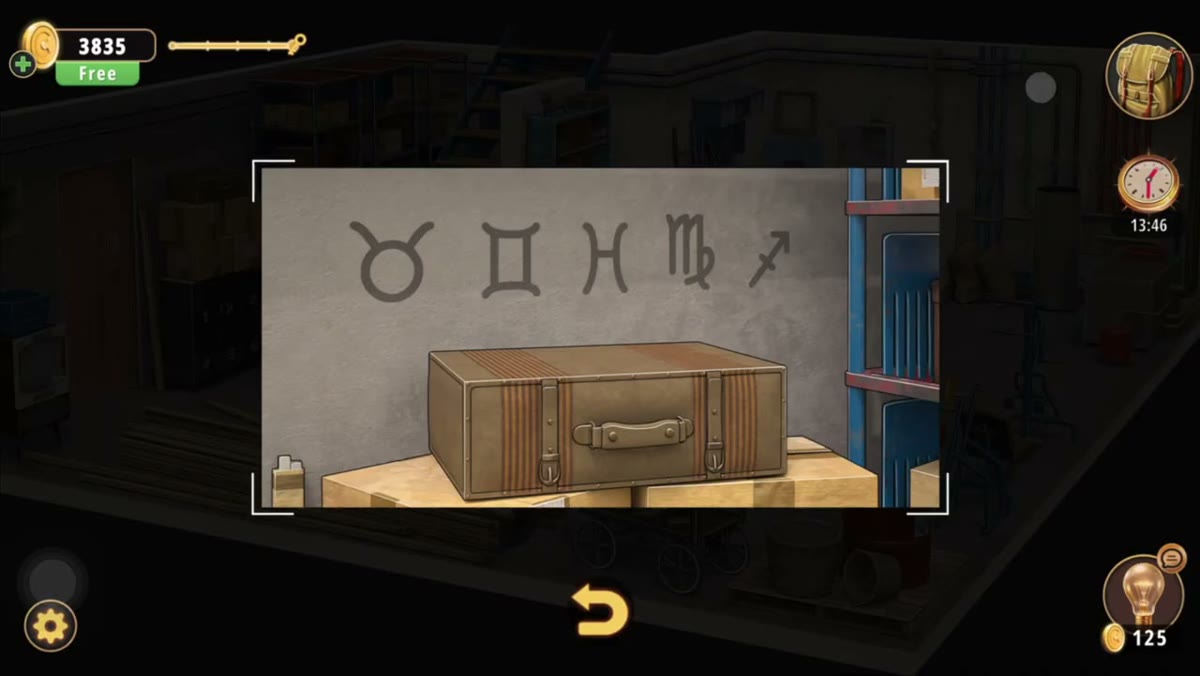
| Zodiac suitcase | On a crate, 7:36 | Vintage tan case with zodiac glyphs painted on the wall above it. |
| Locker bank | Left wall by the door | Six numbered doors, 1 to 6; two of them show a key symbol. |
| Red barrels | Right corner, on a pallet | Hazard-marked drums; scenery with a warning placard. |
Step by step.
The order below follows the recording. Timestamps are video time; the links jump to the matching second.
Where people get stuck.
You spend twenty minutes on the locker bank. Six numbered doors by the door look exactly like the level's main lock, and they are not. The Basement's real gates are the coat rack, the pipe manifold and the barbell. If you cannot find a locker combination it is because there is not one worth finding — the recording opens two, takes what is in them and leaves.
The valves do not respond. They are lettered, not numbered, and the count is turns, not a setting. Look for the stamp on the hub before you touch anything: the green pipe's wheel carries an S, and the red pipe bank carries five W wheels. If you are turning a wheel whose letter is not on the list, you are on the wrong run of pipe.
The 18-kilo bench feels impossible. It is not — it is arithmetic with whole kilos. Two sets, each totalling 18, made from 1 kg to 8 kg plates. Do not try to make both sides look identical; the label asks for the same total, not the same plates.
You cannot find the horoscope. It is not on a shelf. It is in a compartment under the weight bench that only opens once the bar is loaded correctly, which means the bench is a container as well as a puzzle. If you have been loading plates and walking away, go back and look under the seat.
You read the washing machine as a dead end. The Laundry is consumed and the drum spins, but the payout arrives later and quietly — a new item shows up in the grid around 3:00 without a card. Check the inventory after the cycle instead of waiting for a pop-up.
Where the Basement sits in Chapter 3.
Chapter 3 is Murder Dressed in White, and its rooms run: Dining Room, Living Room, Study Room, Guest Toilet, Workshop, Guest Bedroom, Master Bathroom, Kids Playroom, Backyard, Garden, Kitchen, Driveway, Kids Bedroom, Storage Room, Garage, Attic, Terrace, Basement, Garden Shed, Kids Bedroom 2. The Basement is room 18 — after the open-air Terrace and before the Garden Shed.
Mechanically it is the densest room in the chapter. Three chains, four lock types, one laundry cycle and one hidden compartment, all in a single concrete box with no camera cuts to hide behind. Where the Terrace lets you work in any order because everything is visible, the Basement punishes a scattergun approach: pick one side of the room and finish it.
- 1 Dining Room guide
- 2 Living Room guide
- 3 Study Room guide
- 4 Guest Toilet guide
- 5 Workshop guide
- 6 Guest Bedroom guide
- 7 Master Bathroom guide
- 8 Kids Playroom guide
- 9 Backyard guide
- 10 Garden guide
- 11 Kitchen guide
- 12 Driveway guide
- 13 Kids Bedroom 1 guide
- 14 Storage Room guide
- 15 Garage guide
- 16 Attic guide
- 17 Terrace guide
- 18 Basement you are here
- 19 Garden Shed guide
- 20 Kids Bedroom 2 guide
- 21 Hobby Room guide
- 22 Master Bedroom guide
- 23 Entertainment Room guide
- 24 Hallway guide
Previous room: Chapter 3 Level 17 — Terrace
Next room: Chapter 3 Level 19 — Garden Shed
Back to: All Rooms & Exits walkthroughs
Frequently asked questions.
What are the codes in Rooms & Exits Chapter 3 Level 18 Basement?
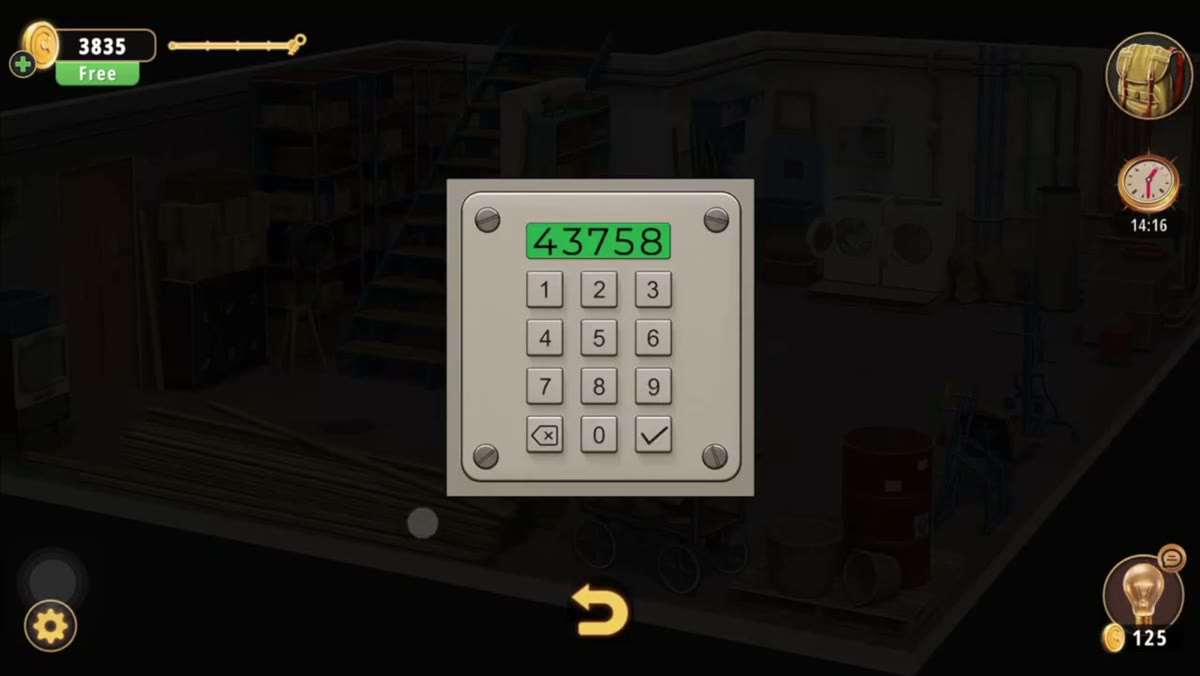
Two are solid. The wall keypad takes 1200 — four digits on a green display, read twice from separate frames. The pipe manifold is set from a printed list beside the valves that reads 3L, 1S, 2V, 5W: the number is how many turns, the letter names the valve. The barbell bench prints 18kilo-18kilo as its target. A final keypad appears at 8:06 with a five-digit string on it, but that one did not survive a second read and is not printed here.
How do the valves in the Basement work?
The pipework is lettered, not numbered. At 4:54 the camera holds a grey handwheel on a green pipe with an S stamped in the middle, and the list 3L / 1S / 2V / 5W sits to its left. At 5:00 five more handwheels on red pipes all carry a W. So each entry in the list is a valve letter plus a turn count: L three turns, S one turn, V two turns, W five turns. The letters on the L and V valves are further along the same run of pipes.
What is the eight-letter dial under the valves?
At 5:06 the game opens a circular brass dial with eight lettered positions around its rim — the ones we could read are V, K, O, W, T, S, M, L — plus a vertical slider on the right. Four of those letters are the four valve letters, which is why the dial belongs to the same puzzle family as the 3L/1S/2V/5W list: you are selecting letters in the order the list gives you, then pulling the slider.
What does the 1200 keypad open?
The keypad is a light grey plate screwed to a wall, with a green four-digit display, a 3x4 number pad, a clear key and a green tick. At 5:30 the display reads 1200. Where the code comes from is not spelled out on screen. Nothing else in the decodable footage opens with it — the recording walks away from the keypad without showing a door, a safe or a hatch swinging open.
What is the weight-bench puzzle?
At 6:30 the game opens the blue bench with its barbell, a rack of coloured plates and a printed label that reads Balance both side / 18kilo-18kilo. The labels above the rack run in single kilos, 1 kg, 2 kg, 3 kg and upward. You are loading each end of the bar to the same total, 18 kilos, and every plate is a whole number of kilos, so the arithmetic is clean. The recording grinds on this for about half a minute before the bench's under-seat compartment pops at 7:06.
What is behind the blue cabinet?
The distressed blue cabinet on the left wall is the level's main storage. It opens at 0:42 with white shoes and bottles on its shelves, and at 0:54 its cubby section shows books and boxes, including one spine printed Vocabulary. At 1:06 the top drawers are pulled open with a green toolbox and a white first-aid kit sitting on top of the unit. This is where the early pickups live, so open all of it before you start on the pipe room.
What is the coat rack hint?
At 1:24 the camera holds a blue wall rack: three white storage bins along the top and three blue hangers below. A hint line appears over it about the white hanger positions and the blue drawer — that is the level telling you the rack's arrangement is a combination, not decoration. A round-button keypad comes up six seconds later at 1:30, which is the lock that arrangement feeds.
What do I do with the laundry and the rings?
Two separate chains, both in the middle of the level. The Laundry is a bundle of coloured clothes picked up around 2:24 and put into the washing machine at 2:36; the drum spins and the item is consumed. The Rings are picked up one at a time — a teal one at 2:06, a purple one at 2:12 — and land in the inventory as a stack of coloured rings. At 3:06 those rings go onto a stacking tower, one peg with rings already on it and a second bare peg, and the recording has it rearranged by 3:12.
Where does the horoscope come from and what is it for?
Solving the weight bench opens a compartment under the seat at 7:06, and the paper inside it goes into the inventory as a folded newspaper. Examined, it is a WEEKLY HOROSCOPE page with all twelve zodiac glyphs laid out in a grid and a date range at the top. At 7:36 the camera finds a vintage suitcase with a row of zodiac glyphs painted on the wall above it — the same glyphs, in the same order the page is showing you.
Does the Basement level finish in this recording?
No. The file runs 8:16. The last thing on screen is a five-digit keypad at 8:06, then the camera pulls back to the room at 8:12 and holds there until the file ends. There is no results card, no level completed banner and no coin figure anywhere, so this page prints no reward for the Basement.
Is the Basement room 18 of Chapter 3?
Yes. Chapter 3 is Murder Dressed in White, and the Basement is room 18 — after the Terrace (17) and before the Garden Shed (19). It is the first fully enclosed utility room in the chapter, and almost every puzzle in it is a piece of household plant: a washer, a fuse panel, a pipe manifold and a weight bench.
What this page could not verify.
1. The five-digit code on the last keypad. This one failed the second-read test outright. The whole-frame pass gave 43758, a 5x crop of the same second gave 17750, and a contact-sheet pass gave 43578. At 720p the digit cells are only a few pixels wide and the display blooms, so this page prints no five-digit code at all. The 1200 on the earlier keypad is a different matter: that one read the same way twice, and it is printed.
2. The date on the horoscope. Two passes over the same page disagreed — one read it as May 10 to May 16, the other as May 20 to May 26 — so the masthead range is not quoted here. The zodiac grid and the glyphs on the wall are solid; the date is not, and a wrong date would send you looking for a clue that does not exist.
3. The zodiac order on the suitcase lock. The glyphs above the suitcase were counted as four by one pass and five by another, and the names read differently each time (one pass had Taurus, Gemini, Libra and Scorpio; another had Taurus, Gemini, Pisces, Virgo and Sagittarius). The mechanism is certain — match the painted glyphs to the horoscope page — but this page will not print a sequence it read two different ways.
4. The ending and the reward. The file runs 8:16. The last frames are the room with the door ajar and the exit icon showing, and there is no results card, no level completed banner and no coin figure anywhere in it. Any reward number quoted for the Basement did not come from this recording.